TUNIC – Achievement Guide
Tunic is a lovely adventure game currently available for PC and Xbox. This guide will give you pointers on how to get all achievements in a single run.
This guide was made during the first 2 weeks after the original release of the game. Future updates can potentially change some details of this guide. Bear this in mind if something does not work as expected. I shall list any updates I make to the guide here, if there’s any.
Updates
March 30, 2022 – Potential different location for the last coin. While writing this guide, you could find 2 coins for sale in the shop. However, upon playing the PC version, only 1 coin is available at the shop. The last coin is found in the swamp. A note was added to the sections pertaining those coins for clarification. It seems like the PC version is the correct one – on Xbox you can actually find 16 coins, so it seems like the extra one in the shop was made available by mistake, but the PC version got the update earlier than Xbox, thus removing the duplicate. Not confirmed, however, Just an educated guess.
Important information
This guide is structured in a way that favors convenience. That means that in each new area that we reach, you’ll get everything you possibly can at that time in the game. Because of this, you’ll be gathering things before you have any contextual information of why (or how). I’ll provide explanations, but most of it won’t make much sense since you usually don’t get much information about secrets until close to the end of the game.
Needless to say, there will be spoilers. I try my best to give you hints before showing the solutions, but in order to properly enjoy the adventure, you should do a blind run first.
Things to keep in mind when starting TUNIC for the first time
- There is a New Game+, so feel free to play the game at your own pace. Once you’re done, you can follow this guide to play through it again and get all the stuff you missed.
- There is post-game content – some things you’ll only be able to do after completing the game. After a certain part of the game, the world state will change, and several areas will be inaccessible, and the ones that are still accessible will be slightly different. After you defeat the final boss, you’ll be able to change between the two world states and hunt for things you’ve missed.
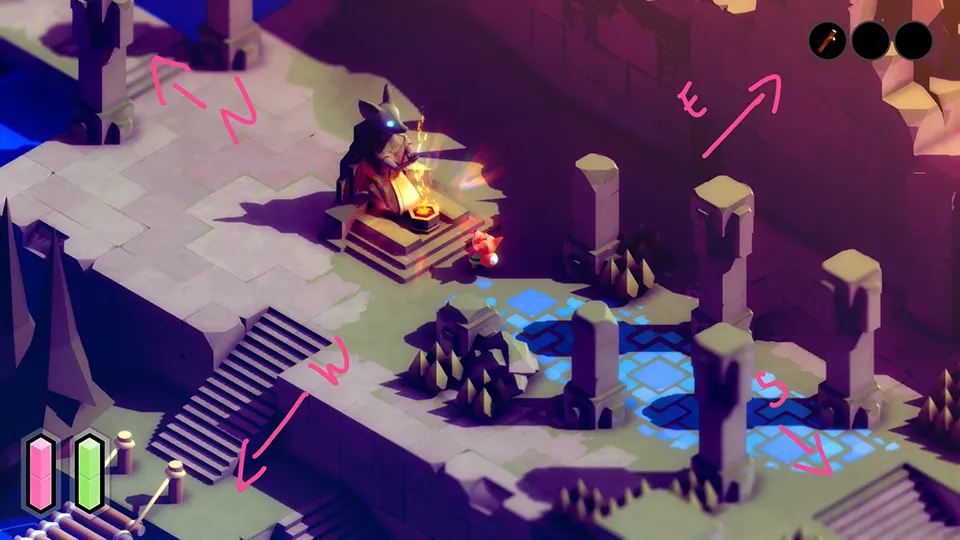
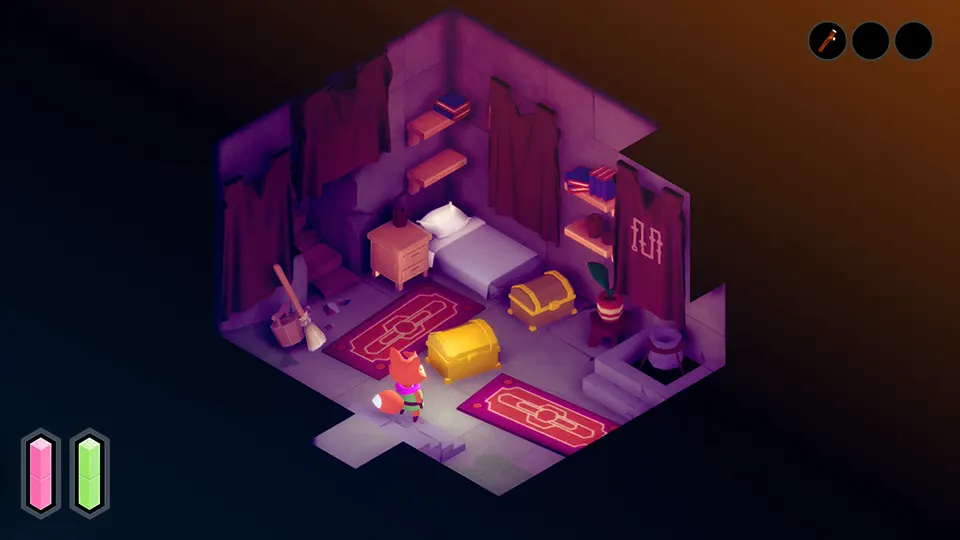
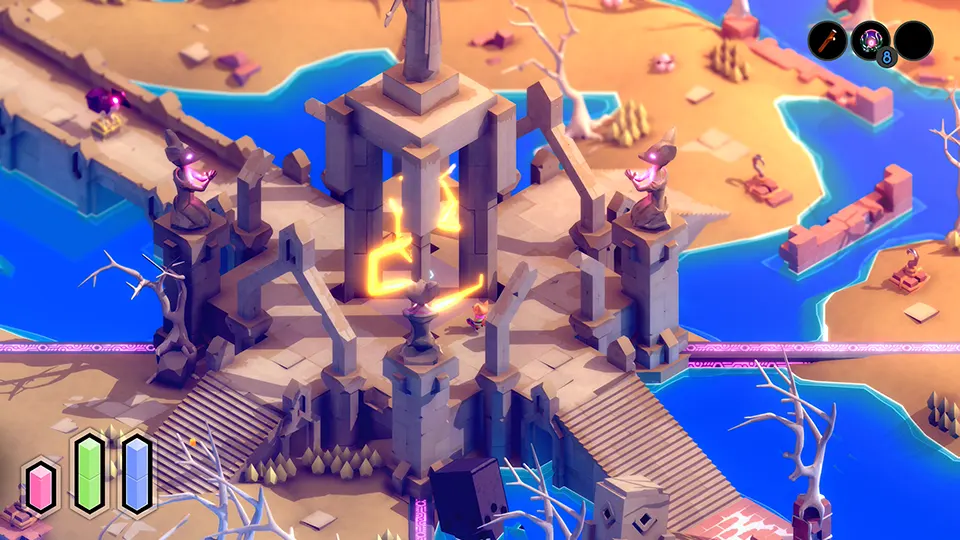
- Since this is an isometric view, we’ll consider the cardinal directions as follows: NORTH: top left (behind the altar the player is in front of in the image below), SOUTH: bottom right (front of the altar), EAST: top right, WEST: bottom left. For convenience, in this guide I’ll also be referring to North as TOP, South as BOTTOM, East as RIGHT and West as LEFT.
Collectibles
In this game you’ll be collecting mainly 3 things besides the more readily available power-ups, consumables, tools and weapons:
- Instruction manual pages
- Secret treasures
- Fairies
An introduction to manual pages
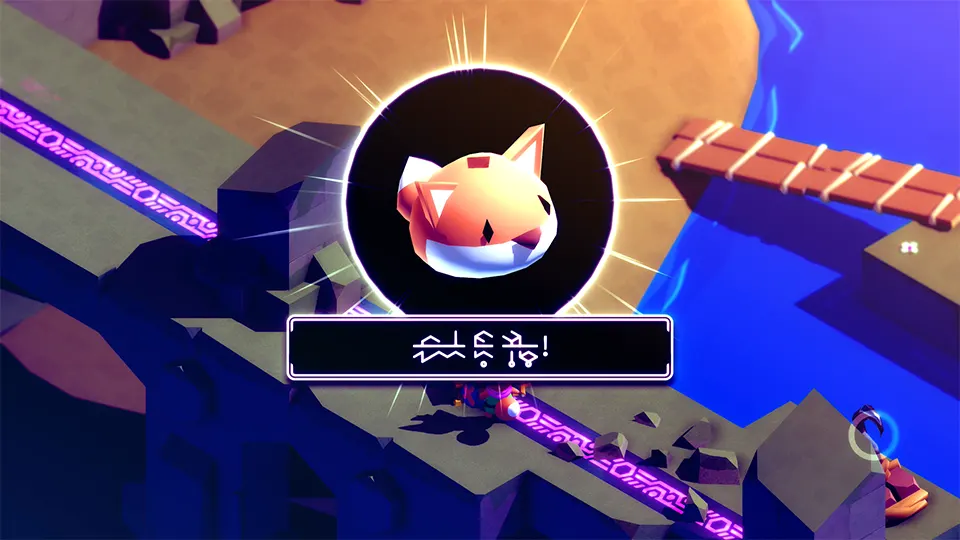
Scattered around the world of TUNIC, you’ll find several sheets of paper. Each of them holds 2 pages of what “seems” to be the manual for the game.
Its layout and design seem to suggest that it’s a regular manual, but its content is mainly written in its own language, and therefore it’s not immediately obvious what it is trying to say. There are legible words scattered around, but most of it is filled with mysterious glyphs.
The game manual will be your source of hints for many important items, game mechanics and secrets.
There’s a total of 28 “sheets of paper” for a total of 55 pages (last numbered page on the manual itself holds the number 55 as the game considers the back of the front cover as page 1).
An introduction to secret treasures
Secret Treasures are treasures that are very well hidden behind some sort of puzzle. The manual or environment (or a combination of both) will provide you with clues as to how to solve the puzzle.
Once the puzzle is solved, a rainbow chest spawns with your treasure inside.
There’s a total of 12 secret treasures in TUNIC.
An introduction to secret fairies

Similar to secret treasures, fairies are secrets that you usually have to solve a puzzle in order to find. Once the puzzle is solved, a golden chest spawns containing a fairy. Once opened, the fairy flies away.
To keep track which fairies you have found, use the list provided on page 48 of the manual.
There’s a total of 20 fairies in TUNIC.
An introduction to secret entrances
The world of TUNIC has a lot of secret entrances. They are either:
- Obfuscated by the camera or environment
- Hidden behind walls that need to be destroyed
- Hidden behind secret doors that have no immediate tell they’re a passage
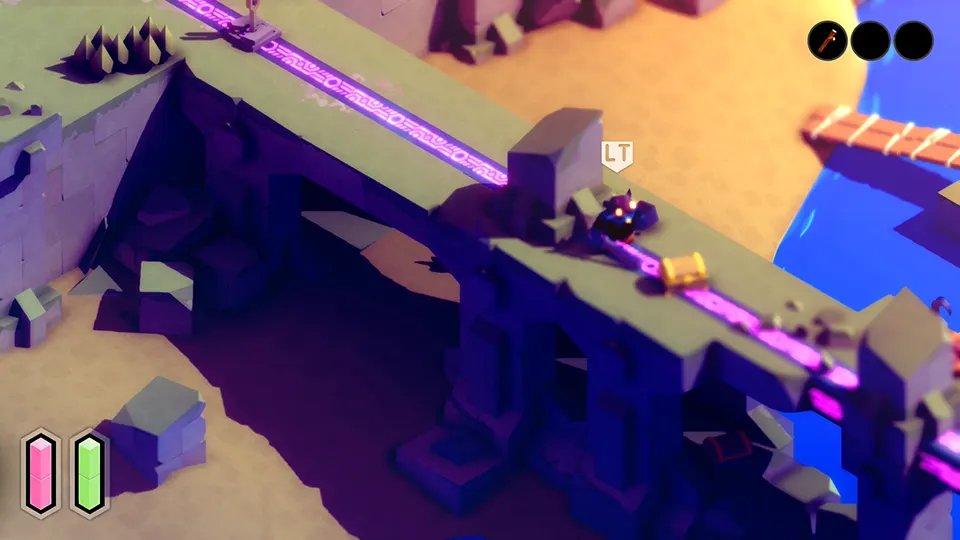
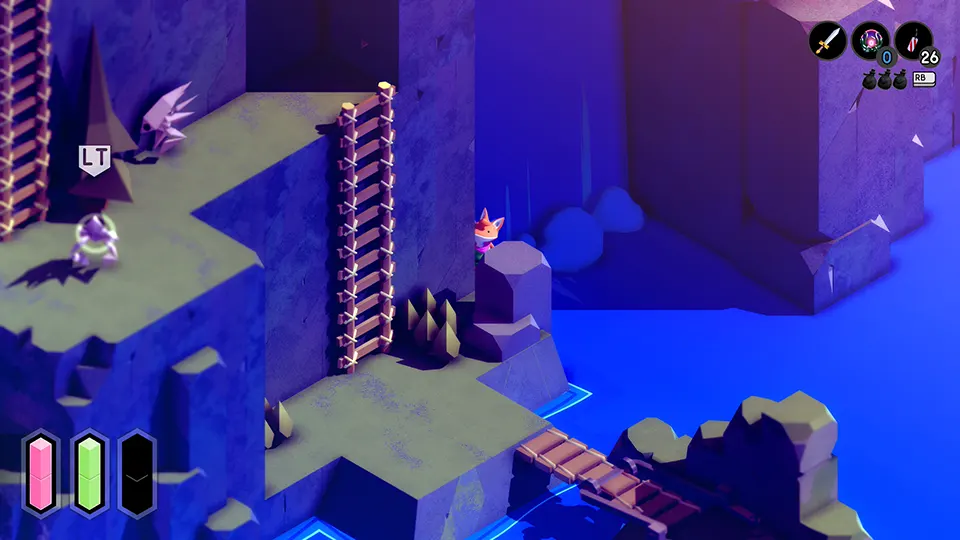
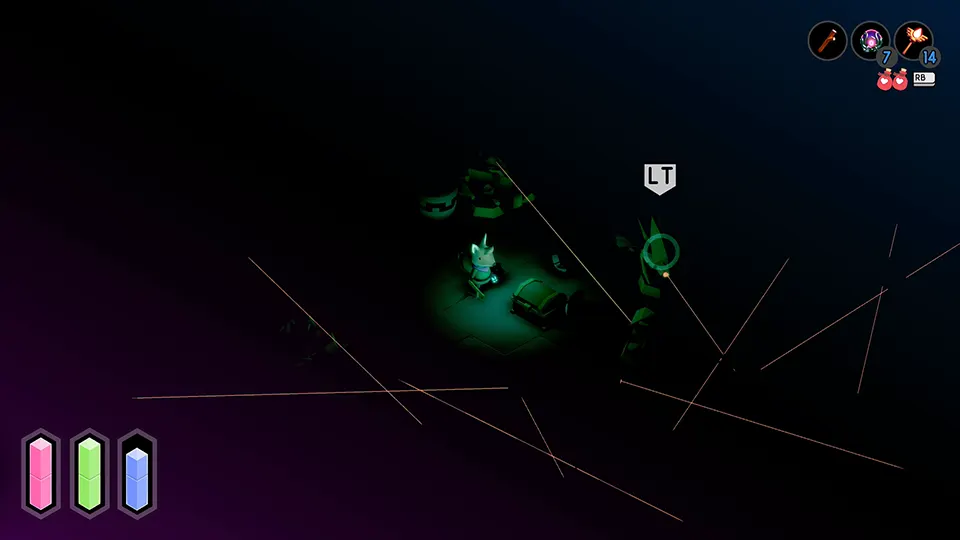
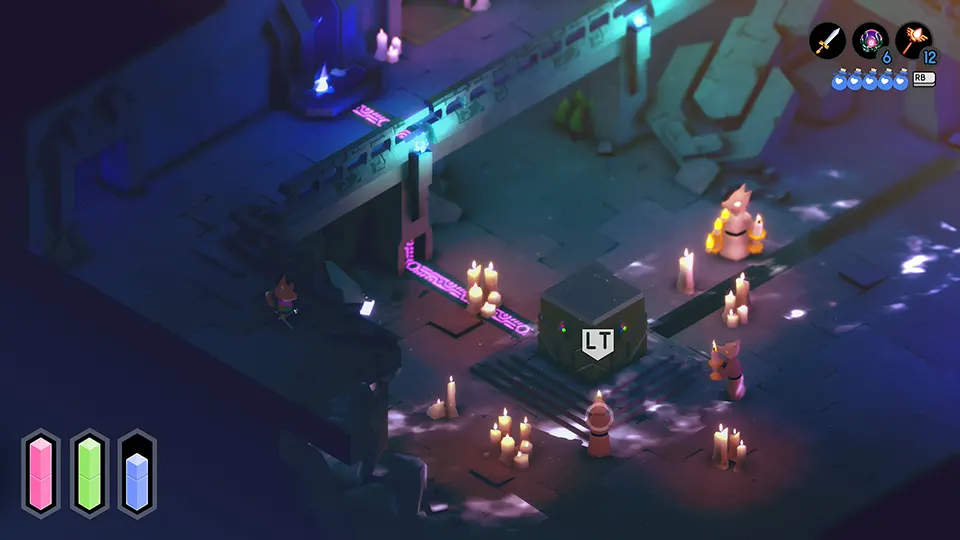
For the first one, you’ll be hugging walls a lot. Usually if you’re paying attention you can see little details that might hint about a secret path. Use LT (left trigger) a lot even outside of combat to tilt the camera and better observe paths that are just outside the range of the regular camera.
For walls that can be destroyed, you can usually find a noticeable tell. Unlike Zelda, this tell is not on the wall itself, but rather on the floor right in front of it: if you see a set of three flowers in the shape of an L, throw a bomb at it! You might be surprised at what you’ll find!
Secret doors are the hardest ones to find because they are not obvious, and usually their tell is part of the scenario, and therefore it doesn’t immediately stand out. Sometimes you can find hints of them on the manual, and sometimes you’ll have to observe your environment and make an educated guess.
An introduction to the HOLY CROSS
A lot of secrets in TUNIC will be inputted making use of the HOLY CROSS. The HOLY CROSS is a meta item: it is actually your D-PAD🎮! So whenever you see mention of HOLY CROSS, just know you’ll have to input sequences on your D-PAD🎮.
Initial setup
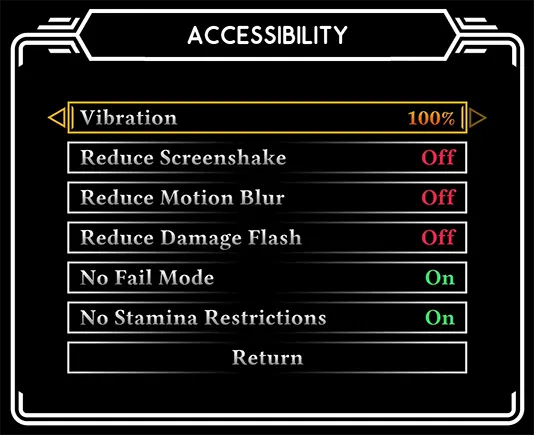
If you’re going solely for the achievements and don’t care about the challenge, you should go to accessibility options and turn on Infinite Health (No Fail Mode) and Infinite Stamina (No Stamina Restrictions). This will make the run much easier.
HOWEVER, you get an achievement for dying. So keep “No Fail Mode” OFF until your first death, which shall occur almost instantly in our playthrough.
Main achievement: Bring it to the wrong fight
In the achievement “Bring it to the wrong fight,” you have to get the rifle before you get the sword.
The game directs you towards the sword naturally, so you’ll have to do some thinking outside the box to be able to break the natural sequence of the game.
Start and new game and let’s go!
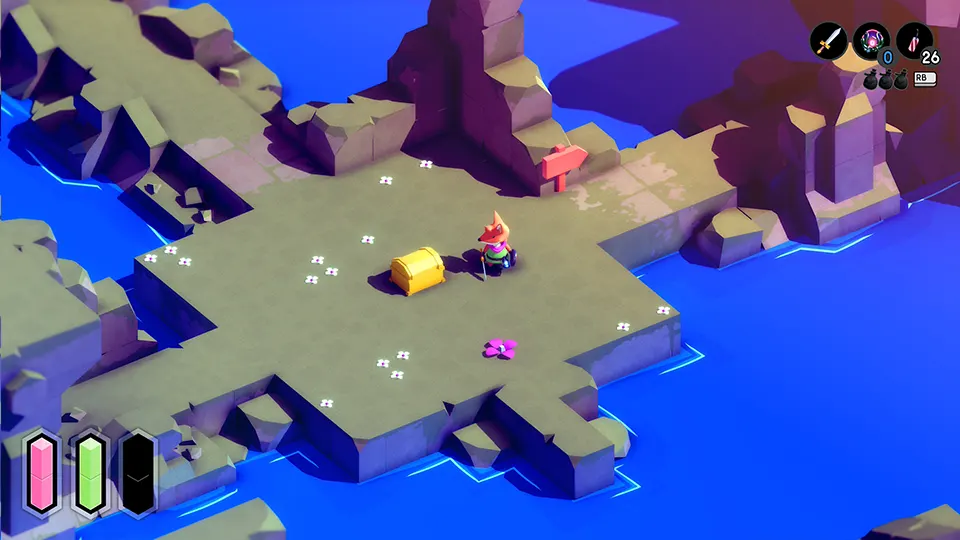
TUNIC Secret Treasure #9 – Back to Work
The first secret puzzle is right in the opening area. If you you want to solve for yourself, you won’t be able to do it now. You need manual page 11 to solve this puzzle. You can solve the puzzle with this page alone, however you need contextual information about certain game mechanics you’ll only learn about close to the end of the game.
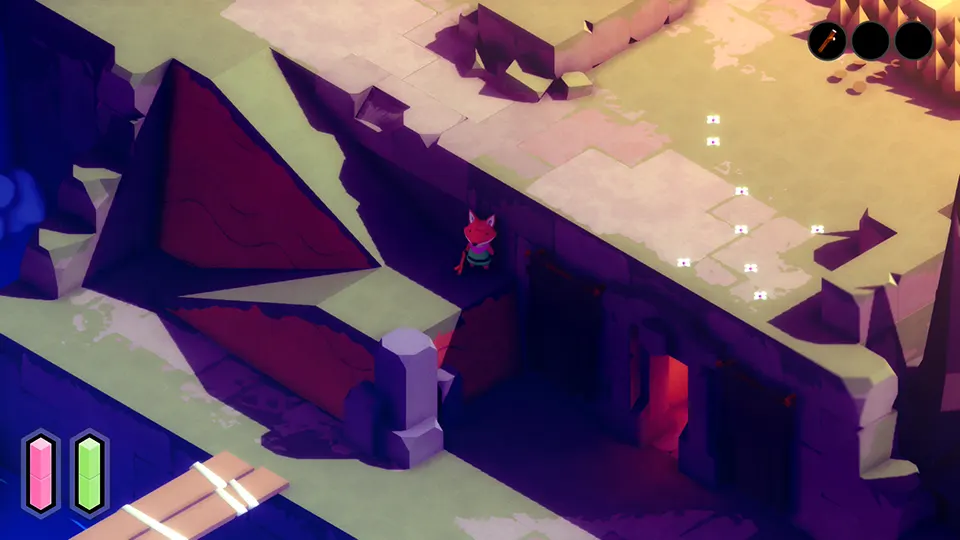
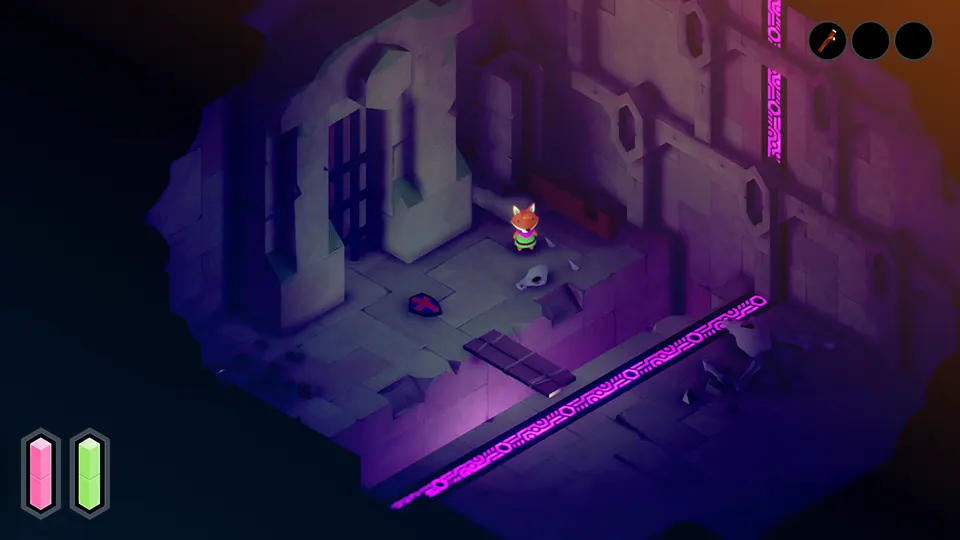
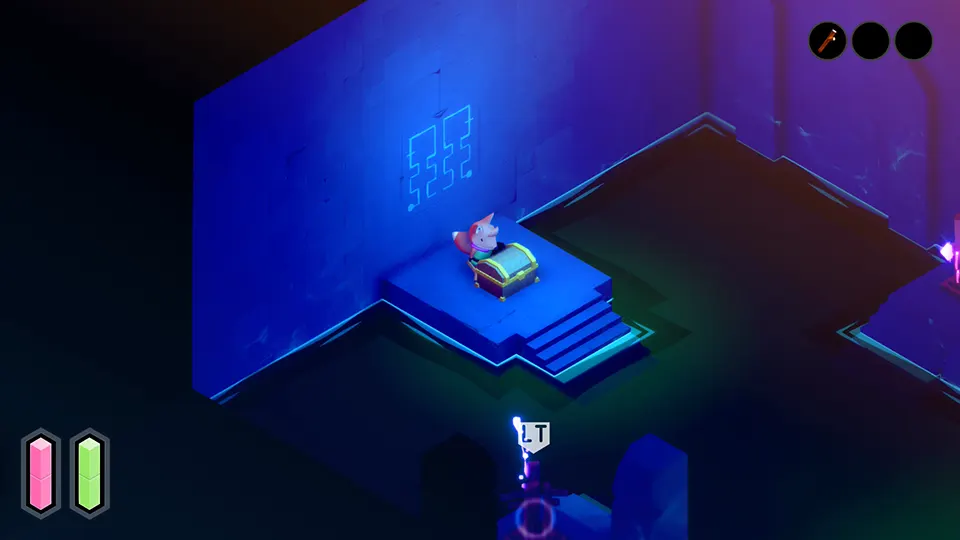
Stand on the following area right after the opening:
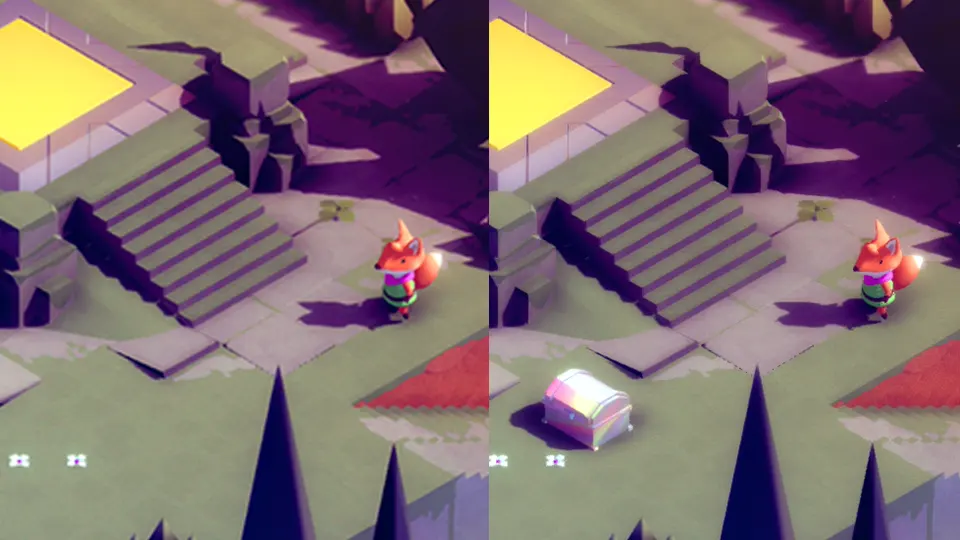
Input the following directions on your HOLY CROSS:
➡️ ⬇️ ⬅️ ⬆️ ⬅️ ⬅️ ⬇️ ➡️ ➡️ ⬇️ ⬇️
(RIGHT, DOWN, LEFT, UP, LEFT, LEFT, DOWN, RIGHT, RIGHT, DOWN, DOWN)
ACHIEVEMENT UNLOCKED:
Back to Work
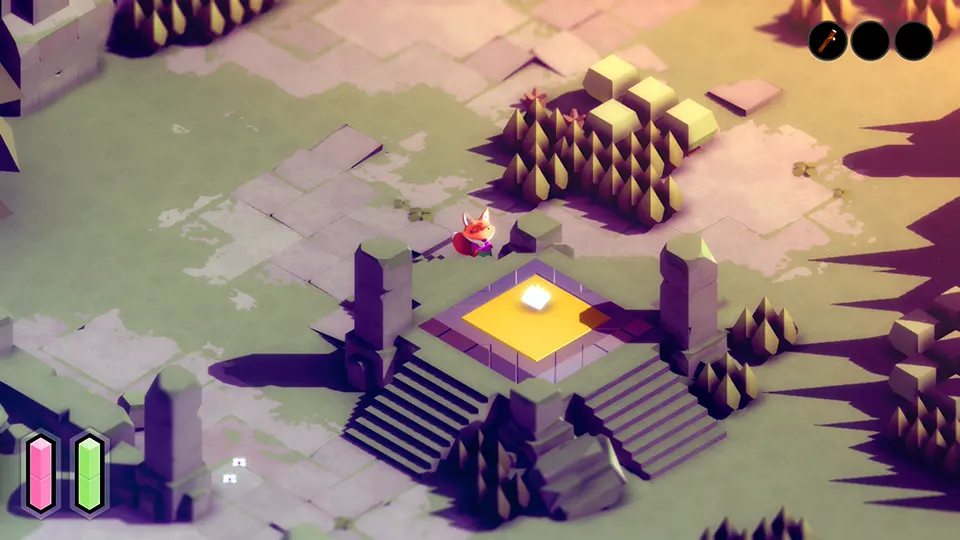
TUNIC Manual Page 2 and page 3
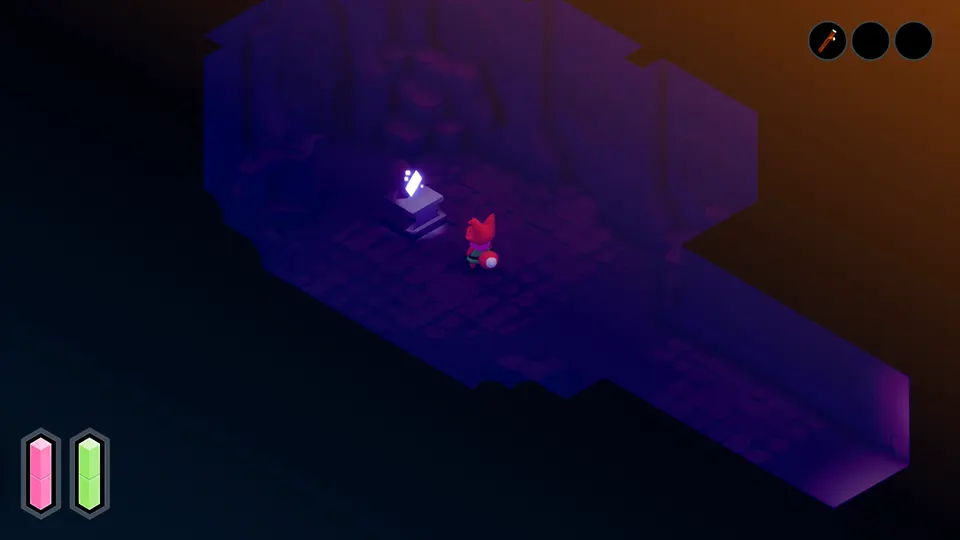
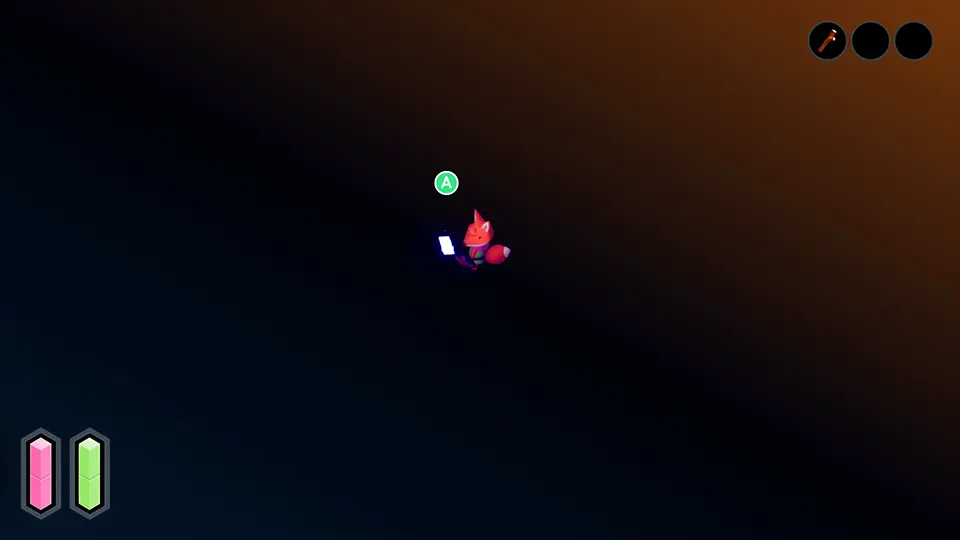
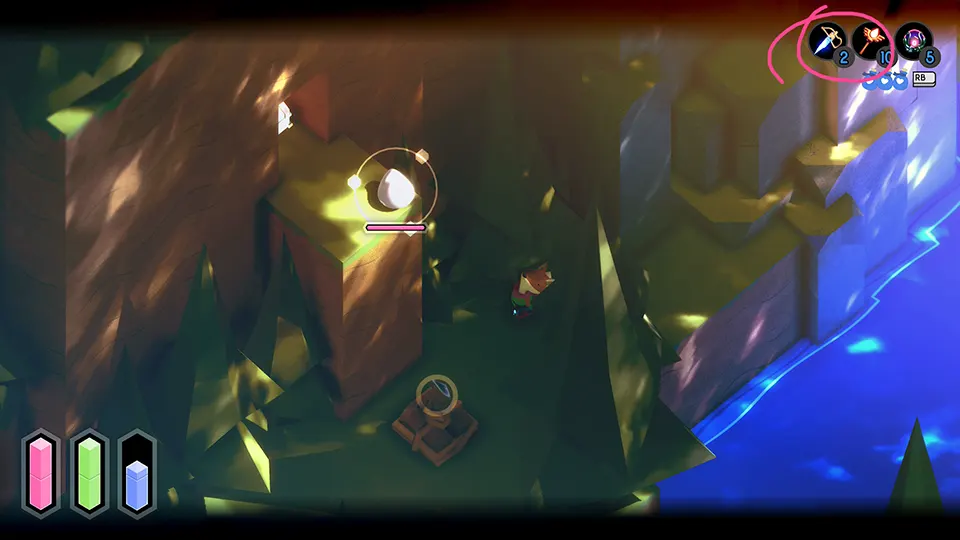
Stand on the yellow plate, then press and hold A 🎮.
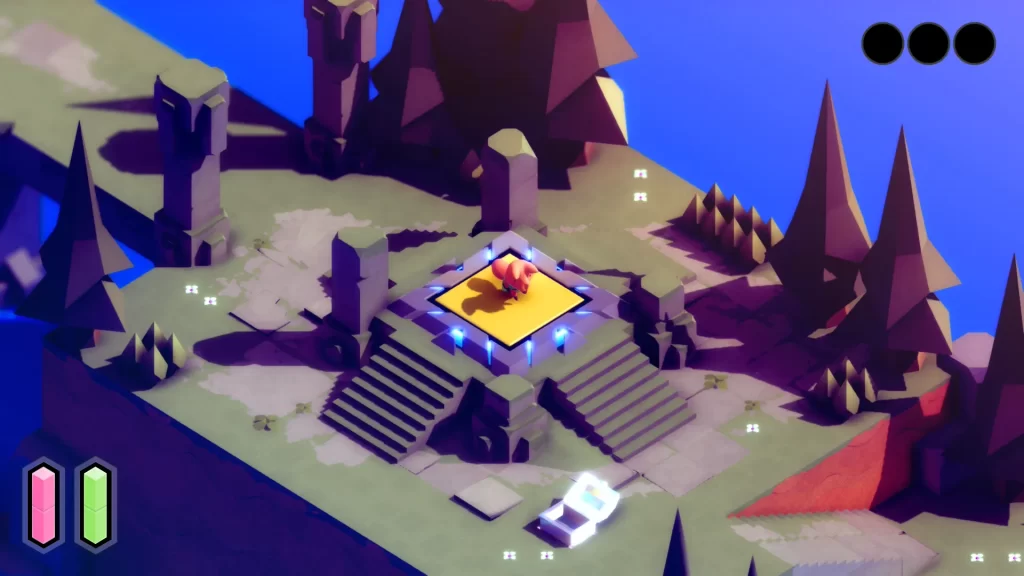
In the ethereal world, grab the page right in front of you.
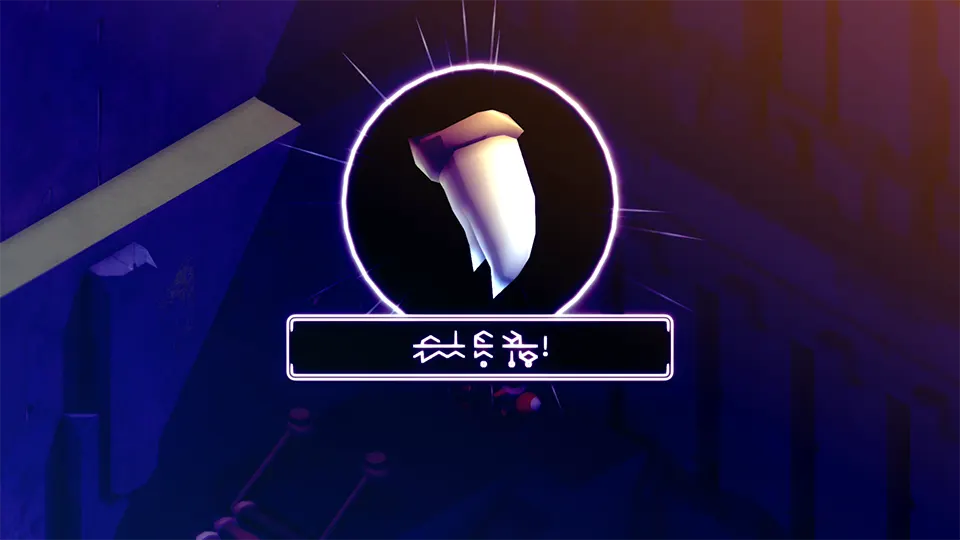
WEAPON – STICK
Enter the first door you see and grab the STICK from a chest inside. You’ll also be able to find a stick in a chest in the East Forest. But since we’re not going that way until much later, this one will tide you over until we get the rifle.

ACHIEVEMENT UNLOCKED:
A Stick!
Equip the stick.
Achievement: What just happened?
Go up the first flight of stairs. You’ll find some slime enemies bouncing around. Walk up to them and take enough damage to kill yourself once.
ACHIEVEMENT UNLOCKED:
What just happened?
The altar and sequence breaking
You’ll respawn back at the beach. Pause the game, go to the accessibility options and turn on “No Fail Mode” and “No Stamina Restrictions” if you haven’t yet.
Make your way up 4 sets of stairs until you come up to this altar, the first in the game. This will be a reference for many directions later on, so keep this in mind!
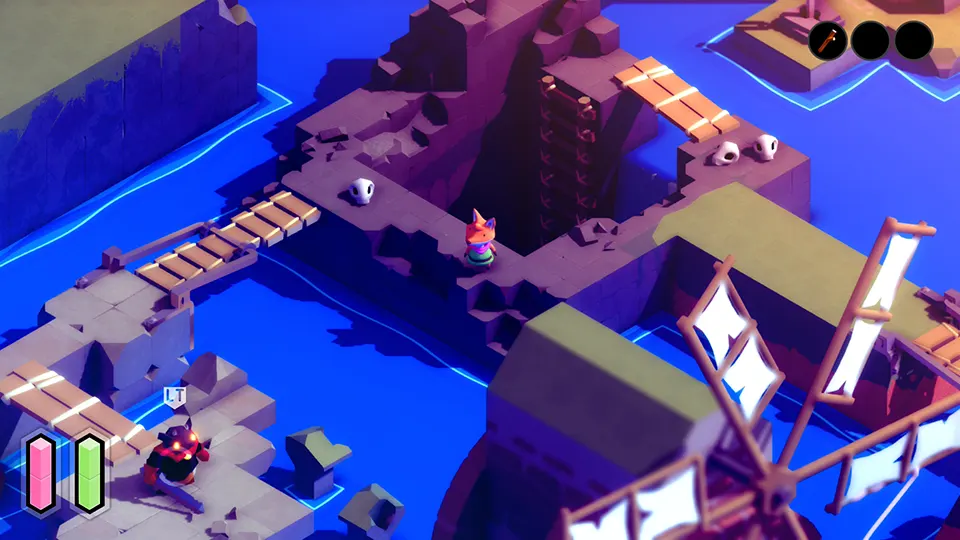
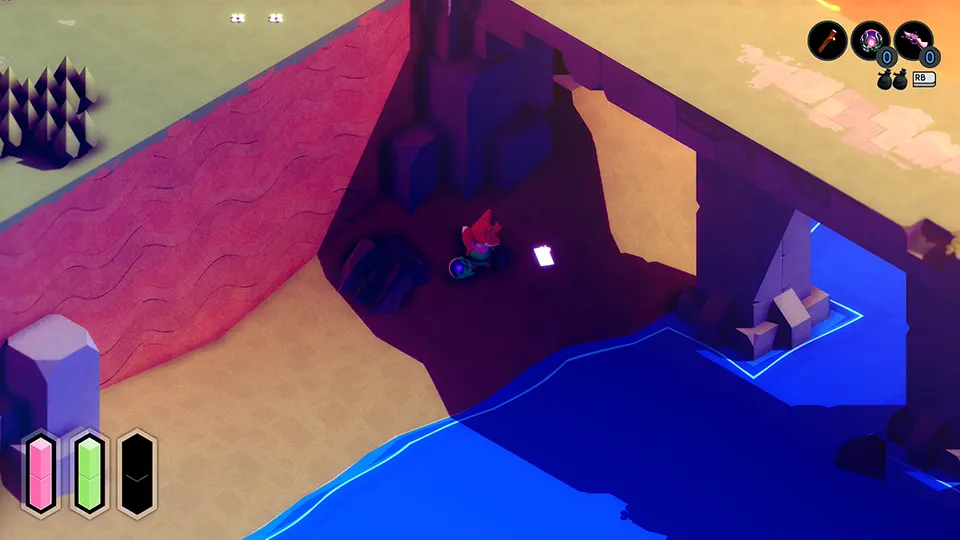
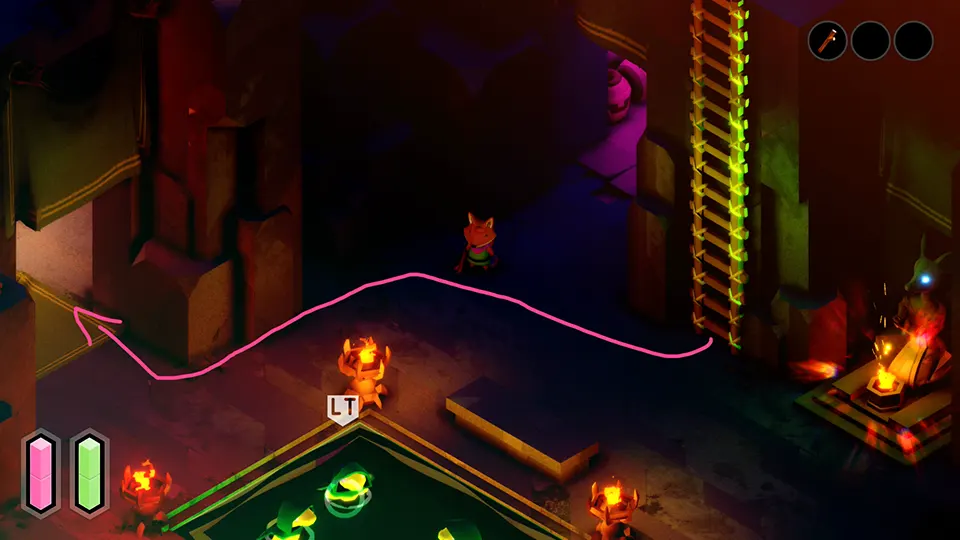
Go down the set of stairs to the left, but do not go over the bridge. Instead, hug the wall and go up towards the waterfall. There’s a secret passage that goes around the back of it. Do not enter the door on the other side and keep following the trail.
Along the way you’ll come across a chest. It contains a STRENGTH UPGRADE. This one is not required, but it may come in handy for boss fights. You have to use it when in front of an altar, so we’ll cover that when we’re back at the altar.
Go over the bridge. You’ll find two sets of skulls on the floor. A little further ahead, there will be a second pair of skulls. This second pair will turn into enemies. I suggest you defeat them now, as they will follow you as you try to make your way around the map and may prevent you from triggering a few switches later on.
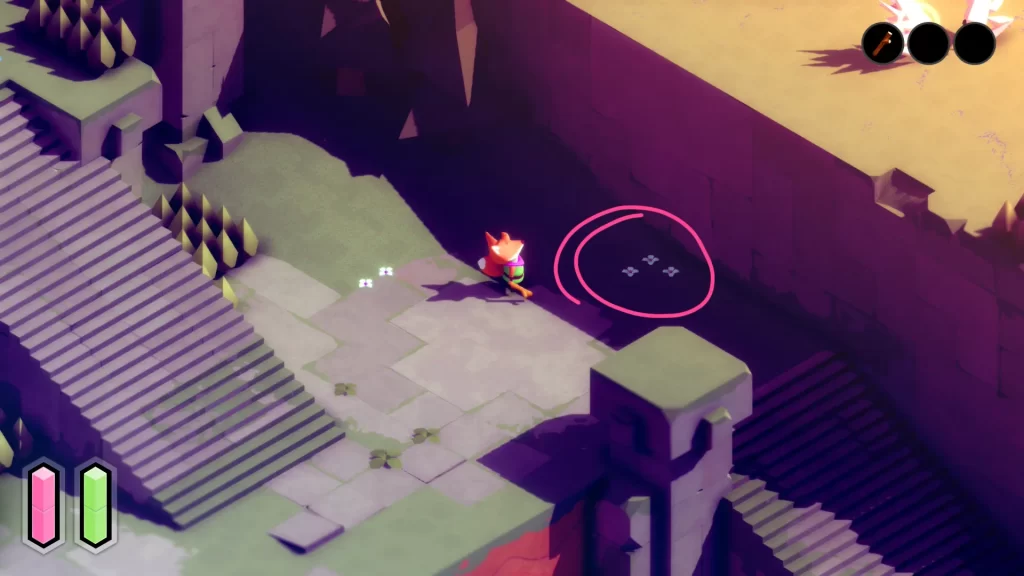
TUNIC Fairy #1
The fairies have their lair hidden behind a waterfall. Right after defeating the two skulls in your way, you’ll come upon a waterfall. There’s a passageway hidden behind it.
Going inside, you’ll see patterns on the walls. They’re the same pattern on both walls, but different parts of it are obscured on each of the walls.
You’ll have to figure out the full pattern, starting from the circle in the middle, and then input the sequence in your HOLY CROSS.
The full pattern is: ⬇️ ➡️ ⬆️ ➡️ ⬆️ ➡️ ⬆️ ⬅️ ⬆️ ⬅️ ⬆️ ➡️ ⬆️ ➡️ ⬆️ ⬅️ ⬇️ ⬅️ ⬇️ ⬅️ ⬇️ ➡️ ⬇️ ⬅️ ⬇️ ➡️ ⬇️ ➡️ ⬆️ ➡️
(DOWN, RIGHT, UP, RIGHT, UP, RIGHT, UP, LEFT, UP, LEFT, UP, RIGHT, UP, RIGHT, UP, LEFT, DOWN, LEFT, DOWN, LEFT, DOWN, RIGHT, DOWN, LEFT, DOWN, RIGHT, DOWN, RIGHT, UP, RIGHT)
ACHIEVEMENT UNLOCKED:
I’m free!
Overworld continued
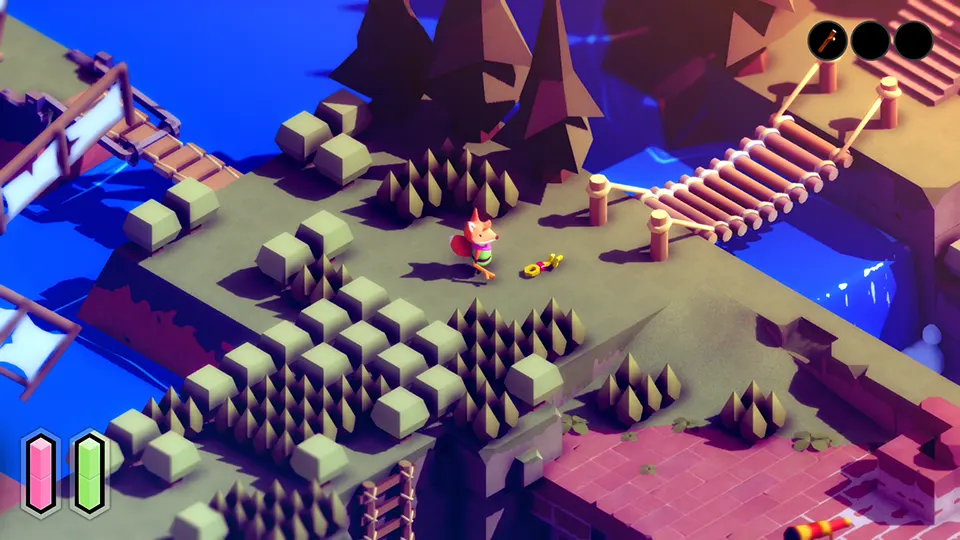
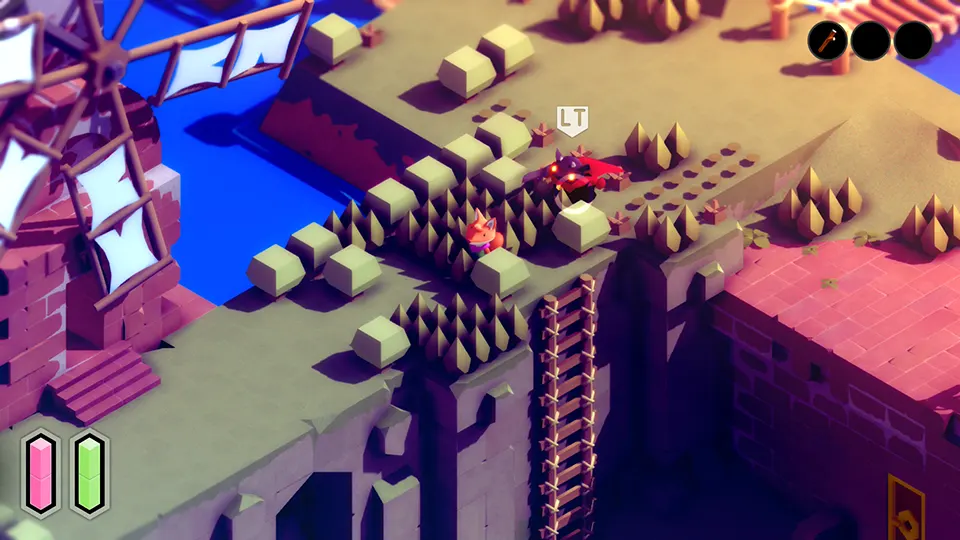
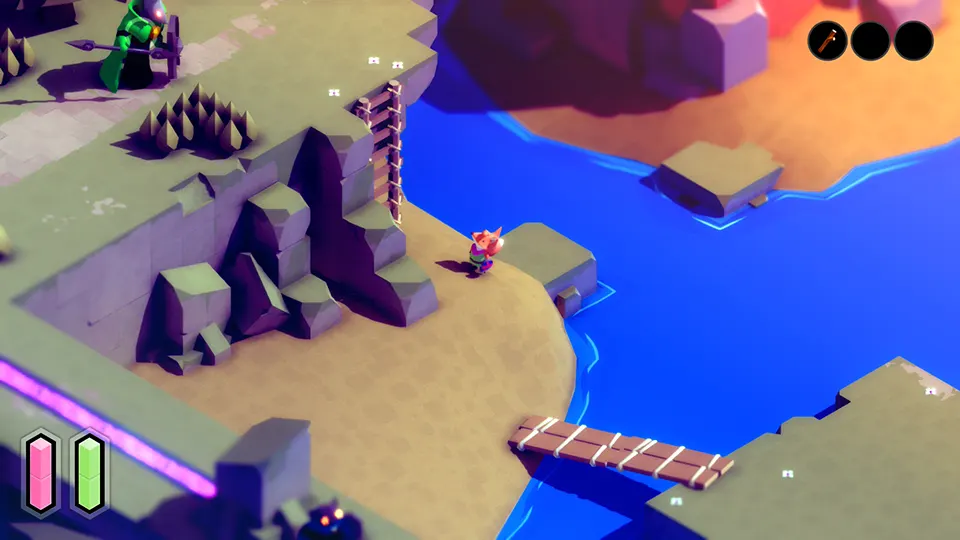
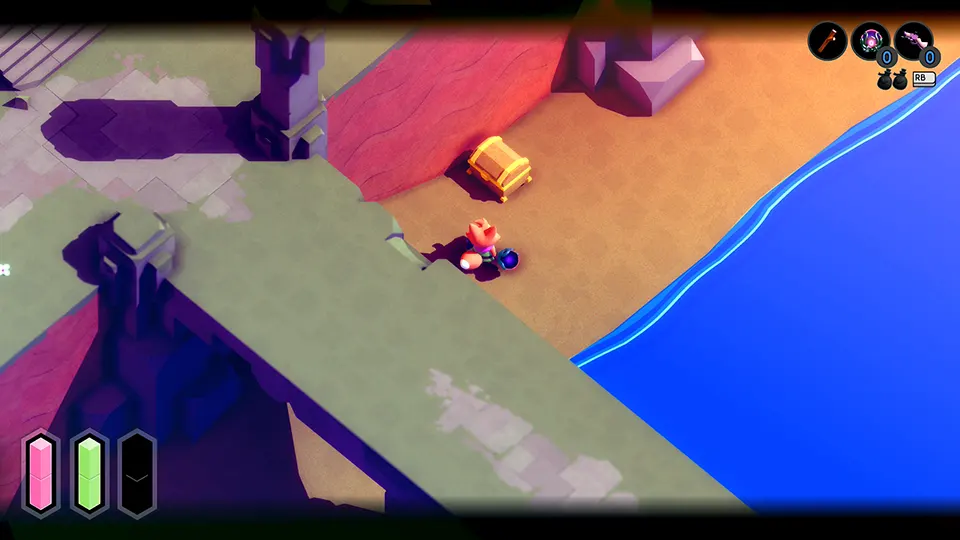
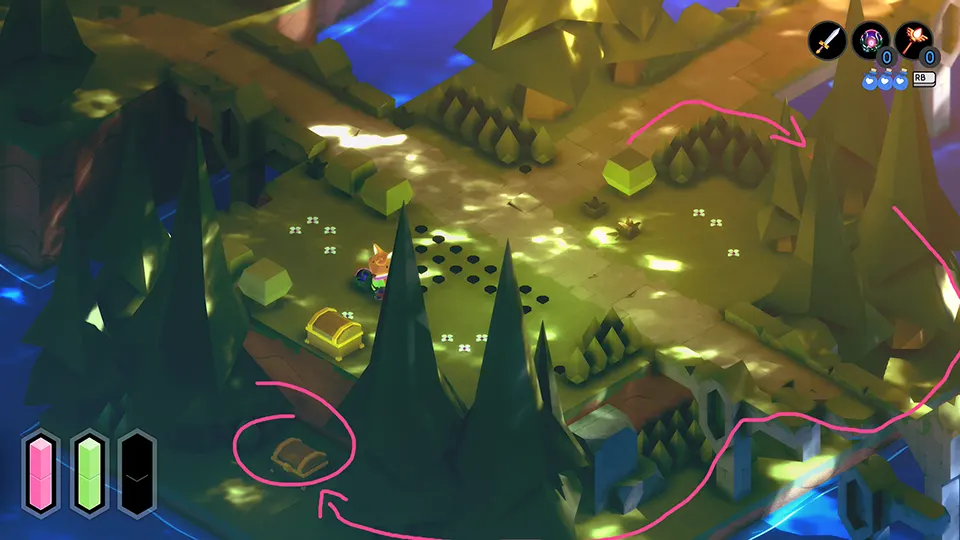
Keep following the path until you come across a set of planks as bridges to a small camp with soldiers. From there, go south towards the broken bridge. Take out the enemies along the way so they don’t get in your way.
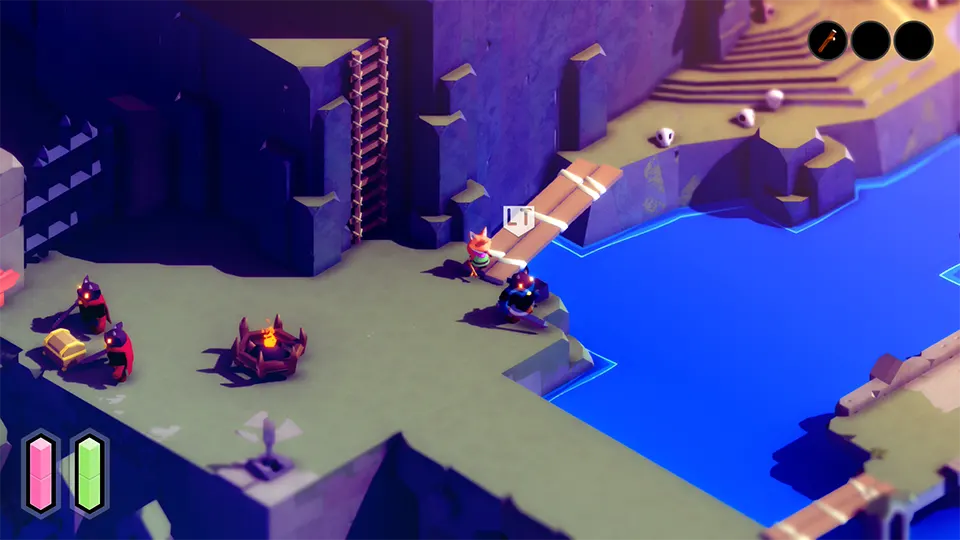
The red soldiers will be defending a chest. This chest contains a pepper (increases your attack momentarily) which is not needed. Grab it if you like using consumables in battles.
Follow along the stone bridge defeating the soldiers. The chest on the bridge contains money. I suggest you grab it so we can upgrade our strength as soon as possible.
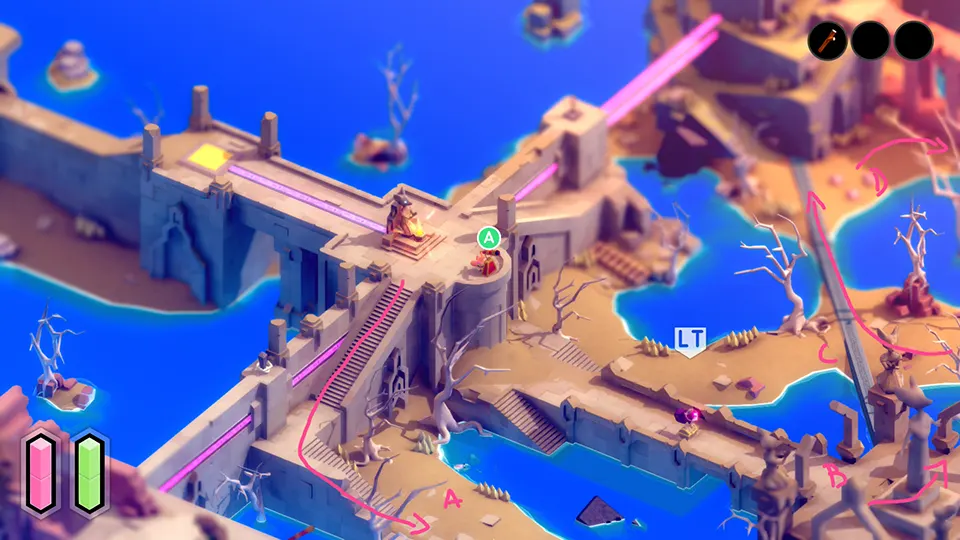
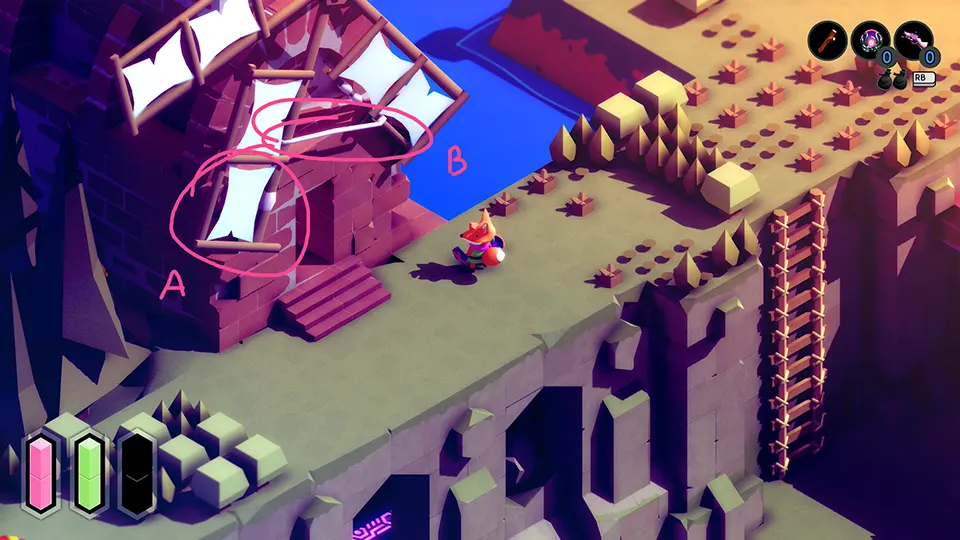
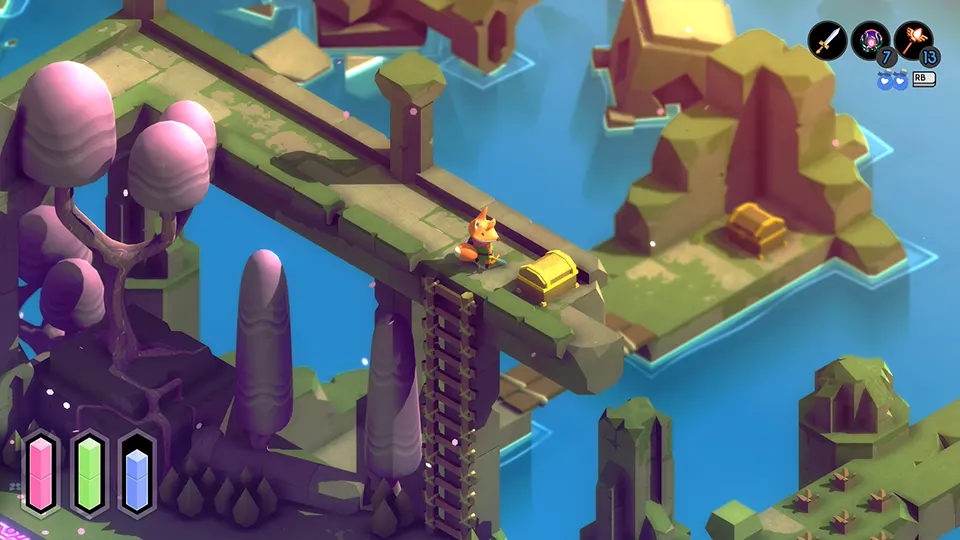
TUNIC Manual page 18 and page 19
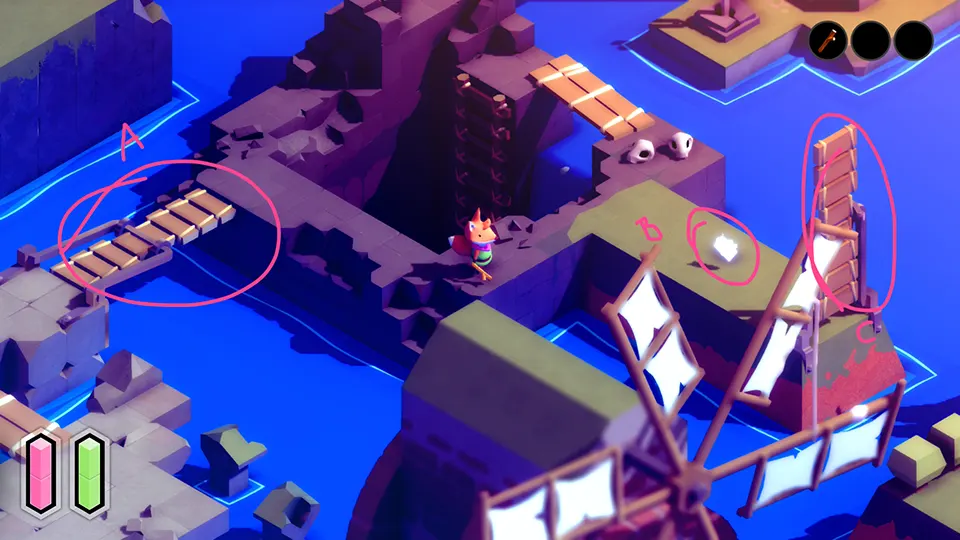
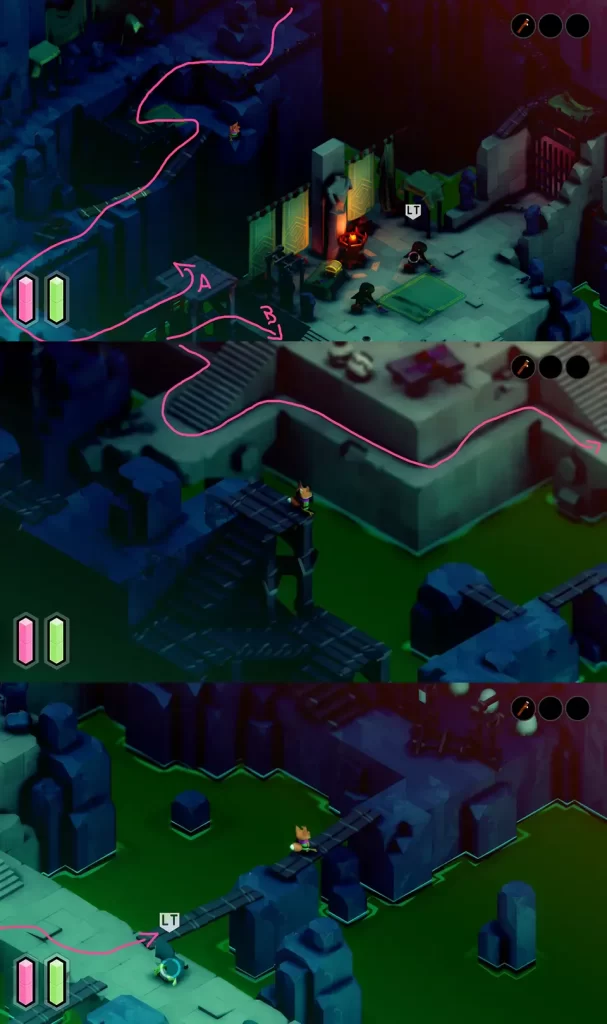
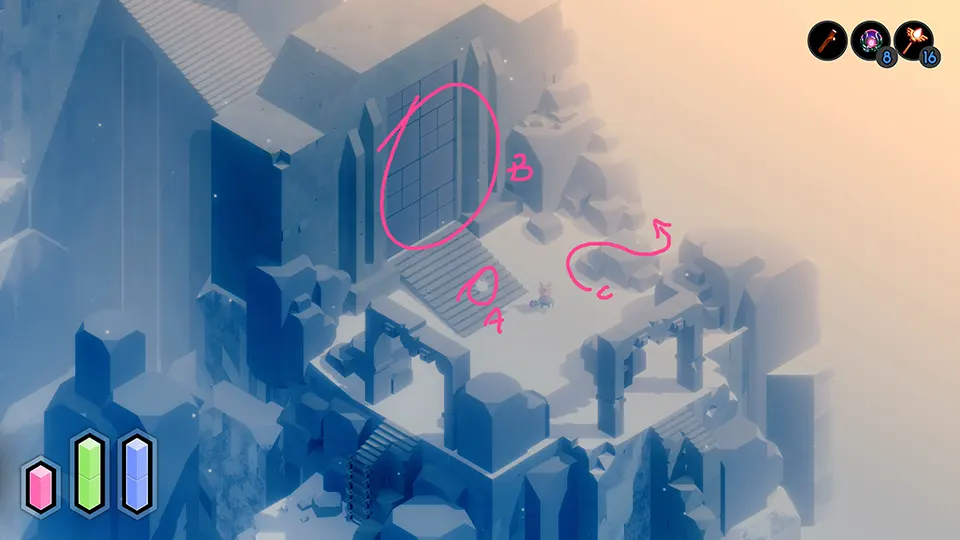
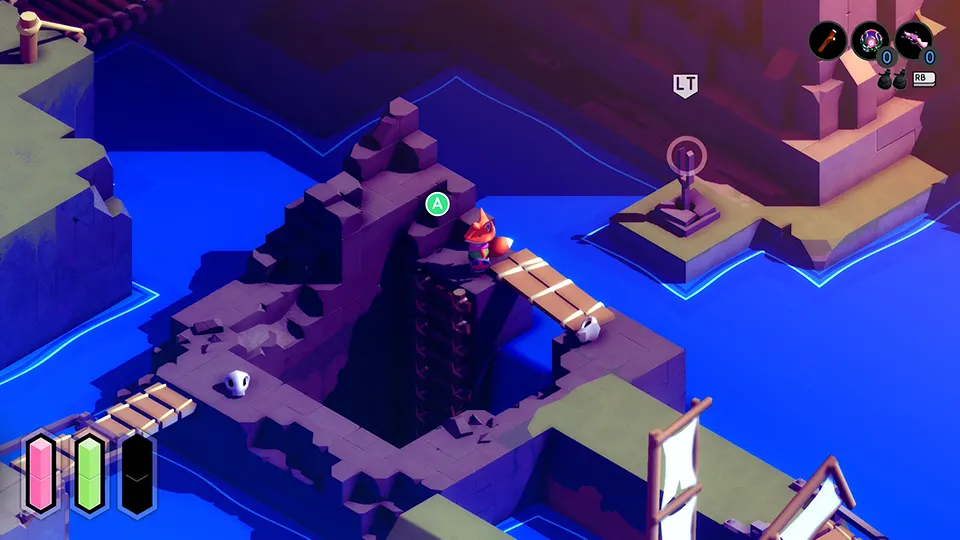
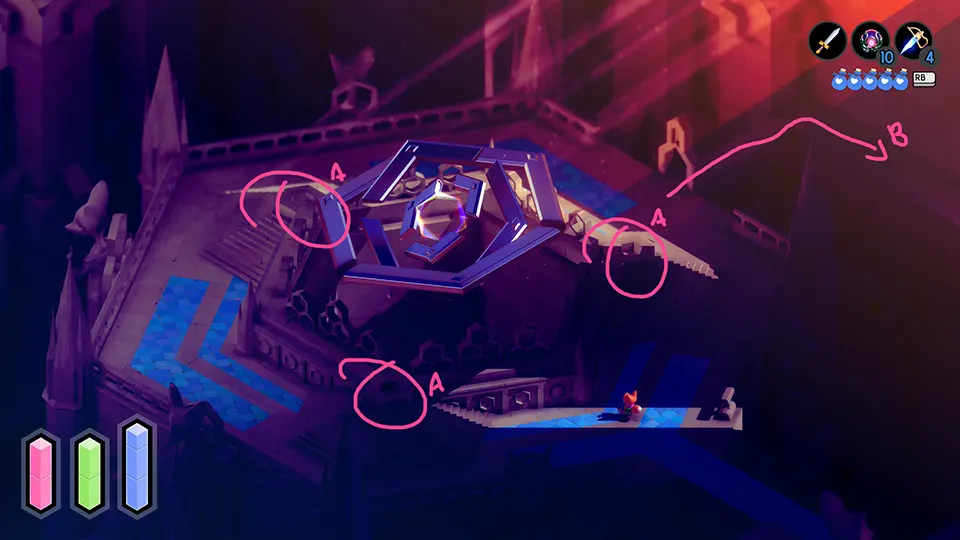
Lower the bridge to the underground area (A), but don’t go down the ladder in front of it. Instead, walk around and grab pages 18 and 19 (B) and lower the bridge that connects back to the main area (C).
TUNIC key to the side area
We’re now back to the bridge that leads back to the altar. In front of it, there’s a key to a side area that leads to the sword. Grab the key, even though we won’t be using it right away.
Go back towards the altar. Press A 🎮 to refill health and mana. This will also respawn all enemies in the world. We need this to lure a soldier towards bushes that we need to cut down. Bushes can only be cut down with a sword.
Upgrading your stats in TUNIC
To become stronger in TUNIC, you need to find consumables. They cannot be used right away, however. You have to make your way to an altar.
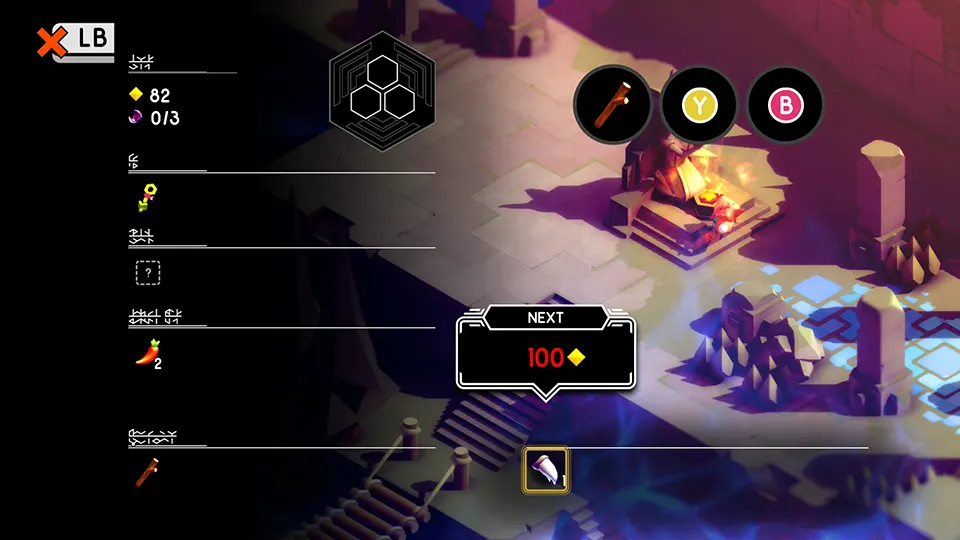
Instead of pressing A 🎮 to interact with the altar, open your inventory with LB 🎮. At the bottom right, you’ll see a list of all the items you have already discovered. Hover your selection box over them. Each has a different price. If you have enough, you can press A🎮 to upgrade that stat.
Here’s what each icon represent:
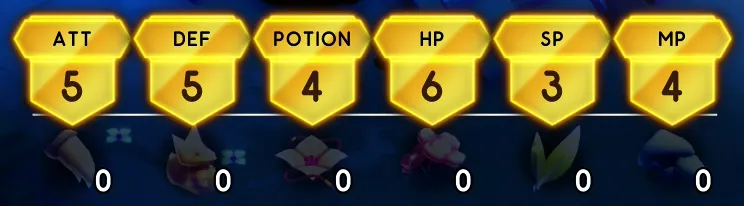
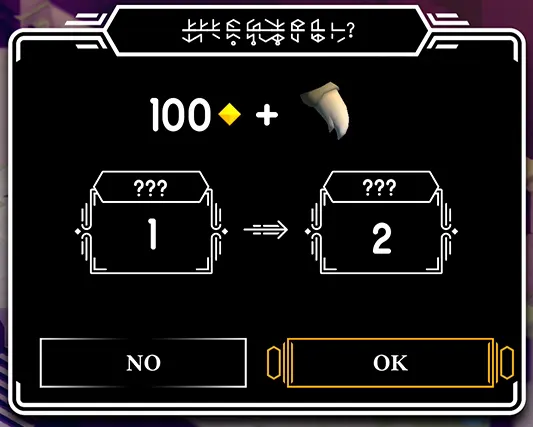
At this point in the game you’ll have a strength upgrade. By farming the slimes on the floor below you can quickly gather 100 money units to upgrade it, so I suggest doing it now to unlock yet another achievement. If you need more, just actiave the altar to respawn the enemies.
If you’d rather not do now, just remember to upgrade your strength later when you come upon another altar and have enough money. Bear in mind you’ll need 1998 money units to get two necessary items that can only be bought, so make sure to save some money for that.
ACHIEVEMENT UNLOCKED:
Your gift is accepted
Sequence break: using soldiers to cut down bushes
Go back to the stone bridge. You’ll see a red soldier closest to you.
Walk up to it and aggro him, then lure him towards the bushes in the main area. Goad him so that his slashes hit the bushes and open up a path to the ladder leading to the area below.
TUNIC Manual page 16 and page 17
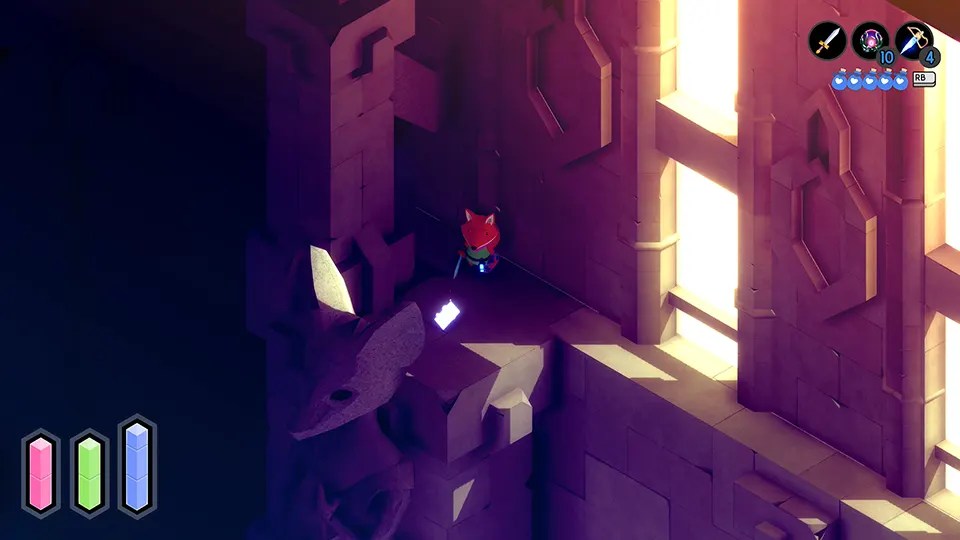
Once on the lower floor, walk towards bottom left, you’ll find another yellow platform on the ground with a manual page hovering on top of it.
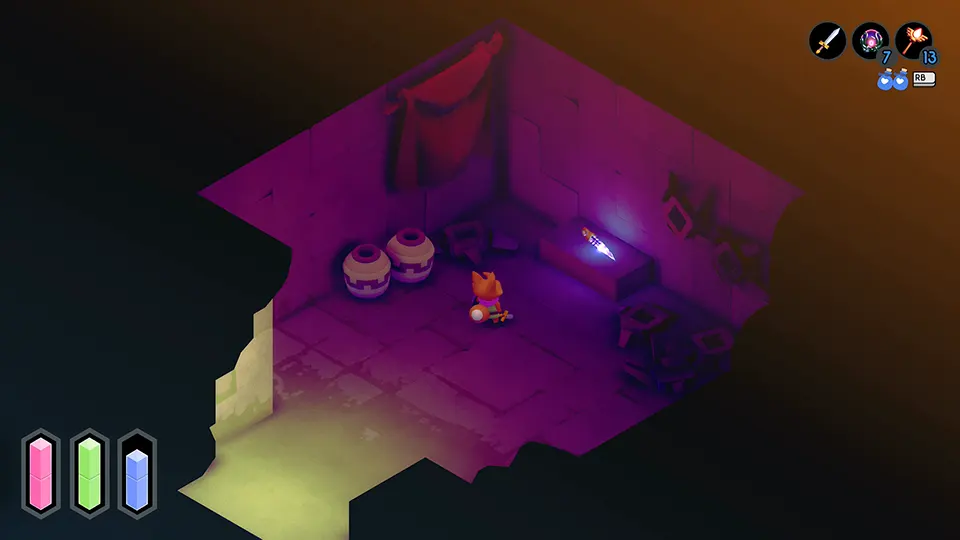
Achievement: Your pocket feels heavier (start)
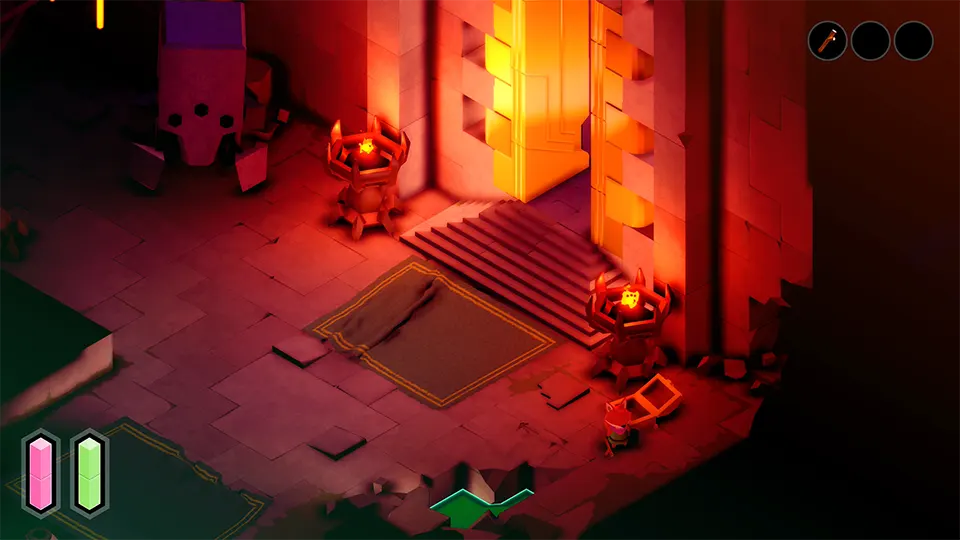
From the platform, go left. You find a slope down with a door with red lights coming from within.
Inside you’ll find 3 chests. One contains money, other explosives, and another will have an HP upgrade. Grab the explosives (2). We’ll need to use 10 of them to unlock the achievement “Your pocket feels heavier.”
Sequence break – continued
Go south from the slope, then right to an area with a pool of water in the middle of it. You cannot get that page now – it will only be possible much later in the game.
Stand in front of the door with the strange symbols. To open this door, you’ll have to use your HOLY CROSS. Get ready!
Secret door #1
Starting from the diamond shape in the middle, follow the lines. That is the pattern you must enter in your D-PAD🎮. The shapes are mirrored, so you have to guess which one is the correct one, but it’s usually the one on the left.
For this particular case, the sequence you must enter is ⬇️ ⬅️ ⬆️ ➡️ ⬆️ ⬅️
(DOWN, LEFT, UP, RIGHT, UP, LEFT)
TUNIC Manual page 44 and page 45
Go inside the newly opened door and grab a page that is meant to be discovered much later in the game.
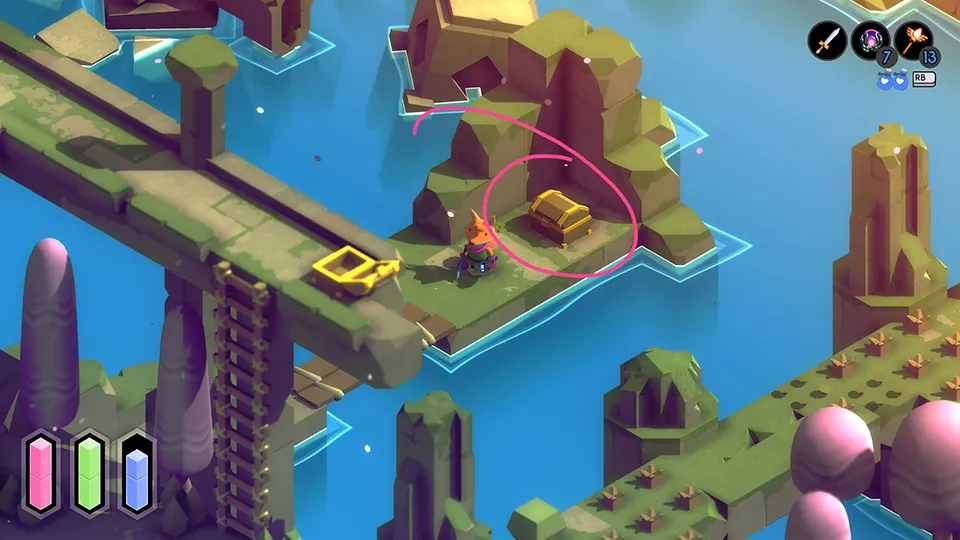
TUNIC Fairy #2
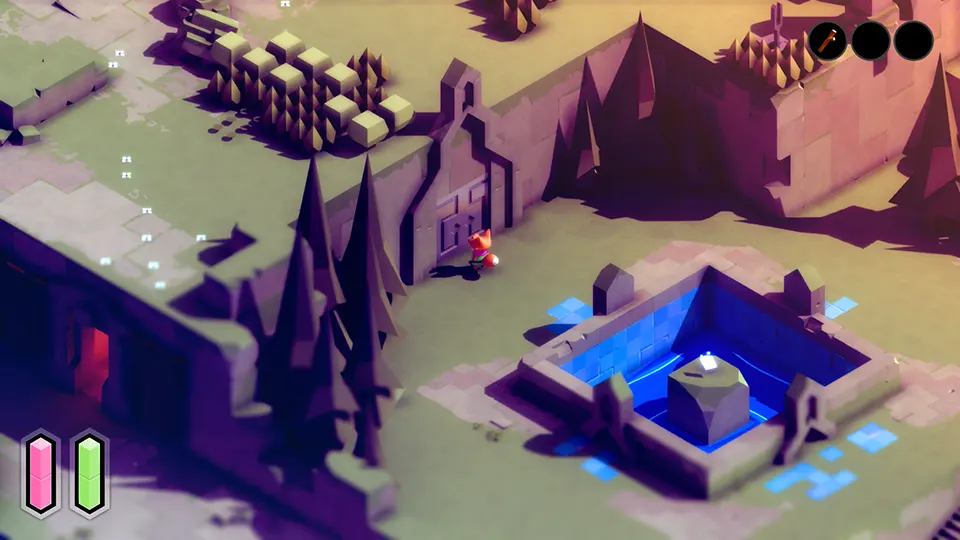
Go back outside and stand in front of the pool. You’ll also use your HOLY CROSS to grab a fairy here.
Pay attention to the blue tiles. They hold the hint to the sequence you must use. Each side or the pool represents a cardinal direction. Pay attention to the number of tiles that are connected in each of the groups. Each group has a very specific number of tiles that does not repeat.
The first direction is the tile that is by itself (down). The second one is the group that has 2 tiles (left), and so on. The final pattern is: ⬇️ ⬅️ ⬅️ ⬇️ ⬆️ ➡️ ⬇️
(DOWN, LEFT, LEFT, DOWN, UP, RIGHT, DOWN)
TUNIC Well done! Achievement – Coin #1
Coins are used in wells to grant yourself extra slots for the card abilities. For the first two extra slots you’ll need 3 coins each, then 4 coins for the 3rd slot, and finally 5 coins for the last slot, giving you a total of 5 slots and 15 coins spent. After spending your last coin, you’ll get the achievement “Well done!” for “making 15 wishes,” which is the same thing as throwing 15 coins in a well.
To find your first coin, you’ll have to make your way into a secret passage to the right of the pool.
Inside, you’ll find a chest with a coin and several panels with bells in front of them. Go behind each of the panels to customize the colors of your character (make sure to always go from one side to the other, if you just walk back you’ll revert to the previous color). If you want to reset your customization in that particular area, just hit the bell.

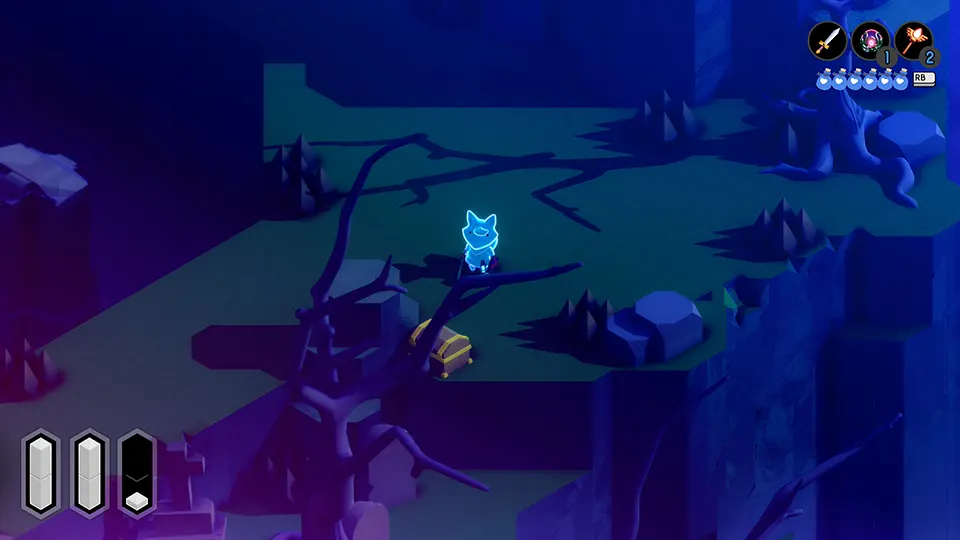
TUNIC Effigy “Too Cute to Smash” #1
Effigies look like a little fox slime decoration. You can break them and get some money. There are 10 of them in the game. One of the achievements, “Too Cute to Smash,” is awarded for collecting all 10 of them without breaking a single one.
Our first effigy is in a chest on the bridge to the Ruined Atoll. From the pool, go down the stairs and keep going straight forward, following the railing in the ground with pink energy flowing in it. There will be a blue soldier behind a pillar. Defeat him for ease of access.
Slight detour for the SHIELD in TUNIC
Though not mandatory, the shield helps block attacks from enemies, and it will come in handy to more easily keep the enemies at bay while we make our way towards the rifle. Feel free to skip the shield, as it does not grant you any achievements, and if you have accessibility options on, it’s not really needed besides avoiding some frustration with certain patterns of attacks. We will be collecting other stuff on the way to the shield, however, so don’t skip this section altogether.
From where you grabbed the effigy, go back towards the stairs. To the right of them, you’ll find a tall enemy known as Envoy. He wears a green cape and holds a lance and tall shield. He is fast and blocks your attacks, so you won’t be able to defeat him right now.
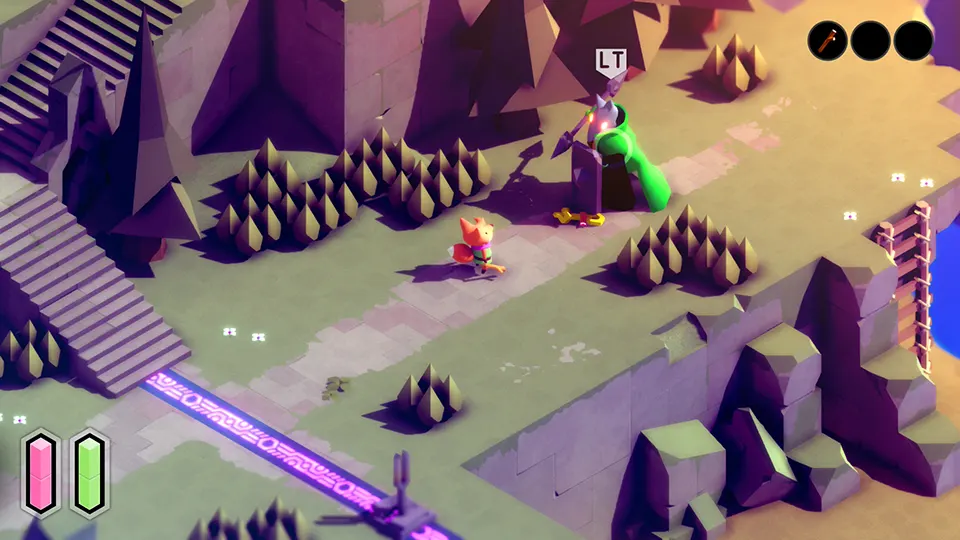
Approach him, and as he steps back to windup his attack, run to the key and grab it. You’ll most likely get hit in the process, but with accessibility options that shall not matter. If you dodge as soon as you grab the key, you can avoid his attack.
Some secret explosives
Go back up to the area with the pool of water above the sets of stairs. To the right of it there will be two sets of round stairs. Go up the first set of it and use one explosive on the north wall (where the flowers are on the ground) to reveal a secret with 4 more explosives.
TUNIC Achievement “Nothing happened…”
Go up the second set of stairs and unlock the gate in front of you. On the other side, you’ll find your first well of the game. Equip the coin and use it while in front of the well. You’ll throw the coin into it and unlock your first coin-related achievement.
ACHIEVEMENT UNLOCKED:
Nothing happened…
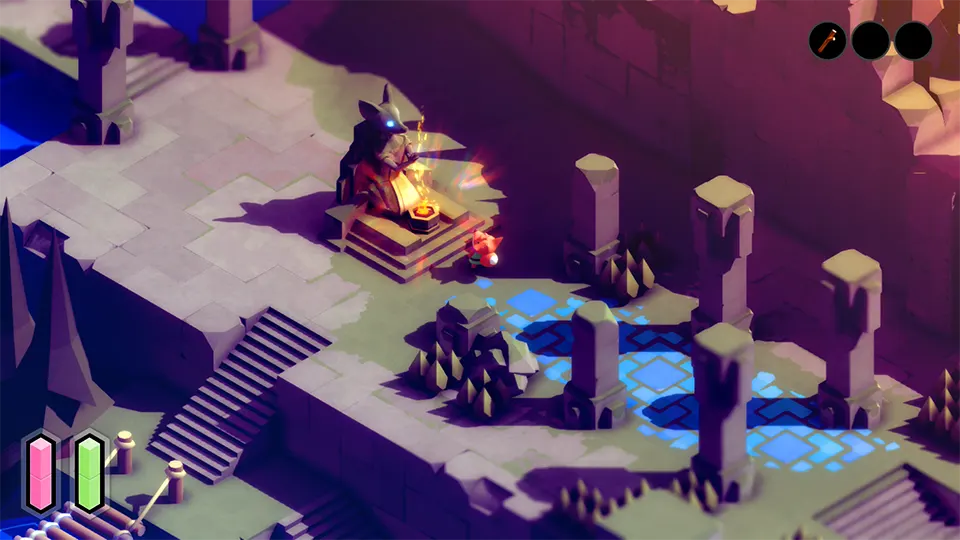
TUNIC Secret Treasure #8 – Power Up
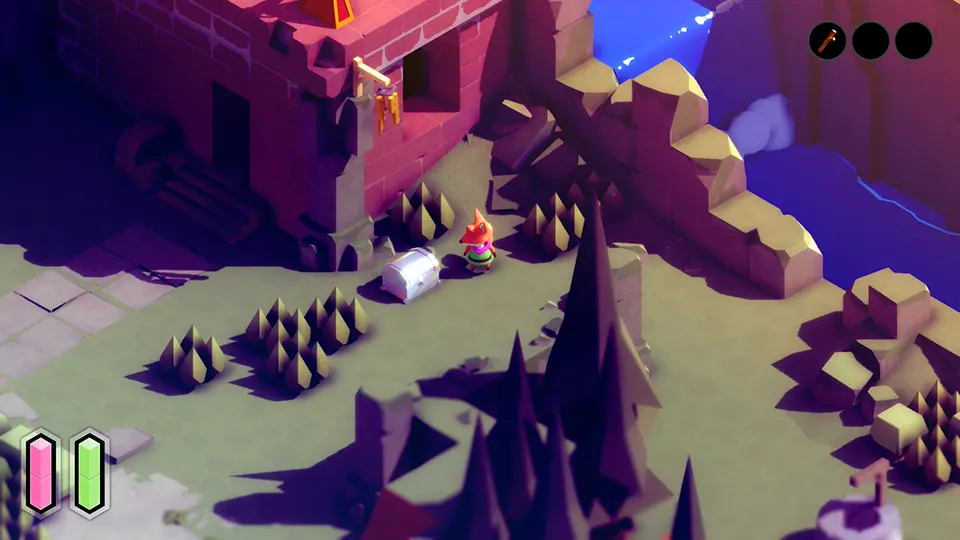
Fromt he well, go north towards the Old House in the Town Ruins. Stand in front of the south wall of the house. There’s a wind chime there.
If you observe it closely, you’ll see that the wind blows it in certain directions. Each direction will have its own note. I’m not musically inclined, so I cannot say how accurate this description is, but you should use page 34 of the manual as a reference. At the bottom left there’s a small compass like thing with notes written in ballpoint pen, and that should be the hint you need to crack this one.
Credits go to TheGamer.com for cracking this particular code. I couldn’t have done it without their guide.
That is the pattern you must enter is ⬆️ ⬇️ ➡️ ⬆️ ⬇️ ⬅️ ⬆️ ⬇️ ⬅️ ➡️ ⬇️ ⬅️ ➡️ ⬆️
(UP, DOWN, RIGHT, UP, DOWN, LEFT, UP, DOWN, LEFT, RIGHT, DOWN, LEFT, RIGHT, UP)
ACHIEVEMENT UNLOCKED:
Power Up
TUNIC Fairy #3
Use the key to unlock the Old House and enter it. Inside, you’ll find that on one of the tapestry hanging on the walls have a pattern on them. Simply type that pattern in your HOLY CROSS to reveal yourself a fairy chest.
Whenever there’s a perpendicular line in a pattern, it means you have to repeat the press in that particular direction.
The sequence you must press is ⬆️ ⬆️ ➡️ ⬇️ ⬇️ ➡️ ⬆️ ⬆️ ➡️ ⬇️ ⬇️ ⬇️
(UP, UP, RIGHT, DOWN, DOWN, RIGHT, UP, UP, RIGHT, DOWN, DOWN, DOWN)
The chest inside the Old House contains only 1 piece of currency, so feel free to ignore it.
Grabbing that shield
There’s another door up towards the top of the screen in the Old House. Go through it and down the hall. The shield will be at the end of this hall.
Open the gate to reveal a backroom. There you’ll find another HOLY CROSS gate with another manual page inside.
TUNIC Manual Page 52 and page 53
Enter the very simple pattern on the door to open it. It is a long dark corridor with the page floating around at the end of it.
The pattern to enter is ⬆️ ➡️ ⬇️ ⬅️ ⬇️ ➡️
(UP, RIGHT, DOWN, LEFT, DOWN, RIGHT)
The Ruined Atoll
Make your way back to the area where we got the key to the old house. Right next to the Envoy that was protecting it, there’s a ladder. Go down to the beach level.
TUNIC Manual page 32 and page 33
Hug the wall behind the ladder and walk around and behind the waterfall in the back. You’ll end up on the other side of the river. There you’ll find manual page 32 and page 33, just floating further along down on the beach!
TUNIC Fairy #4
Under the bridge right after the page, go up against the wall towards the continent / north. You can sort of see there’s a doorway there. Go inside.
This area has an invisible pathway to a chest with some money inside (255). What you don’t realize is that the directions you take to reach the chest can also be input in your HOLY CROSS to reveal a fairy chest as well!

Final sequence: ⬆️ ⬅️ ⬇️ ⬅️ ⬆️ ➡️ ⬇️ ➡️ ⬆️ ➡️ ⬇️ ⬅️ ⬆️ ⬅️ ⬆️
(UP, LEFT, DOWN, LEFT, UP, RIGHT, DOWN, RIGHT, UP, RIGHT, DOWN, LEFT, UP, LEFT, UP)
TUNIC Well done! Achievement – Coin #2
This coin, like the sheet of paper before, is also just lying around in the sand, a little further ahead of the page. The bridge is in front of it, so you might have to turn your camera with LB🎮 in order to see it.
TUNIC Fairy #5
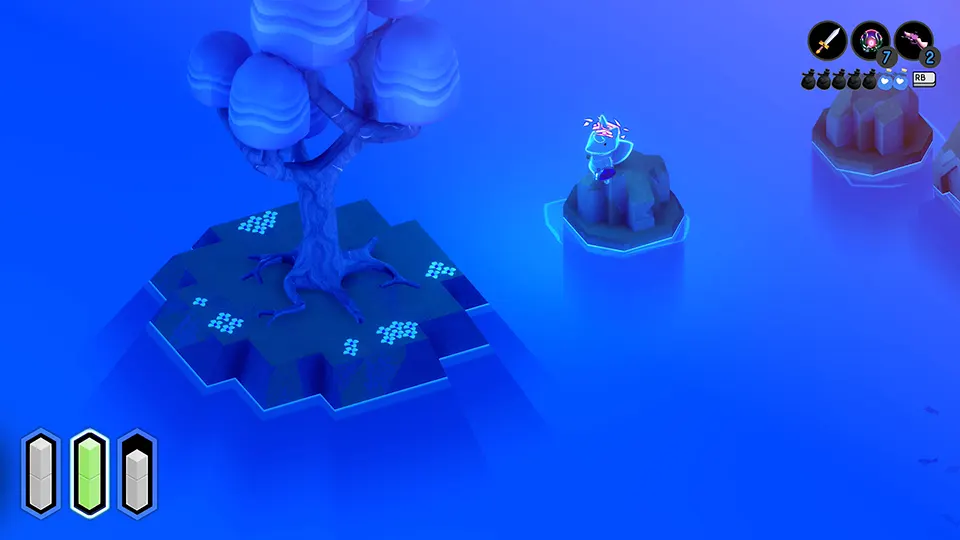
Return to the ladder you used to get down to the beach. Proceed straight ahead to the wooden plank in front of it onto a small island covered with green.
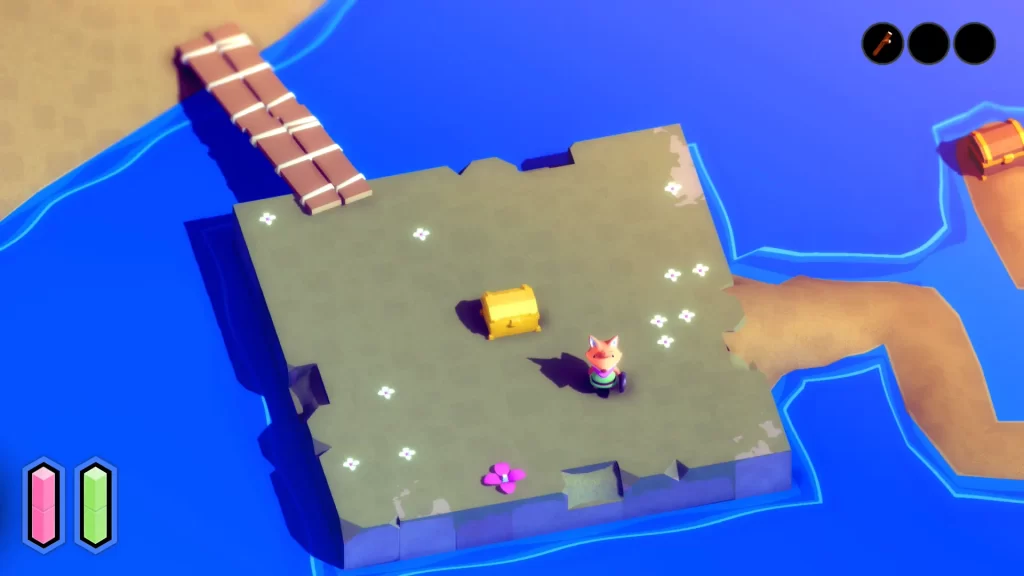
The pink flower is the starting point for your sequence. From there, look for the flower that has a direct path to the pink one. From there, always look for the next flower that has a direct line to the current one.
SOLUTION: ⬆️ ➡️ ⬇️ ⬅️ ⬇️ ⬅️ ⬇️ ⬅️ ⬇️ ⬅️ ⬆️
(UP, RIGHT, DOWN, LEFT, DOWN, LEFT, DOWN, LEFT, DOWN, LEFT, UP)
TUNIC Secret Treasure #4 – Vintage
Stand in the dirt path towards the chest in the water. You have to input a sequence here.

In order to figure this one out for yourself, you need to have found the first page of the manual, which you could only get after finding all the other pages.
After finding that page, you have to stand in a body of water for 60 seconds, as suggested by the hint on page 51 of the manual. When you do that, a new message will appear next to the star on page 1. It shows this location. I’m not sure of the particulars of how to figure out the pattern. We only managed to figure out up to the point where you stand 6o seconds in water. This one I was only able to solve because of TheGamer.com as well, so all credits go to them.
SEQUENCE: ⬇️ ➡️x11 ⬅️x12
(DOWN, RIGHT (11 times), LEFT (12 times))
ACHIEVEMENT UNLOCKED:
Vintage
Path to the Ruined Atoll 1
Keep going right from the fairy chest to find another chest with some money. Then return to the beach and head left.
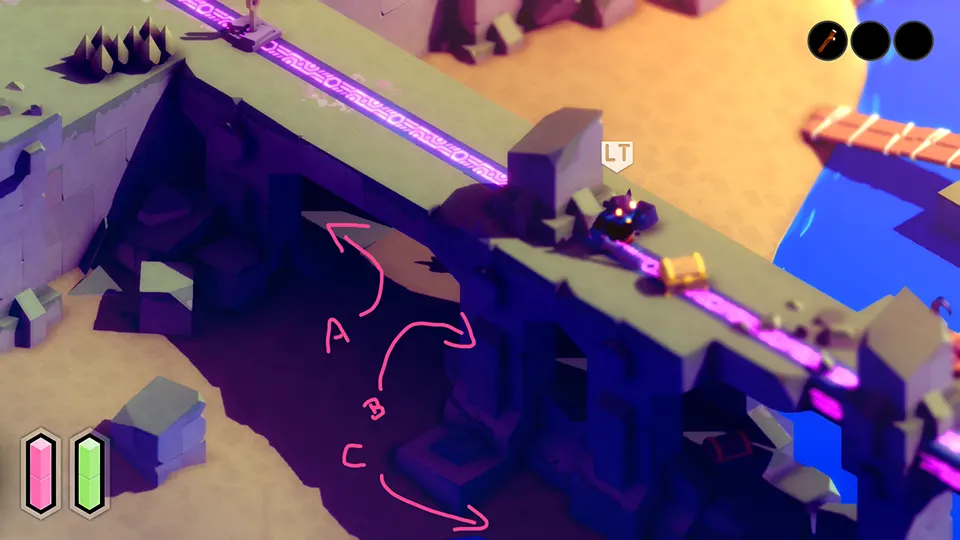
Under the bridge, you can go right (B) to find a chest with a POTION upgrade.
Following the path down along with the bridge (C) will lead you to the Ruined Atoll, our next destination.
Before that, however, we’ll go grab an hourglass and another fairy in the cave (A).
TUNIC tool – The Hourglass
Go into the cave (A). You’ll find 3 turrets (AUTOBOLTS) and a chest with the hourglass.
Since you don’t have a sword yet, you cannot destroy the AUTOBOLTS. Use your shield to protect yourself from their shots the best way possible as you make your way across. Once there, stand behind the chest; you’ll be safe from their line of fire. Wait for a little bit and they’ll disengage, allowing you to get the treasure undisturbed.
The hourglass slows down time for everyone, including the player. I haven’t found any good use for it, but please let me know if it’s useful for something! Maybe I’m missing something obvious.
You probably noticed that there’s a pattern behind the chest with the hourglass. If you input it on your HOLY CROSS, a door will open, leading you into a tower.
SEQUENCE: ➡️ ⬆️ ⬅️ ⬆️ ➡️ ⬆️ ⬅️ ⬆️ ⬆️ ➡️ ⬇️ ⬅️ ⬇️ ➡️ ⬇️ ⬅️ ⬇️ ➡️
(RIGHT, UP, LEFT, UP, RIGHT, UP, LEFT, UP, UP, RIGHT, DOWN, LEFT, DOWN, RIGHT, DOWN, LEFT, DOWN, RIGHT)
TUNIC Fairy #6
Climb the tower. You’ll have to use your HOLY CROSS at the top of it.
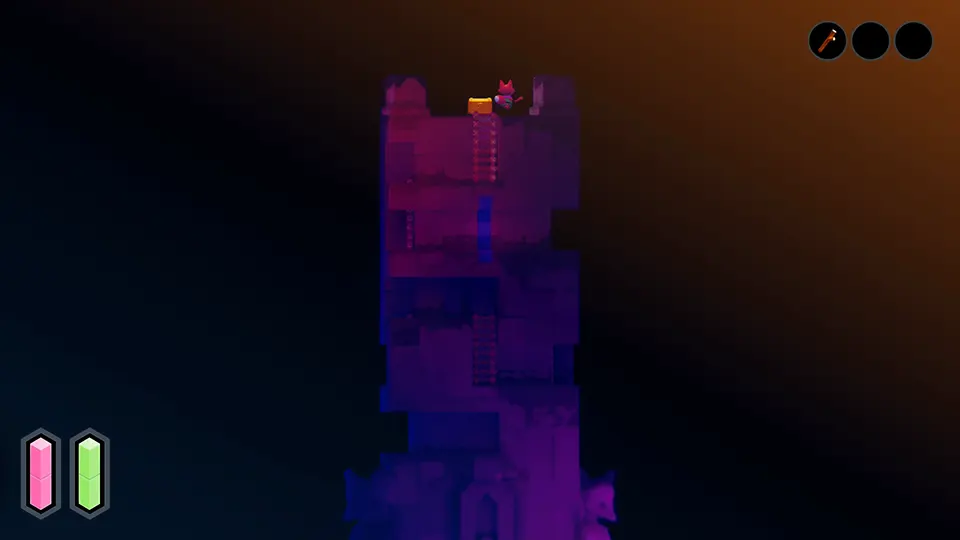
Pay attention to the path you took to reach the top of the tower. While the blue lines don’t do anything, they hold a meaning.
The credits to solving this one go to Zodd95. The path you took to the top of the tower is the sequence you need to input in your HOLY CROSS. The blue lines mean you should input that direction one more time, just like the perpendicular lines in other patterns we’ve come across before.
SEQUENCE: ⬅️ ⬆️ ➡️ ⬆️ ➡️ ⬇️ ➡️ ⬆️ ➡️ ⬆️ ⬅️ ⬅️ ⬅️ ⬆️ ➡️ ⬆️
(LEFT, UP, RIGHT, UP, RIGHT, DOWN, RIGHT, UP, RIGHT, UP, LEFT, LEFT, LEFT, UP, RIGHT, UP)
Path to the Ruined Atoll 2
Go down the path (C) highlighted in the image of section “Path to the Ruined Atoll 1” above.
Use your shield to protect yourself from the fire of the AUTOBOLT. Remember, since you don’t have a sword yet, you cannot destroy it.
You’ll come to a small crack on the wall. Push against the southern wall to find a hidden ladder. Climb it and go down towards the Ruined Atoll.

The Ruined Atoll
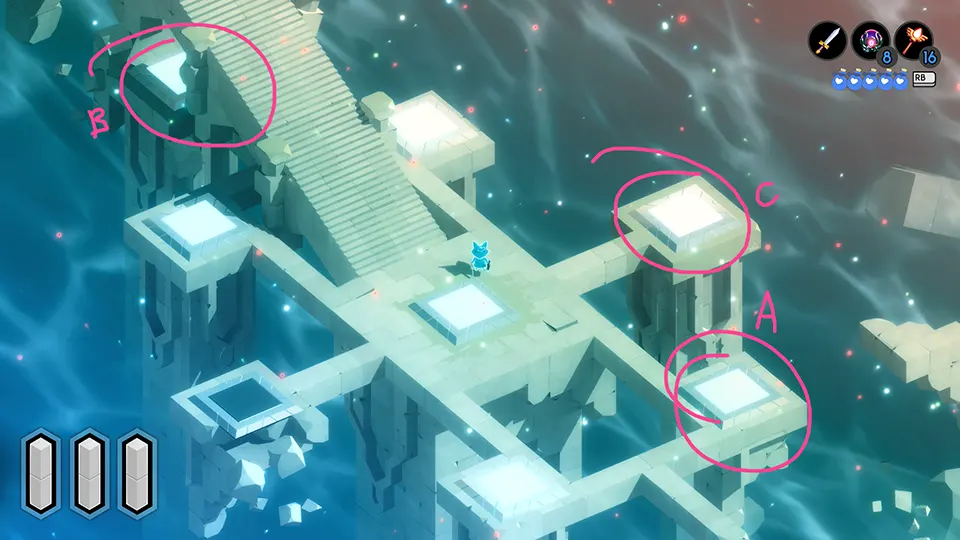
From the entrance, go down the staircase to the left (A) and keep going down. Reach the left staircase of the central island area and use it to cross to the opposite side (B). Use the deactivated floor railing to cross to the northern island (C). Coast along the bridge avoiding the crabs (D).
Go under the bridge / wall and walk under it towards the chest. It contains 15 money units. Walk past the chest and make your way behind the northernmost mountain. You’ll find a secret ladder there. Climb it and go inside. Once inside, climb down the ladder and sneak behind the frog to the second ladder in the back. Go down that ladder to enter the frog’s domain.
The Frog’s Domain
We’re here to get the magic orb, the item that basically works as a hookshot. We’ll need it to skip parts that we’d otherwise need the sword to get across.
Once you’re down in their domain, sneak past the 3 frogs in the pond and go through the door in the north.
Some explosives along the way
In the hallway, there’s going to be a door on the south (your blind spot) close to where the frog is. In that room, there’s going to be a chest with 3 more explosives, leaving you just short of 1 explosive to get the achievement for using 10 of them.
Hurrying to the Magic Orb
From here on out we’ll book it to the Magic Orb, unless you want to face all the enemies – they are quite overpowered for your current strength, and they’ll most likely constantly stun you.
Once in the hall, go down towards the left until you reach a major area with a locked gate. Follow the path suggested in the following image to reach the latch. Once the gate is opened, just run to it; the path to it should be obvious after opening it.
Don’t worry about the chests in this section. The one in the leftmost part of the map contains 2 healing berries, which are useless to us. The chest in the main area with the two big frogs contains 100 money units.
Running into the next room, go through a hole in the wall to the right side of the main golden door. Before that, make sure to grab the chest in this room as it contains a strength upgrade.
Achievement: Your pocket feels heavier – conclusion
You’ll find yourself in a room with several slimes in a small pond with a frog. There’s also a chest here with 3 more explosives. With this chest you’ll have enough to unlock the achievement for getting the explosive upgrade.
Make sure to actually use the explosives. It won’t unlock if you simply have them in your inventory.
ACHIEVEMENT UNLOCKED:
Your pockets feel heavier
Obtaining the magic orb
Follow along to the right of the pool, leading you into a small corridor that gives you access to the main room. Lower the access bridge at the top if you’d like, but after we get the magic orb, there’s no reason to come back.
Go to the main hall, then down the ladder. Grab the orb from the altar, avoiding all the enemies (or defeating them). Equip it and latch to the hook on the right. You can choose your target with the RIGHT STICK🎮.
From there, make your way back to the surface.
Completing Ruined Atoll
There are 4 “obelisks” around the Atoll. Go around the place and stand in front of each of them, “praying” (holding down the A🎮 button while standing still). This will activate them.
ACHIEVEMENT UNLOCKED:
You hear a strange hum
TUNIC Effigy “Too Cute to Smash” #2
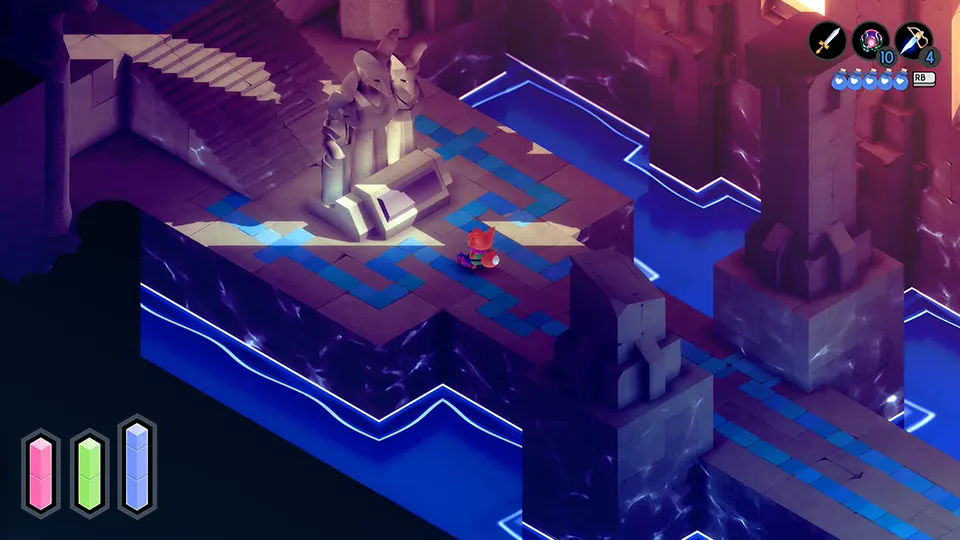
Our second effigy can be found here in the Ruined Atoll. It’s located on the bottom left of the map, right behind the mountain with an obelisk. On ground level, walk around the back of the mountain and walk over the railing that conducts the purple energy.
Finding your way to the Great Library
Once all 4 obelisks have been activated, go to the sculpture in the middle of the Ruined Atoll and pray to it as well. It will raise. Go under it before it flashes and it will teleport you to the Great Library.
The Great Library
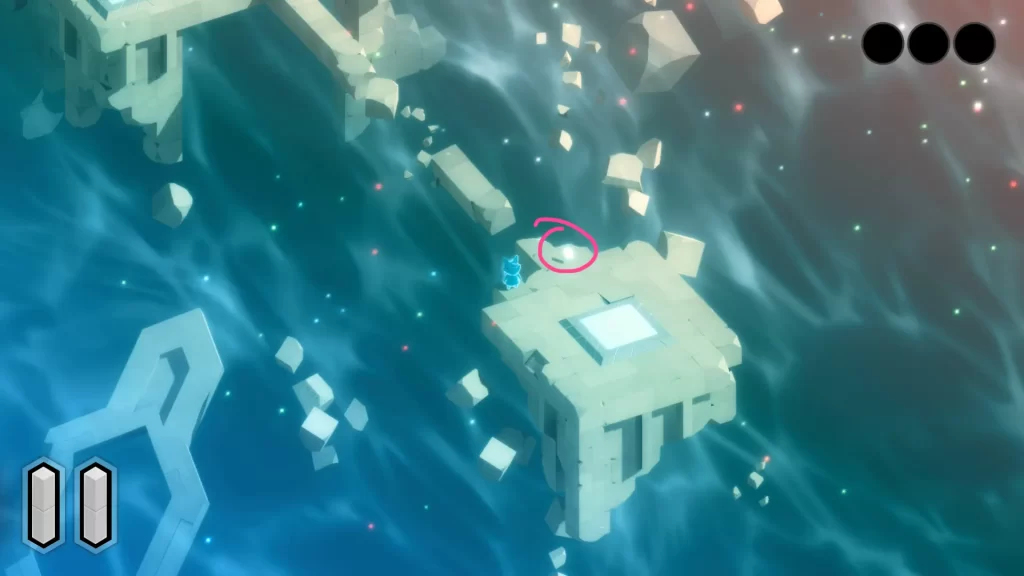
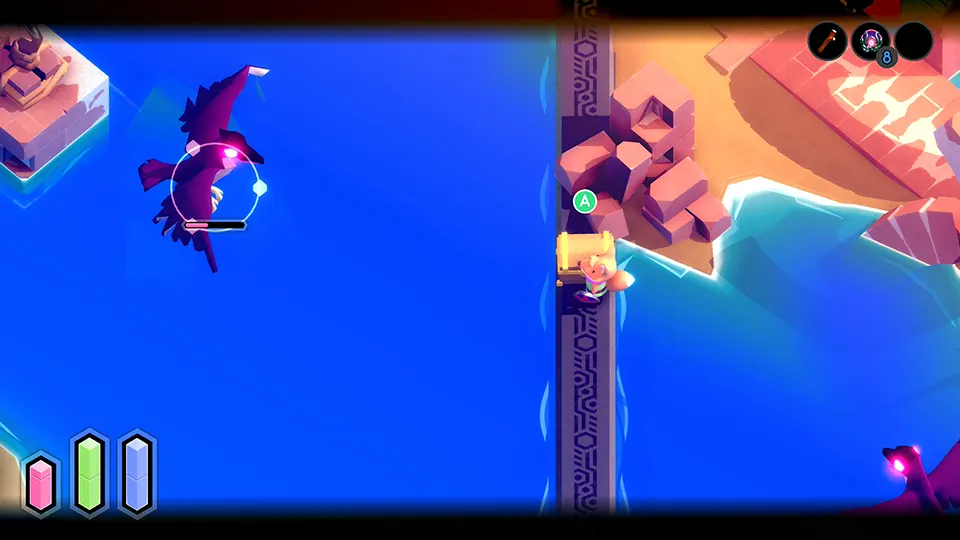
Make your way to the side of the library. You can hook into those tuning forks to reach the island and then find your way around it into an open window.
Attention! If, for any reason you want to go back to the Ruined Atoll, just pray in front of the tree in the isolated area you start in.
TUNIC Fairy #7
In the main hall of the Great Library, stand on the middle of the carpet in the center of the room.
If you want to figure it out for yourself, the sequence starts in the middle. Despite it having 4 distinct patterns, the one that works is the top left one.
The full pattern is: ⬆️ ⬅️ ⬇️ ⬅️ ⬆️ ➡️ ⬆️ ⬅️ ⬆️ ➡️ ⬆️ ⬅️ ⬇️ ➡️ ⬇️ ⬅️ ⬆️ ⬅️ ⬇️ ⬅️ ⬆️ ➡️ ⬆️ ⬅️ ⬆️ ➡️ ⬆️ ➡️ ⬇️ ⬅️ ⬇️ ➡️ ⬇️ ⬅️ ⬇️ ➡️
(UP, LEFT, DOWN, LEFT, UP, RIGHT, UP, LEFT, UP, RIGHT, UP, LEFT, DOWN, RIGHT, DOWN, LEFT, UP, LEFT, DOWN, LEFT, UP, RIGHT, UP, LEFT, UP, RIGHT, UP, RIGHT, DOWN, LEFT, DOWN, RIGHT, DOWN, LEFT, DOWN, RIGHT)
TUNIC Manual page 38, page 39, page 40, page 41, page 50 and page 51
Go up the staircase, then the ladder. You’ll be in a circular hallway. Walk around it to find another ladder.
Once there, use your Magic Orb to reach the main area / study. You’ll find three sheets of paper inside capsules.
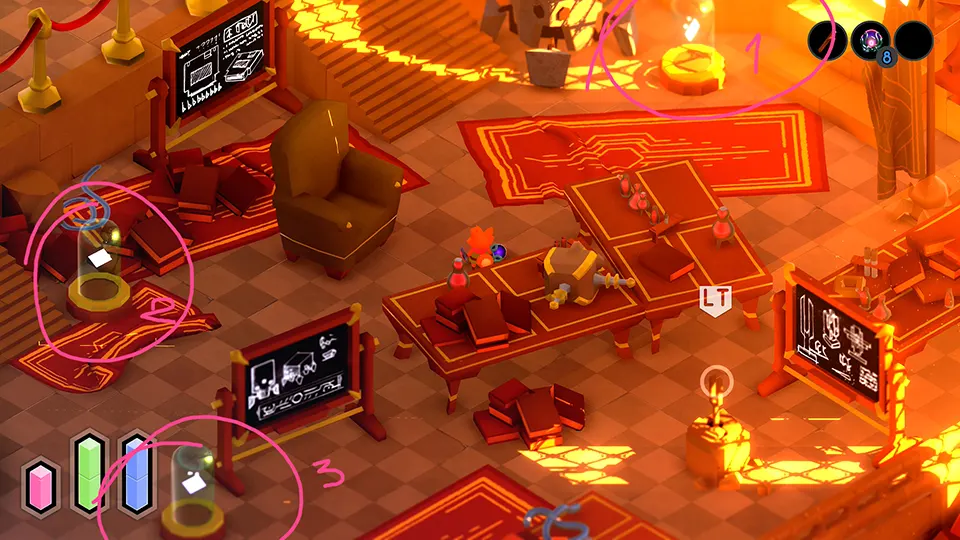
Break the capsules with your stick and collect all the pages. After that’s done, activate the obelisk and use the teleporter.
In the teleporter hub, use the teleporter in the middle right to go back to the Town Ruins.
A Run for the rifle
We’ll start making our way to the rifle from the Town Ruins teleporter, gathering a bunch of goodies along the way.
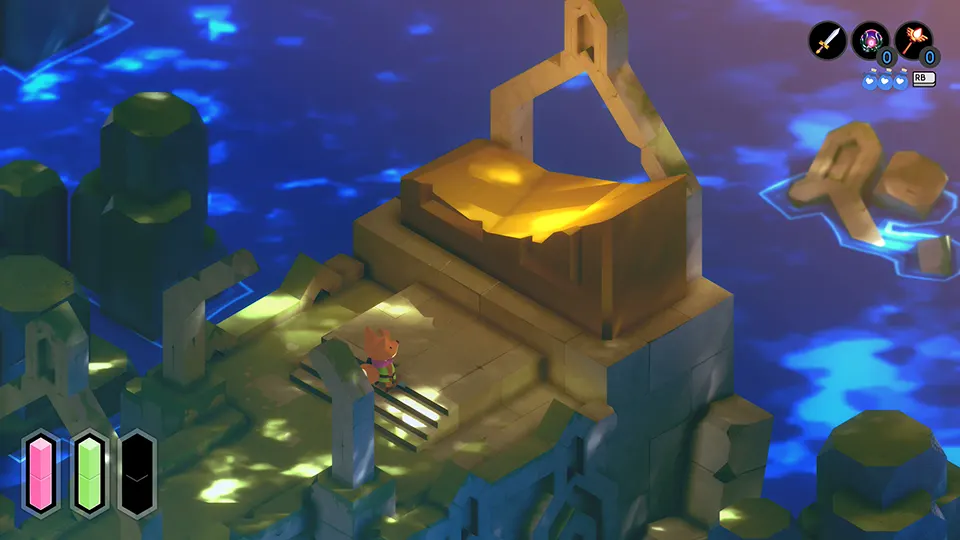
Start off by going back to the first altar of the game. From there, go north towards the Sealed Temple (the bigg’un with the golden doors). Press LT🎮 to target a tuning fork that you can hook yourself to on a pillar right next to it.

Go down the little staircase to the south towards a lever and activate it to reveal a ladder and a path to the right. We’re going to find a field of flowers there, and you know what that means!
TUNIC Fairy #8
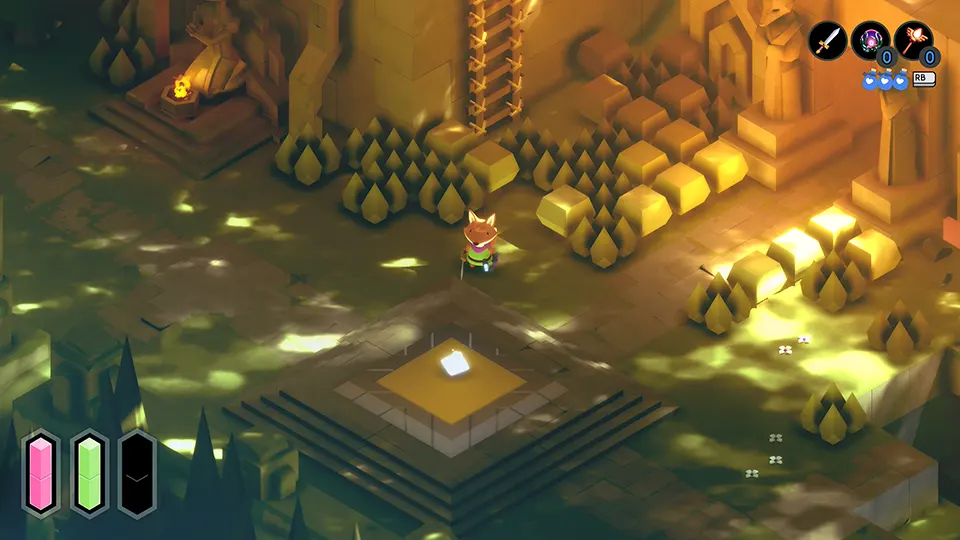
Go down the ladder you just revealed and go right. You’ll find several slime guys there, and a pattern on the ground of an open area, starting with a bright pink flower. We’ve done one of those before, so let’s cut to the chase:
Full sequence is: ⬆️ ⬅️ ⬇️ ⬅️ ⬇️ ⬅️ ⬇️ ⬅️ ⬆️ ➡️ ⬇️ ➡️ ➡️ ⬇️ ➡️
(UP, LEFT, DOWN, LEFT, DOWN, LEFT, DOWN, LEFT, UP, RIGHT, DOWN, RIGHT, RIGHT, DOWN, RIGHT)
Once you’re done, go up and lower the bridge. This will bring you to an area with a waterfall. There’s where we’ll find yet another fairy.
TUNIC Fairy #9
Go behind the rock next to the waterfall and find an entrance to the side.
Inside you’ll find a chest with 30 units of money. But if you follow the path straight ahead from the entrance, you’ll find a secret chamber in the back with a soldier pacing around.
If you look closely, the soldier is following a very specific pattern. That’s the input you’ll have to repeat on your HOLY CROSS.
The pattern is: ⬇️ ⬇️ ➡️ ⬆️ ➡️ ⬇️ ⬅️ ⬇️ ➡️ ⬆️ ➡️ ⬇️ ⬇️
(DOWN, DOWN, RIGHT, UP, RIGHT, DOWN, LEFT, DOWN, RIGHT, UP, RIGHT, DOWN, DOWN)
TUNIC tool magic wand
Back outside, go up the ladders to the top level.
At the top, going right will bring you to a chest with mana berries. Going to the left will bring you to a huge staircase that leads into the mountains, but ignore it for now. Keep going left until you find a golden tablet with the magic / fire wand in front of it. Collect it, but don’t leave just yet!
TUNIC Manual page 48 and page 49
After collecting your wand, input the pattern shown on the tablet to materialize the pages of the manual: ⬆️ ⬅️ ⬇️ ➡️ ⬇️ ⬅️ ⬆️ ➡️
(UP, LEFT, DOWN, RIGHT, DOWN, LEFT, UP, RIGHT)
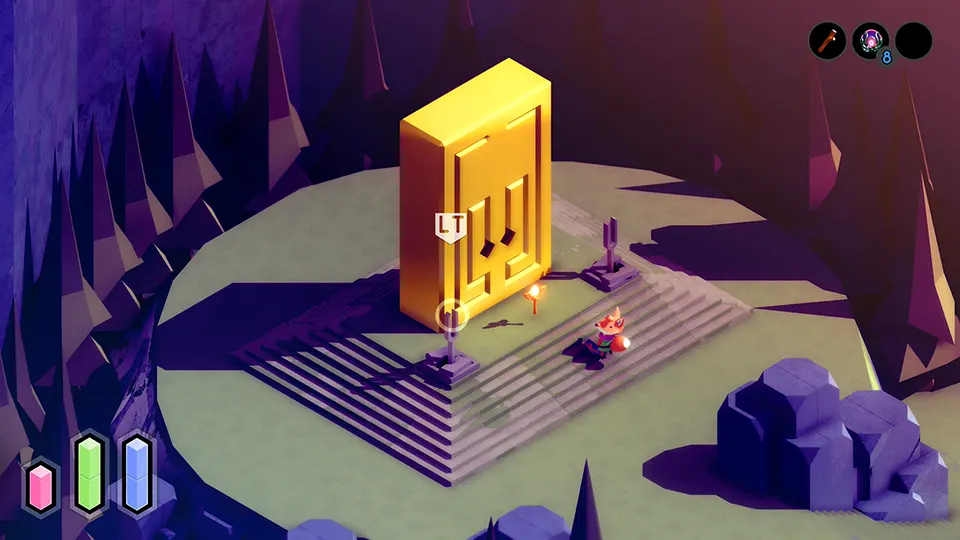
The Mountain and TUNIC Manual page 20 and page 21
Go back to the huge staircase and climb it. You’ll reach a snowy area. Keep following the path until you reach a giant door with another sheet of paper floating in front of it.
Bear in mind for a future section that we’ll exit this area through the path shown with (C) once we’re done with the mountain. For now, grab the pages (A) and stand in front of the closed gate / door.
TUNIC Manual page 1 and manual cover
Get ready for the longest sequence of arrows of the entire game.
The mountain door (B) is one of the most complex puzzles of the game. In order to have all the necessary pieces to solve it, you’ll have to have all the other pages of the manual, since the puzzle needs hints from almost all of these pages.
On page 49, there’s a grid with several numbers. Each of these numbers are references to pages in the manual. On each of those pages, there will be elements that, upon a casual look, might not mean much, but that will stand out once you know what you’re looking for. They’re lines that will be placed on the grid. Once you’ll have all the clues, the pattern will be revealed, starting from the bottom, in the middle.
However, some of those patterns are not immediately obvious. One of them will even require you to mess with the save files, discover a secret save file that will load a special maze that will then hold the pattern that you need to place in the grid.
This one is very complex and requires a lot of steps. If you want to figure out for yourself, the paragraphs above should give you a good idea of how to solve it. Otherwise, just enter the pattern below. It works even if you don’t have all the pages, so if’s not working for you, you’re making a mistake somewhere. Take your time, this one is very easy to screw up.
⬆️ ⬅️ ⬇️ ⬅️ ⬆️ ⬅️ ⬇️ ⬅️ ⬆️ ➡️ ⬆️ ➡️ ⬆️ ⬅️ ⬆️ ➡️ ⬇️ ➡️ ⬆️ ⬅️ ⬆️ ⬅️ ⬆️ ➡️ ⬆️ ⬅️ ⬇️ ⬅️ ⬆️ ➡️ ⬆️ ⬆️ ⬅️ ⬆️ ➡️ ⬇️ ➡️ ⬇️ ➡️ ⬆️ ➡️ ⬇️ ⬅️ ⬇️ ➡️ ⬆️ ➡️ ➡️ ⬇️ ➡️ ⬆️ ➡️ ⬇️ ➡️ ⬆️ ➡️ ➡️ ⬇️ ⬅️ ⬇️ ⬅️ ⬇️ ➡️ ⬇️ ➡️ ⬇️ ⬅️ ⬅️ ⬇️ ➡️ ⬇️ ⬅️ ⬇️ ➡️ ⬆️ ➡️ ⬇️ ➡️ ⬆️ ➡️ ➡️ ⬇️ ⬇️ ⬅️ ⬆️ ➡️ ⬆️ ⬅️ ⬇️ ⬅️ ⬆️ ⬅️ ⬆️ ⬅️ ⬆️ ➡️ ➡️ ⬆️ ⬅️ ⬆️
(UP, LEFT, DOWN, LEFT, UP, LEFT, DOWN, LEFT, UP, RIGHT, UP, RIGHT, UP, LEFT, UP, RIGHT, DOWN, RIGHT, UP, LEFT, UP, LEFT, UP, RIGHT, UP, LEFT, DOWN, LEFT, UP, RIGHT, UP, UP, LEFT, UP, RIGHT, DOWN, RIGHT, DOWN, RIGHT, UP, RIGHT, DOWN, LEFT, DOWN, RIGHT, UP, RIGHT, RIGHT, DOWN, RIGHT, UP, RIGHT, DOWN, RIGHT, UP, RIGHT, RIGHT, DOWN, LEFT, DOWN, LEFT, DOWN, RIGHT, DOWN, RIGHT, DOWN, LEFT, LEFT, DOWN, RIGHT, DOWN, LEFT, DOWN, RIGHT, UP, RIGHT, DOWN, RIGHT, UP, RIGHT, RIGHT, DOWN, DOWN, LEFT, UP, RIGHT, UP, LEFT, DOWN, LEFT, UP, LEFT, UP, LEFT, UP, RIGHT, RIGHT, UP, LEFT, UP)
You did it!
With the door open, go up the stairs to the top of the mountain and grab the first page of the manual.
With the cover and page 1 in your hands, go back down and exit the mountain through its back path (C).
TUNIC fairy #10
Once you reach the bottom of the staircase after leaving through the back of the mountain, you’ll come across an area with several bush-like plants and a miniature pine tree.
This is one of the HOLY CROSS patterns, starting from the pine tree miniature.
Final sequence is: ⬆️ ➡️ ⬇️ ⬅️ ⬆️ ➡️ ⬆️ ⬅️ ⬇️ ⬅️ ⬆️ ➡️ ➡️ ⬇️
(UP, RIGHT, DOWN, LEFT, UP, RIGHT, UP, LEFT, DOWN, LEFT, UP, RIGHT, RIGHT, DOWN)
The Quarry and the rifle
You’ve finally reached the quarry. This backdoor allows you to quickly reach the rifle.
Make your way down to the quarry. You’ll know you’re there as the place looks dark and purple, like it’s nighttime. Since we do not have the gasmask, being close to the crystals will reduce our max health constantly until it reaches 1. Normally that would mean that anything would one shot us, but since we have infinite health, there’s nothing to worry about.
Go down to the area with the second big crystal. Hug the top wall and go left. There’s a secret passage to a plateau with three snipers. Get rid of them with your wand. The rifle is in a chest on a suspended area beyond the plateau.
ACHIEVEMENT UNLOCKED:
Bring it to the wrong fight
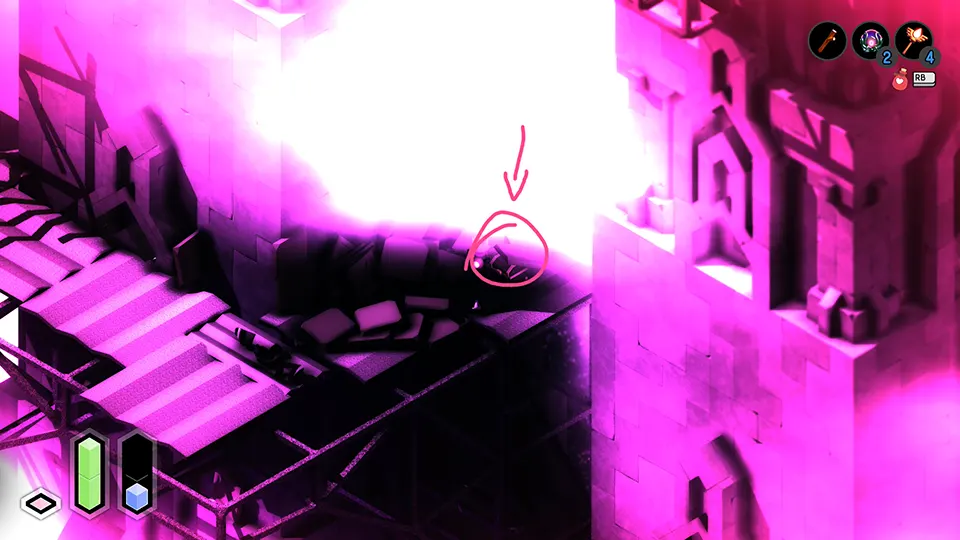
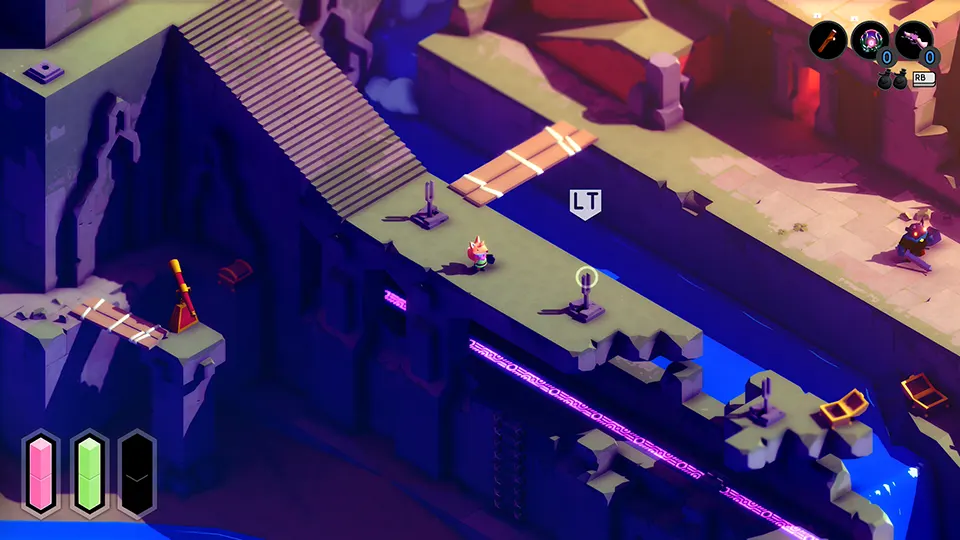
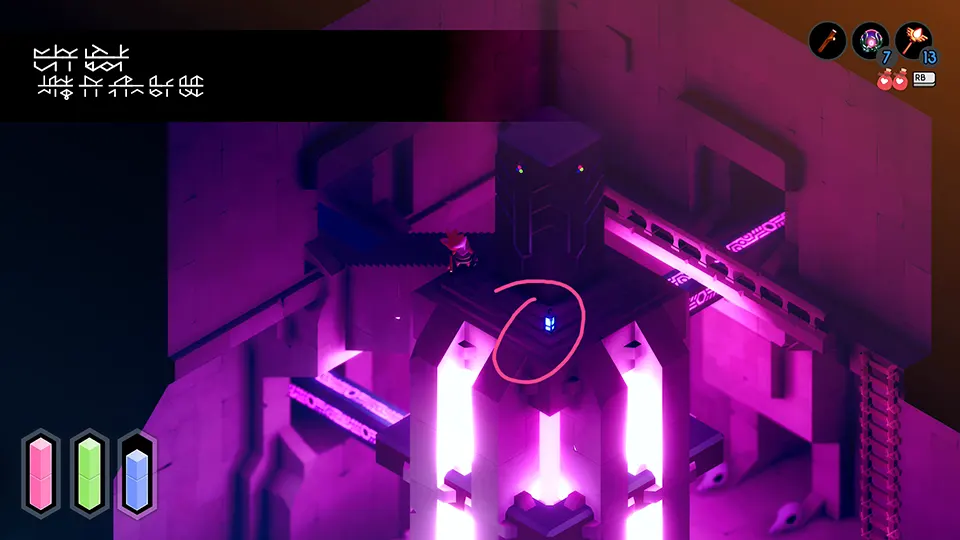
With rifle in hands, go back up the mountain up to the part you’re not affected by the crystals anymore. We’re going to make a small detour to get a coin and open the door to the underground.
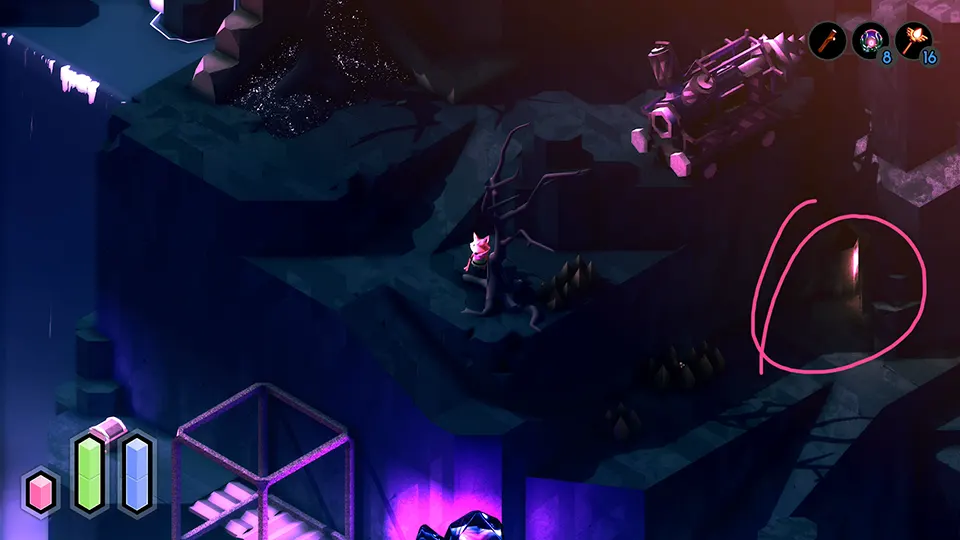
You’ll come out of a secret doorway hidden from plain view on the other side of the quarry (circle in the image below). First we’ll go down (A) to open the door to the underground. Then we’ll come back and follow the (B) path that will lead us a coin.
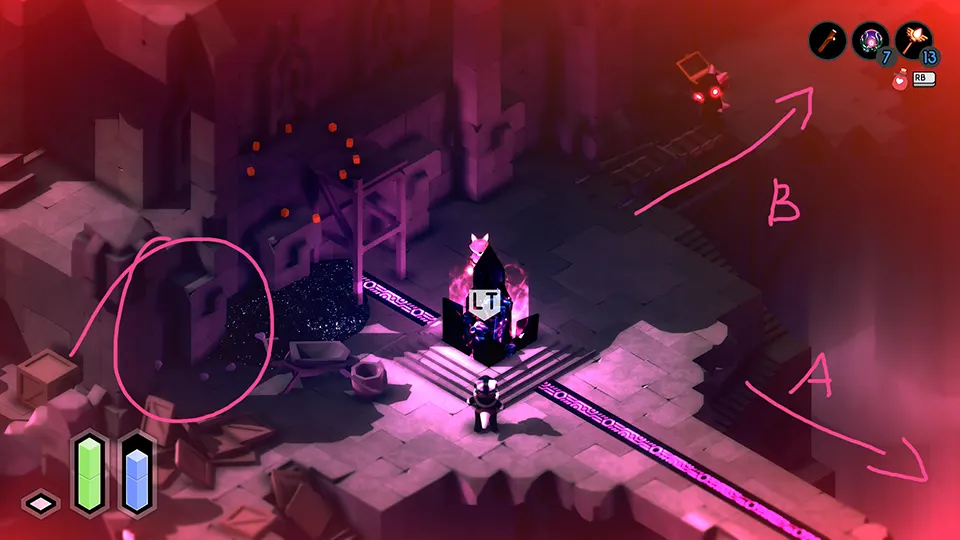
Go back all the way to the next loading zone following down path (A). You have to activate an obelisk there to bring power to this side of the map.
With the other obelisk activated, you can then activate the obelisk in the image above. When you do so, the door in the background will open. We’ll need that for later.
TUNIC Well done! Achievement – Coin #3
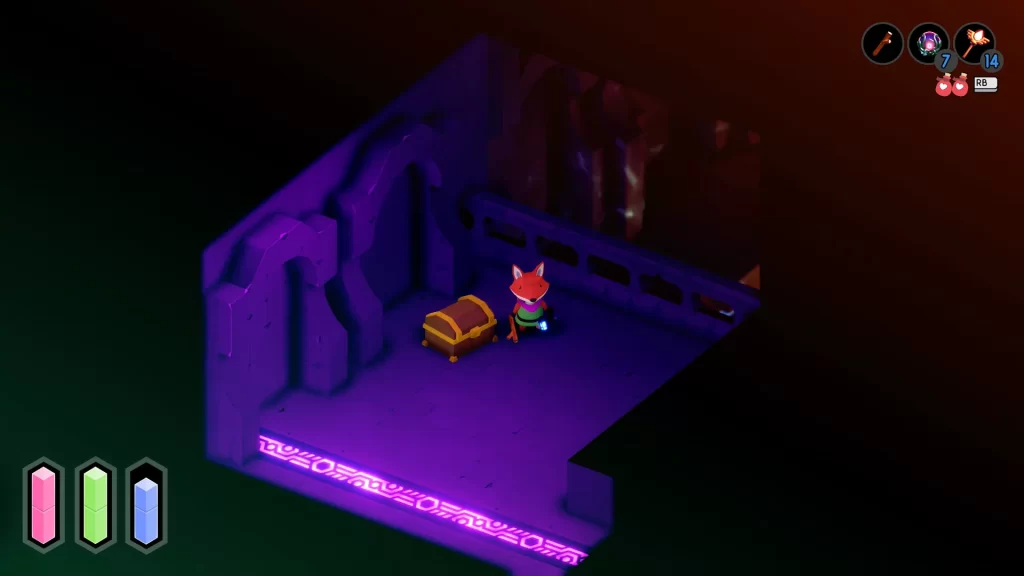
Make your way back to the building you came out of the shortcut from and follow up the (B) path. Right after the bridge there’s another strength upgrade in a chest, don’t forget to grab it!
Climb all the way to the top of building. Once there, don’t go into the door (unless you want the gasmask in order to remove the visual effects of the contaminated area – it’s in a chest in the back of the cave, this place is known as “the monastery”), but rather go up the ladder in front of the altar. It will lead to a chest containing your first coin.
Making your way to the underground
Since we’re already here, we’re going to the underground. We’re not fighting the boss yet because we don’t have our sword, but we might as well activate the teleporter for later. This area also has very few items of interest, so we might as well get it done and over with.
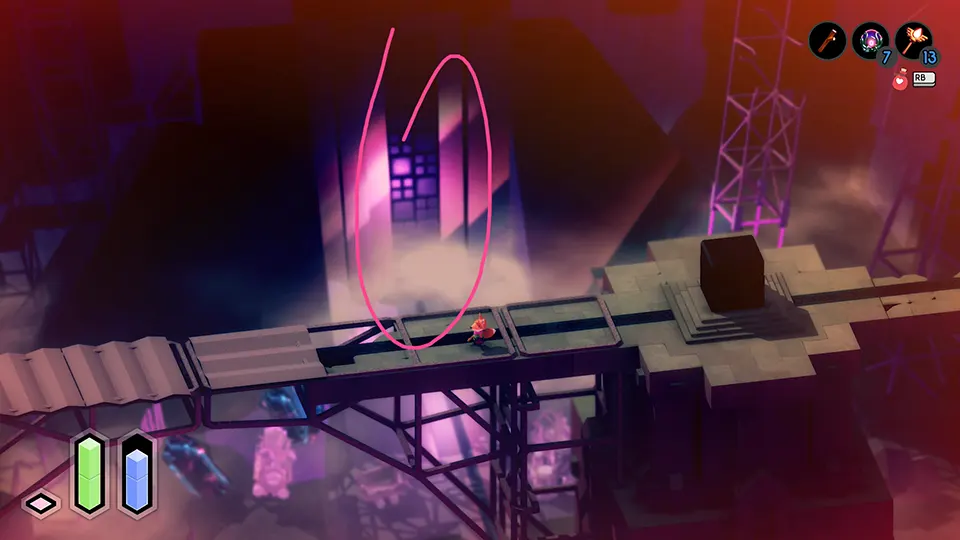
Return to the backside of the quarry, where you got your rifle. Instead of going the secret path where the rifle was, keep going down until you find some scaffolding with some tracks / rails.
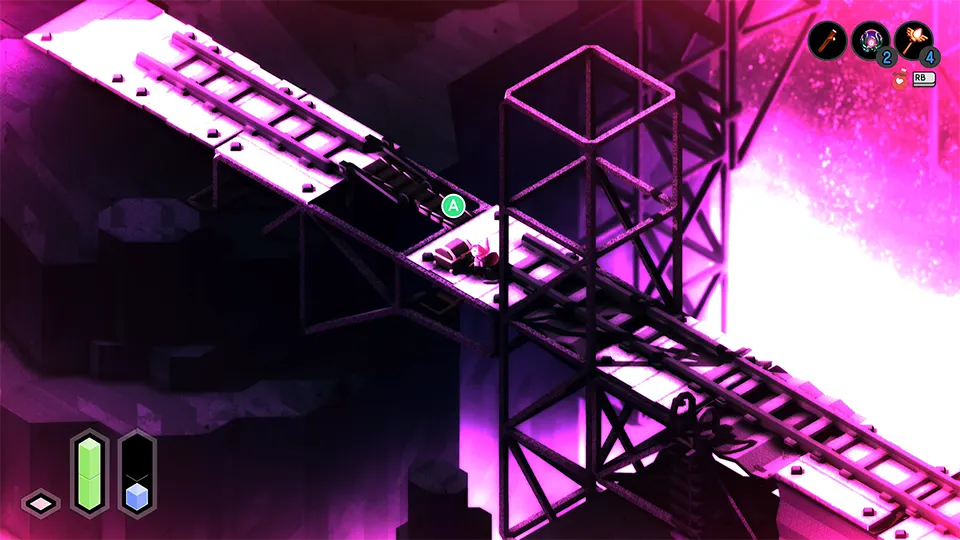
TUNIC Effigy “Too Cute to Smash” #3
From the scaffolding area, go right (while still on the mountain path) towards some more scaffolding in the back. You’ll find some wooden boxes with two jars in front of them. Use your rifle or magic wand to get ride of them (they’re explosive), and behind them you’ll find your 3rd effigy!
Making your way to the underground – continued
Go back to the main area with the scaffolding. Lower the bridge and make your way across. Go down the first ladder. There’s going to be another ladder. This one is broken, so you won’t be able to make your way back up once you go down.
Follow the way and the rails to the entrance of the underground. Go inside and stand in the elevator.
THE UNDERGROUND – “Inside the Ziggurat”
This area is very straightforward. There’s only one way forward with no way to stray. In this area, your altars are replaced by a more technological contraption, but it works the same way.
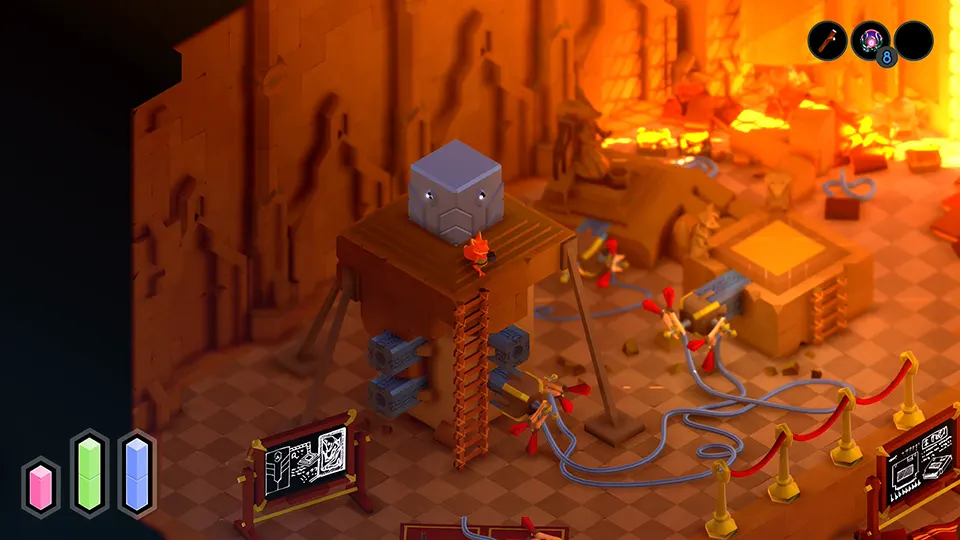
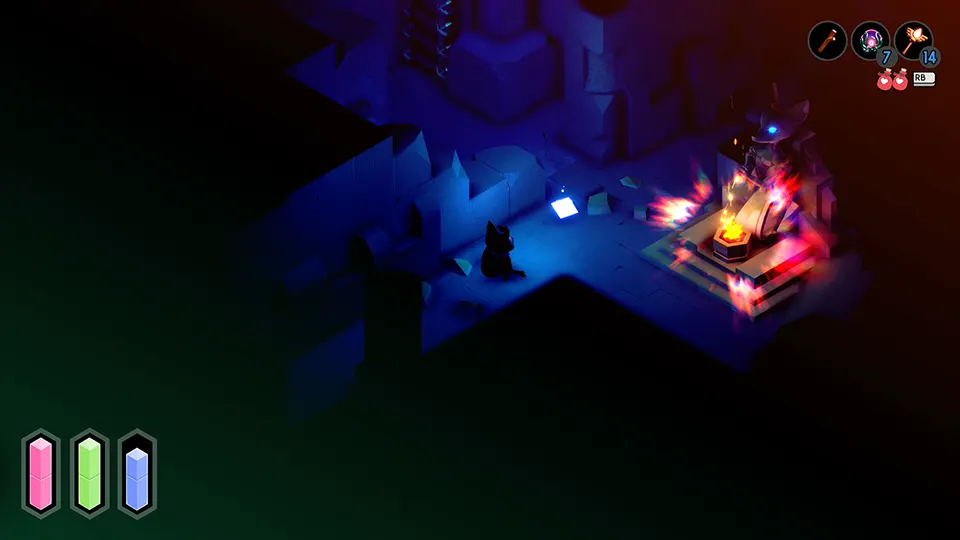
Follow the main path until you come across this miniboss that looks like an obelisk. You need to defeat it in order to activate the ladder to proceed further into the dungeon (A). There are two stages to this fight. We suggest you save your rifle for the second stage of the fight.
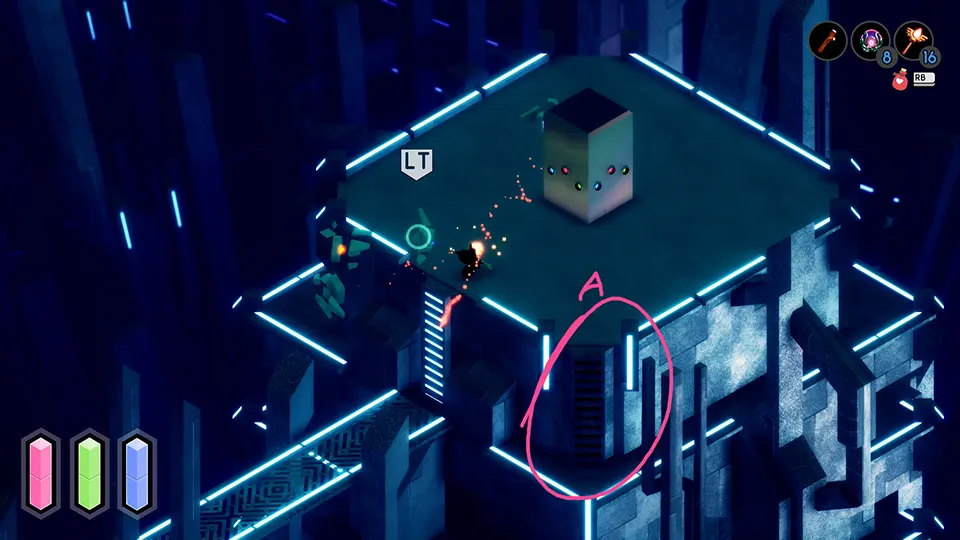
Go down the tower. You have to go up first to find the ladders that will bring you further down. Go into the tall door deeper into the Ziggurat. Once there, make your way down to yet another elevator that will bring you to the depths of the place.
In this area, we suggest you run past most of the enemies. They are really annoying to deal with and their attacks reduce your max HP. However, somewhere along the way you’ll come across a chest with a freezing potion, which we’ll need for the achievement “Whoops.” You can try to grab it here, but I’d suggest we do it so later, in a much easier spot that will be way less aggravating to do.
A small roadblock
You’ll eventually come to a platform with two of the obelisk-looking enemy. In order to activate the actual obelisk, you’ll have to defeat them first.
Keep to the “top” of the battlefield, otherwise two of those purple ethereal monsters will crawl out of the pink goo from the south of the platform, making the fight even more difficult, especially since they multiply once defeated. Once the enemies are dealt with, activate the actual obelisk.
Keep going south until you reach a long ladder down. Then go right until you find the last altar before the boss. There’s an obelisk hiding behind it. Activate it and go through to the door behind it to find a teleporter. Go into the teleporter and return to the Town Ruins (middle teleporter on the right in the central area of the hub).
The quest for a magic dagger
We’re still not going to go get our sword. In order to reach a secret area in the zone where you originally get the sword, you also need to have the magic dagger. So we’re going to get it first. It’s more convenient this way. Since all the teleporters are close to the boss areas, it’s easier to just leave the bosses for later.
From the Town Ruins, go up the ladder. Since we’re going west now, we’re also going to mop up all the secrets and items around this area, starting with a secret treasure.
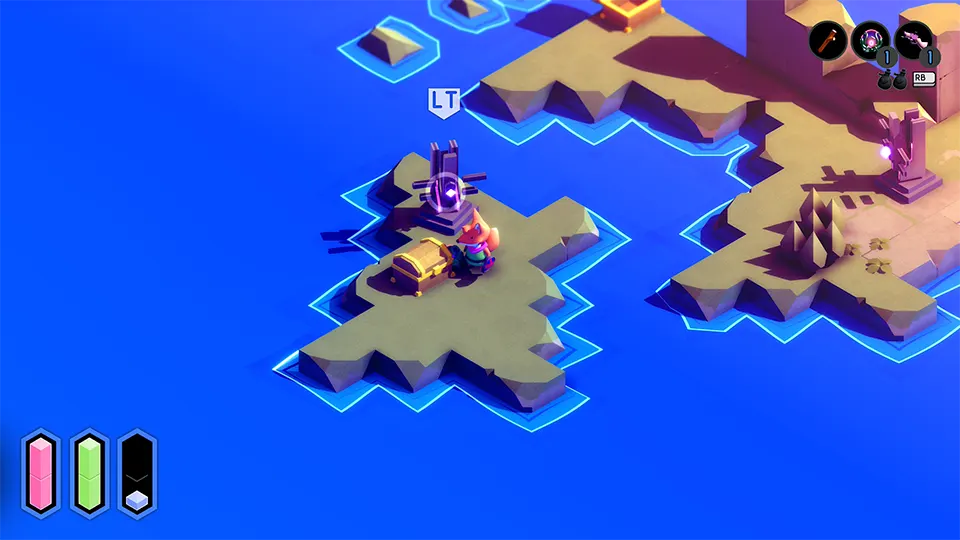
TUNIC Secret Treasure #3 – Sacred Geometry
Stand in front of the windmill. Each of the panels have a little indent in them. those indents indicate with of the 4 directions you should press on your HOLY CROSS. It begins with the outermost one – (A) in the picture below. You can see the frame has an extending extremity, as well as a white mark on it. There’s a white rope indicating where the pattern turns to the innermost panels (B).
The correct pattern is: ⬇️ ⬅️ ⬅️ ⬆️ ⬆️ ➡️ ➡️ ⬅️ ⬇️ ➡️ ⬆️ ⬇️
(DOWN, LEFT, LEFT, UP, UP, RIGHT, RIGHT, LEFT, DOWN, RIGHT, UP, DOWN)
ACHIEVEMENT UNLOCKED:
Sacred Geometry
TUNIC Coin #4 – “Well done!”
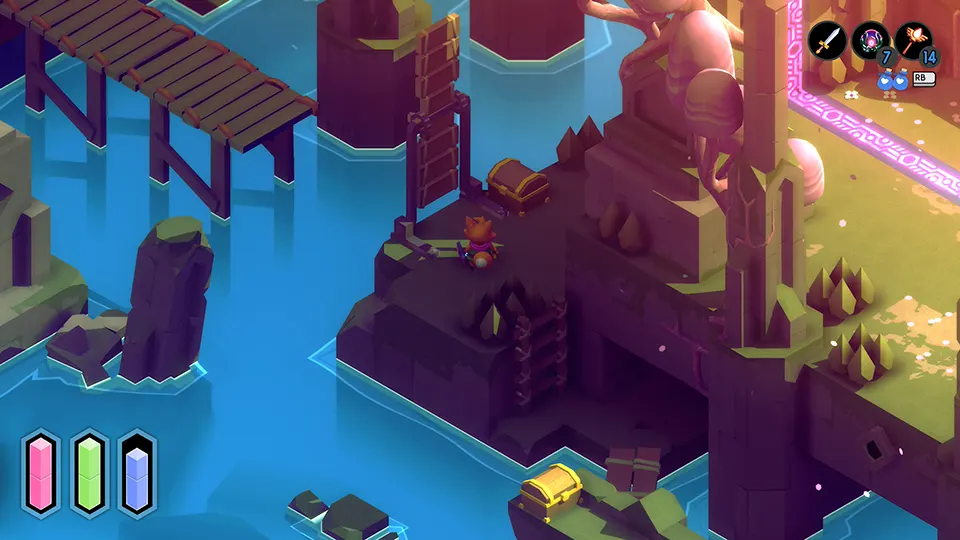
Hug the right wall of the windmill. There’s a secret path that will lead you down to the beach. You’ll go under the area you just were, into a tower with an obelisk you can’t reach yet, and then out on an area to the side of the Town Ruins. It is here that you’ll find a ladder that grants you access to the beach.
Right in front of said ladder, you’ll find a tuning fork. Keep going to the left. You’ll find a turret and a chest. On an isolated part of the bridge, you’ll find another turret and another chest. It’s in this chest that you’ll find your 3rd coin. Use your magic orb to vault over the gap, latching to the turret on the island when it comes out to target you.
TUNIC Fairy #11
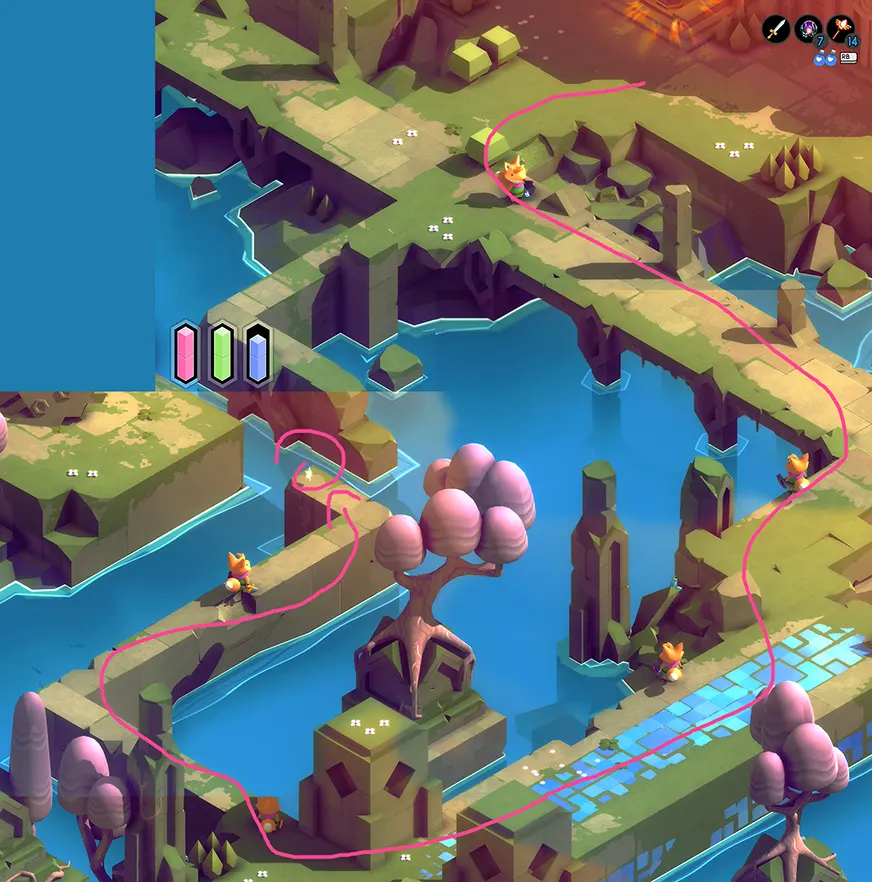
In order to find our way to the West Gardens, our next location, we need to go back to the windmill area. Instead of backtracking, however, use your magic orb to pull yourself to the top of the wall / bridge.
This one is quite a stretch. Go up the staircase and stare at the wall. Starting at the clump of three little seedlings, follow the moss pattern on the wall all the way to the other side of it. Inputting this correctly will net you yet another fairy.
Complete sequence: ⬆️ ➡️ ⬆️ ⬅️ ⬇️ ⬅️ ⬆️ ⬅️ ⬆️ ➡️ ⬇️ ➡️ ⬇️ ➡️ ⬆️ ⬅️ ⬆️ ➡️ ⬇️ ➡️ ⬇️
(UP, RIGHT, UP, LEFT, DOWN, LEFT, UP, LEFT, UP, RIGHT, DOWN, RIGHT, DOWN, RIGHT, UP, LEFT, UP, RIGHT, DOWN, RIGHT, DOWN)
Making our way to the West Gardens
Go back to the windmill area. You can go down the staircase and over the wooden plank shown in the image above to find yourself back in the Town Ruins area.
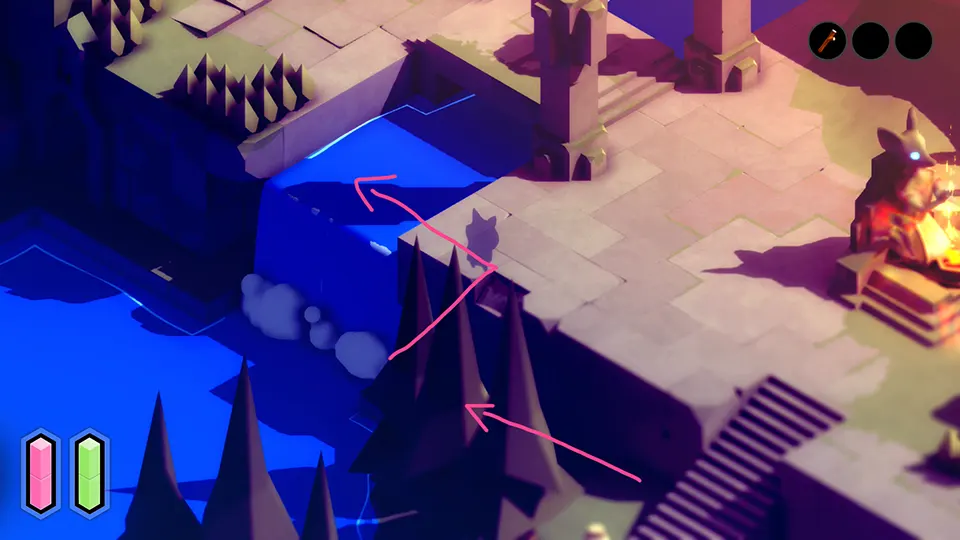
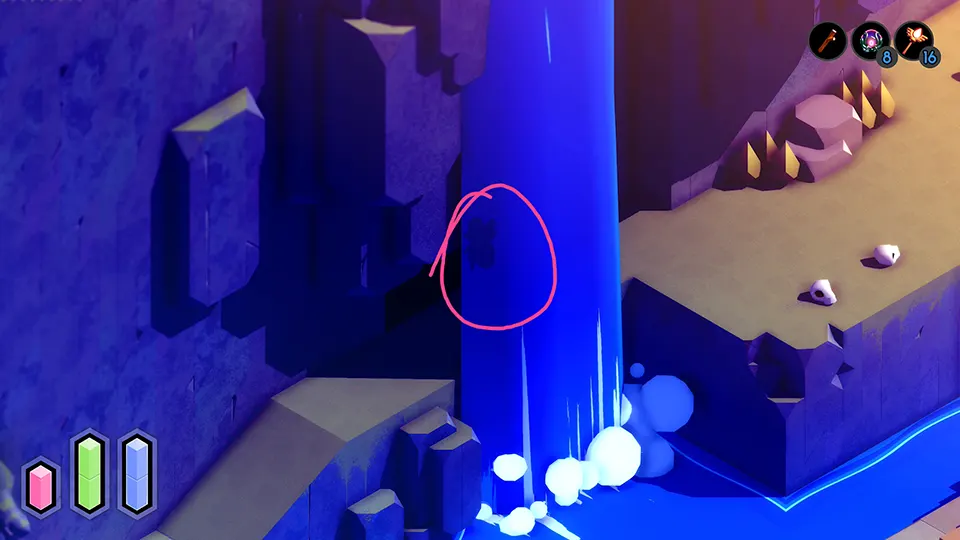
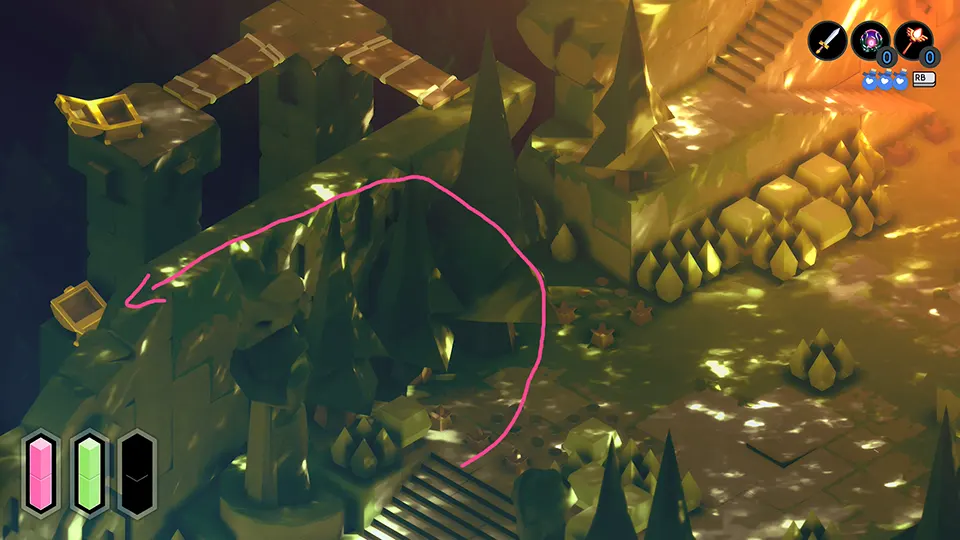
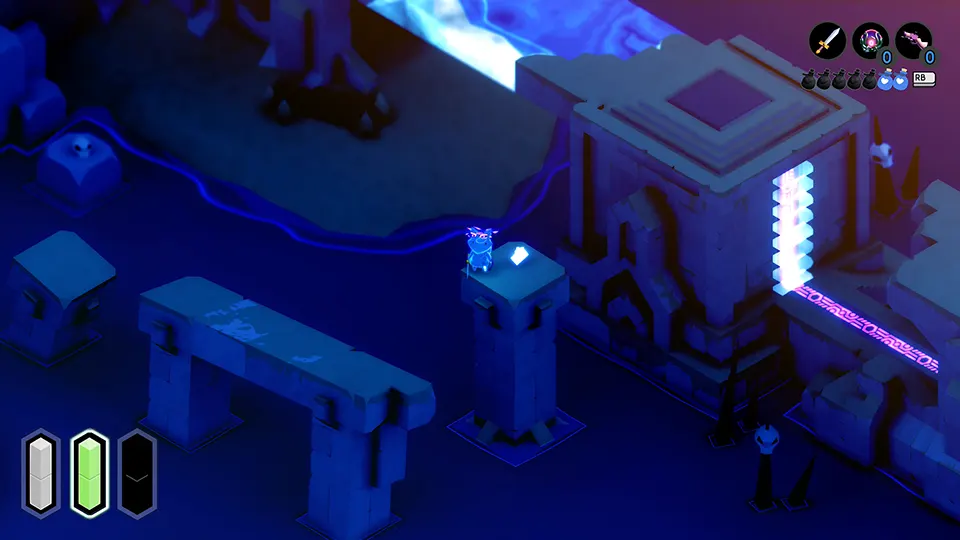
From there, use the bridge on the right side of the windmill, towards the north, the one we lowered at the beginning of this guide. This time we’re going down the ladder into the hole in the middle of the water.
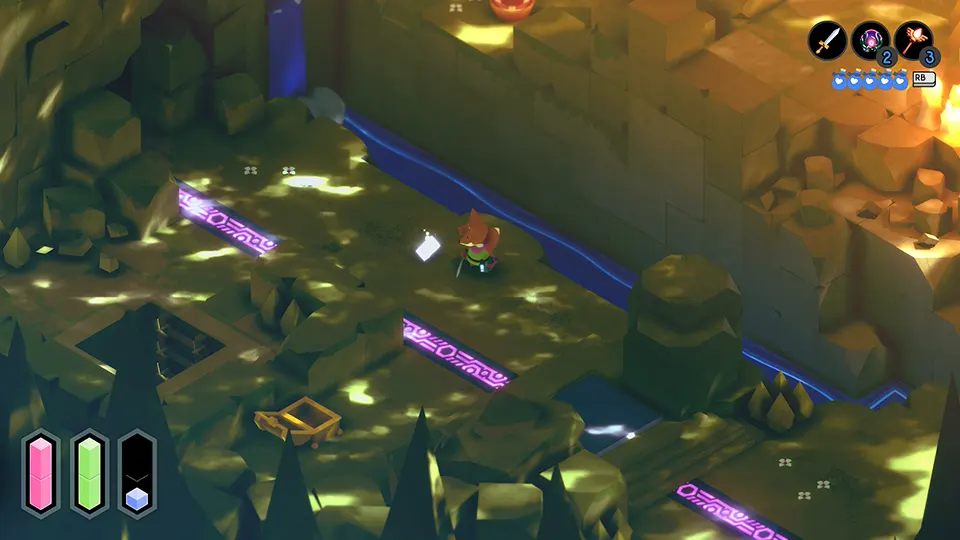
Go down the two ladders and up to the next room in the north. We recommend the magic wand to deal with the blob-looking monsters, the Slorm. You can stun them by blocking, but shooting them from far away with the wand is much easier – at this point in my game they go down with a single shot of the wand.
Go past the altar room. You’ll find a new page in the next area.
TUNIC Manual page 34 and page 35
The page is just standing there in the open. Grab it and go right, crossing over the bridge. Shooting the Slorm from there will make it explode just as the soldier is walking past it, getting rid of both enemies at the same time!
In the next area, cross the water, walk around the turret and lower the bridge. Go up towards the hallway.
TUNIC Effigy “Too Cute to Smash” #4
In the hallway, there’s a secret passage right in front of you.
Take it and walk around the debris to find your 4th effigy of TUNIC!
Make your way back to the room where you found a page by going down this hall and around the next room, making your way out on the other side of the room with the page. Lower the bridge and go back down to the next doorway next to the waterfall.
TUNIC Well done! Achievement – Coin #5
This one took me quite a while to figure out. When you’re in the altar room at the beginning of this area, you can see a chest up on a ledge above. However, there’s no clear way of accessing it.
The way to that chest is through this room next to the waterfall. Go up the ladder, defeat the flying skulls and stand in between these two pillars. If you look closely, there’s a pattern that resembles a button on the wall. Go to it and press A🎮. A secret passage will be revealed.
This one was tricky because there’s no prompt for you to interact or press any buttons when there. It was sheer luck as I thought the two pillars on both sides sort of looked like a doorway. Quite proud of this one, I am! 😺
Grabbing the lantern
Go all the way down and follow the railing south until you reach an obelisk. Walk around it to grab the lantern, which will be needed for the next area we’re going to.
Activate the obelisk and make your way back. Now with the lantern you’ll be able to see a passageway to another area to the east that was in complete darkness before. Unfortunately even if you knew about it, the game does not let you go that way unless you have the lantern with you.
TUNIC Well done! Achievement – Coin #6
Don’t go into the doorway that was revealed by the lantern. Instead, follow the railing back to the previous room where you found the secret door. Now that the obelisk has been powered, another secret passage has been revealed. Just follow the railing all the way to the next room. There will be a lone chest there with your 5th coin.
TUNIC Achievement – Whoops
Just outside this secret room with the coin there’s a chest surrounded by those flying skull enemies. Inside of the chest, there’s a freezing bomb! Grab and equip it, then throw it (preferably against a wall) and stand in its explosion range to freeze yourself and get the achievement!
ACHIEVEMENT UNLOCKED:
Whoops
Return to the area now revealed by the lantern down the hallway. Go into the newly revealed doorway. There will be 3 enemies there. Defeat them and open the gate to a new area.
TUNIC Manual page 30 and page 31
The page is just standing in your way there. Grab it and head up the ladder.
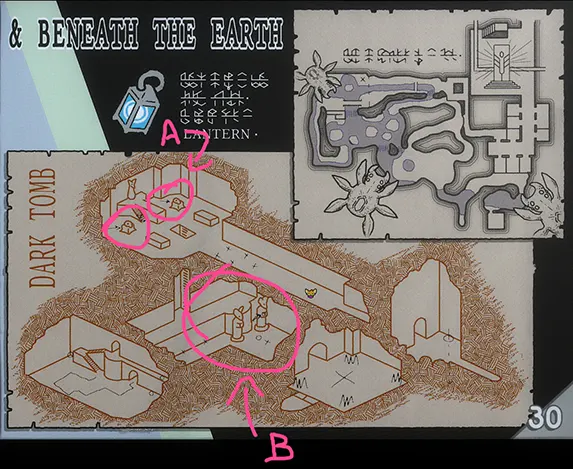
Navigate the area “Dark Tomb” according to the notes on the manual, page 30, the one you just collected. In the first area, you have to activate two skulls, one on the left and one on the right. Inspecting the page will give you the exact location of said skulls. For your convenience, I have also highlighted them on the image below, the marker (A). The rest of the area is pretty straightforward, and since most of it is shrouded in darkness, screenshots wouldn’t be very helpful either way.
TUNIC Well done! Achievement – Coin #7
In the area of the tomb with the two tall statues – (B) in the image below – go behind the one on the right, and push up against the corner. There’s a hidden passageway. It’s completely dark, but if you stop you’ll see the prompt for A🎮 pop up.
TUNIC Effigy “Too Cute to Smash” #5
In the next room, there will be several “laser-sight statues” and a chest in the middle. Open that chest to find your 6th effigy!
West Garden
Activate the lever in the room to open a door out. Make your way out through the obelisk area and down to the west garden.
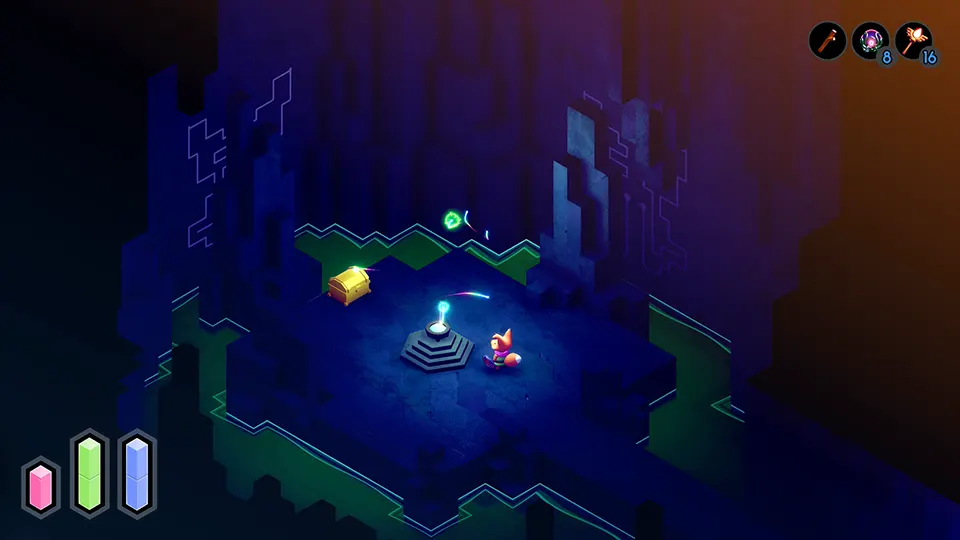
Keep navigating it until you reach the “main area” where the altar is located. You’ll also find a door with a pattern here. Open it up and you’ll find a sword! It’s not the originally expected place for you to get one, but it’s one of the two places you can get it. Now we can get crackin’!
The sequence for your HOLY CROSS should be very obvious, but for sake of thoroughness, here’s the sequence: ⬇️ ⬅️ ⬆️ ➡️ ⬆️ ⬅️
(DOWN, LEFT, UP, RIGHT, UP, LEFT)
ACHIEVEMENT UNLOCKED:
A Sword!
TUNIC Achievement – It uses stamina
Now in possession of a sword, you can perform special techniques! While moving, press Dash + Sword (A + the button the sword’s equipped on) to perform a special technique.
ACHIEVEMENT UNLOCKED:
It uses stamina
TUNIC Manual page 26 and page 27
From the main area, follow this path to reach the lone booklet page floating on the edge of a wall:
Finding the bridge back to the main area
Make your way around the bridges and islands until you reach the bridge that gives access back to the main area. Lower it.
TUNIC Effigy “Too Cute to Smash” #6
From the area shown in the previous picture, go down the ladder and under the stone area. Make your way across it to a small ruin with a chest. There’ll you find your next effigy!
Path to the magic dagger
Keep following the other walkways until you reach the upper area of the West Garden. If you check the manual page you just collected (pages 26 and 27), you’ll see it points to the exact location where the magic dagger is. You can’t miss it. It will be in a cave, just standing on a display area, begging for you to take it. Do it.
Using the magic dagger in conjunction with the wand makes you shoot ice instead of fire. This will freeze enemies. If you use your magic orb on them, instead of pulling them towards you, you’ll drag yourself to their position! This allows for some quick traversal of terrain, and it is essencial to get a secret treasure later on in the East Forest.
TUNIC Fairy #12
Make your way out and back to the upper area, going north towards the boss arena. Before climbing the ladder, notice the floor on the huge open platform; there’s blue tiles spelling out a pattern!
The pattern is: ⬆️ ⬅️ ⬆️ ➡️ ⬆️ ⬅️ ⬆️ ➡️ ⬆️ ⬅️ ⬇️ ⬅️ ⬆️ ➡️ ⬇️ ➡️ ⬆️ ⬅️ ⬆️ ➡️ ⬆️ ⬅️ ⬆️ ➡️ ⬆️
(UP, LEFT, UP, RIGHT, UP, LEFT, UP RIGHT, UP, LEFT, DOWN, LEFT, UP, RIGHT, DOWN, RIGHT, UP, LEFT, UP, RIGHT, UP, LEFT, UP, RIGHT, UP)
Defeating the West Garden boss
Right next to the ladder climbing up to the boss arena there’s a chest with a strength upgrade in it. Don’t forget to grab it!
Defeat the boss with your newly found sword and accumulated power. Then make your way right back to the overworld. You’ll find a chest with a whopping 200 money units in your way!
Go up the tower and hit the bell. Make your way back to the windmill and lower the bridge that allow you easy access to the West Garden.
ACHIEVEMENT UNLOCKED:
Dong
Finding the keys – the red key
Now we’re going back to the beginning area, completing it and going for the red key. From here on out, the game will be pretty linear according to the expected progression. Let’s go!
TUNIC Achievement: Lawnmower
The overworld has tons of grass to cut down. I suggest you swipe any grass you come across until you get the achievement; you’ll need to cut down 1000 blades of grass. It’s really hard to pinpoint when it will unlock. During my playthrough I unlocked it right before the boss in the East Forest Temple.
ACHIEVEMENT UNLOCKED:
Lawnmower
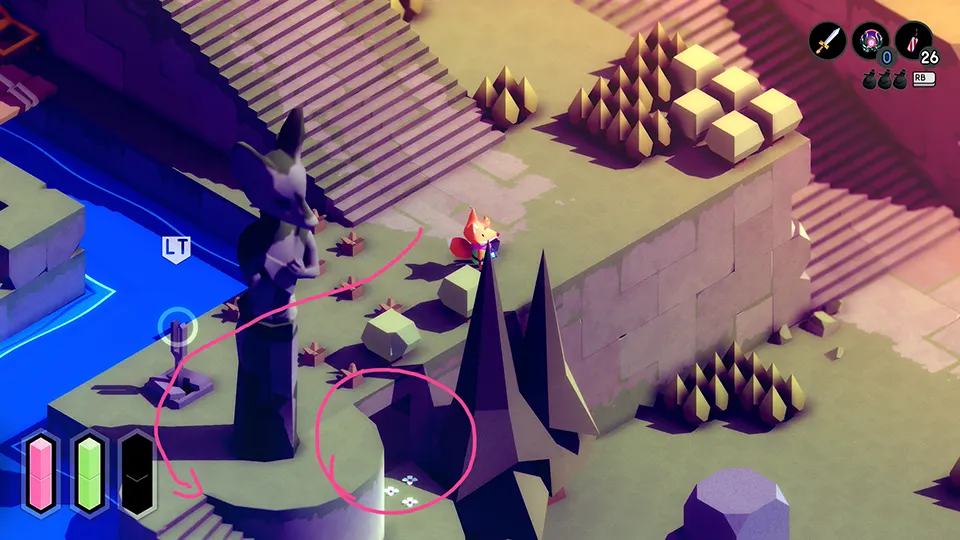
TUNIC Fairy #13
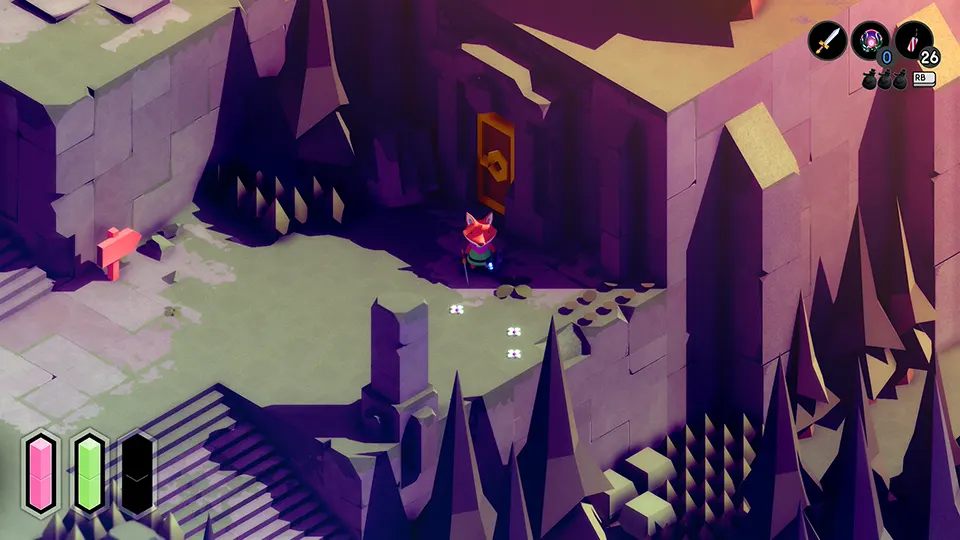
Go back up to the first altar you’ve ever seen. Go down the stairs until you come across a giant fox statue in front of a tuning fork. Have you noticed that the spiral staircase there leads to a wall? Isn’t that suspicious?
As if that wasn’t enough, if you notice on the floor, there are 3 flowers, which indicate that this wall can be blow to smithereens. So let’s do just that! Once destroyed, it will reveal a door to a secret place…
Once inside, you’ll find a floating golden cube. By this point, you know that the way the cube moves basically spells out the inputs you need to use with your HOLY CROSS.
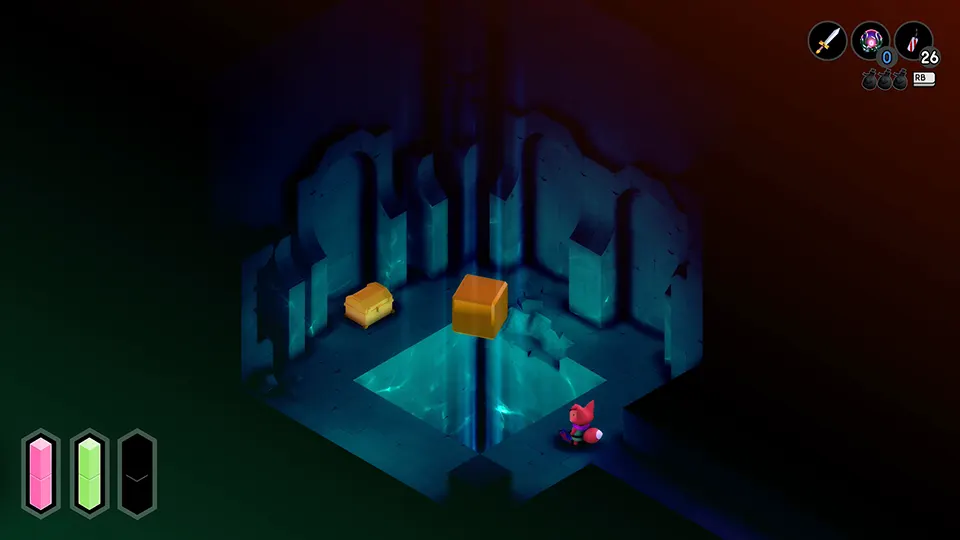
For your convenience, the final sequence is: ➡️x4 ⬆️x4 ➡️x3 ⬆️x3 ➡️x2 ⬆️x2 ➡️ ⬆️
(RIGHT 4 times, UP 4 times, RIGHT 3 times, UP 3 times, RIGHT 2 times, UP 2 times, RIGHT, UP)
TUNIC Manual page 10 and page 11
Return to the first locked door of the game. It’s next to the opening area. Open the door and go inside.
The page will just the floating there without a care in the world. Collect it!
TUNIC Secret Treasure #1 – Mr Mayor
See anything suspicious in this area? You guessed it! The pattern on the wall is yet another one for your HOLY CROSS. Get pressin’!
The full pattern is: ➡️ ⬆️ ⬅️ ⬆️ ➡️ ⬇️ ➡️ ⬆️ ⬅️ ⬇️ ⬅️ ⬆️ ➡️ ⬆️ ⬅️ ⬇️
(RIGHT, UP, LEFT, UP, RIGHT, DOWN, RIGHT, UP, LEFT, DOWN, LEFT, UP, RIGHT, UP, LEFT, DOWN)
ACHIEVEMENT UNLOCKED:
Mr Mayor
Small Detour
Make your way outside and go down the ladder. You’ll see a HOLY CROSS door there.
To unlock it, use the sequence ⬇️ ⬅️ ⬆️ ➡️ ⬆️ ⬅️
(DOWN, LEFT, UP , RIGHT, UP, LEFT)
Inside you’ll find 3 chests containing mana berry, a fiery sword card and money (50).
There’s also a ladder that is initially inaccessible due to the bushes. Destroy them and go down the ladder. You’ll find a chest by the pillar on the beach (48 money units) and a tunnel under the bridge. Go in the tunnel to grab yourself a fairy.
TUNIC Fairy #14
There’s a moving pattern being projected on the wall. That’s the sequence you should input in your HOLY CROSS.
Full sequence: ➡️ ⬆️ ⬅️ ⬆️ ➡️ ⬇️ ➡️ ⬆️ ➡️ ⬇️ ⬅️ ⬇️ ➡️
(RIGHT, UP, LEFT, UP, RIGHT, DOWN, RIGHT, UP, RIGHT, DOWN, LEFT, DOWN, RIGHT)
East Forest Bound
Go back to where you left the cave; the one with a small elevated area and an empty chest on it. This time go up the ladder.
TUNIC Effigy “Too Cute to Smash” #7
Once you’re in the area with the small waterfall, walk towards the trees. There’s a secret path among them that will lead you to a chest containing your next effigy!
TUNIC Fairy #15
We’re on a roll! Go back and climb the ladder in the waterfall area, and you’ll find yourself in an area with a weathervane sort of thing. Upon inspecting it, you get a lot of gibberish!
However, if you compare this gibberish to the compass looking thing on page 34 of the manual, you realize it’s actually spelling a pattern. Time to get pressin’!
The full sequence is: ⬅️ ➡️ ⬇️ ⬆️ ⬆️ ⬇️ ➡️ ⬅️ ⬆️ ➡️ ⬇️ ⬅️ ⬆️ ⬇️ ➡️ ⬅️
(LEFT, RIGHT, DOWN, UP, UP, DOWN, RIGHT, LEFT, UP, RIGHT, DOWN, LEFT, UP, DOWN, RIGHT, LEFT)
TUNIC Manual page 28 and page 29
That’s another piece of paper just floating there in the open. Originally you wouldn’t be able to get it since you need a sword to cut down the bushes, but since we already got one in the West Garden, we can go straight to it and nab it now.
For convenience, also make your way up to the path on the left. There’s a lever there that reveals a ladder to this area from the other side. It will be a useful shortcut later on.
TUNIC Manual page 12 and page 13
Go right into the East Belltower following the wooden sign. There will be a few slimes there, and right past them there’s another page just waiting to be grabbed (A). Keep in mind there’s a secret passage (B) we’ll make use of once we’re all the way back here after completing the East Forest.
Exit the area through the lower right, there’s a corridor next to the staircase to the right.
East Forest
Go down the ladder and exit into the East Forest. Follow this secret path in order to find your way to the lower east forest without having to enter loading zones.

TUNIC Secret Treasure #6 – Regal Weasel
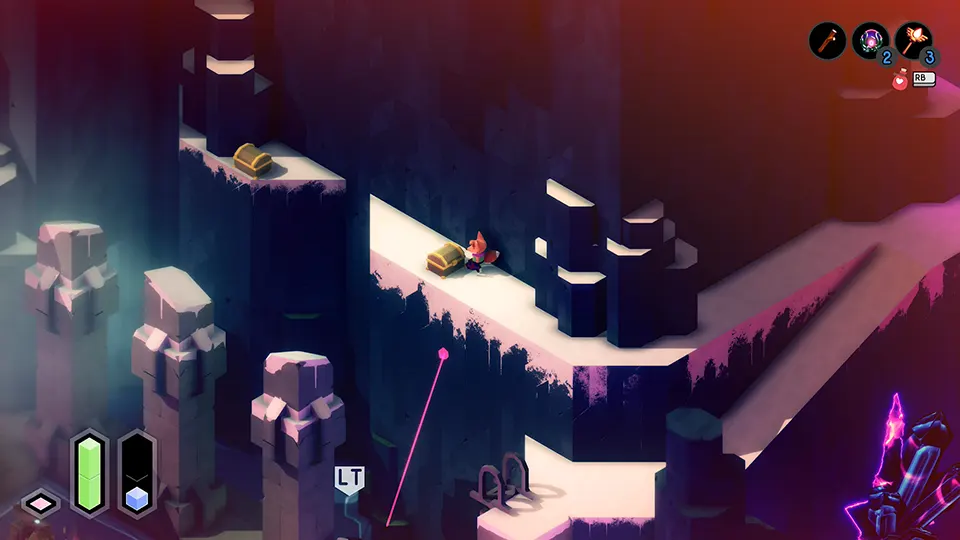
Go down the 3 ladders you find there. Go right and you’ll find a hook on the ground. There’s an elevated area with a single slime there.
Equip the magic dagger, the wand and the magic orb. Press LT🎮 to target the slime. Use the dagger and the wand at the same time to freeze the slime. Once frozen, use the magic orb to hook yourself to the slime (instead of the other way around). Behind the slime you’ll find your secret treasure number 6, Regal Weasel.
If you don’t have enough mana, there’s an altar in the upper area of the forest, really close by to the shortcut, to the right of the unopened chest you see in the image above.
ACHIEVEMENT UNLOCKED:
Regal Weasel
TUNIC Well done! Achievement – Coin #8
Go down to a small elevated area with some spiders. On the top area you’re currently are, there’s a chest with some explosives. However, on the lower level there’s another chest, and that one holds our next coin!
In order to reach it, find a somewhat hidden slope in the right side of this area:
TUNIC Fairy #16
Proceed to the right. There’s another central area of which 4 paths converge. Ignore the bottom one with the hooks now, as you’ll need an ability you’ll only get close to the end of the game. Instead, go all the way to the right, to the broken golden tablet.
All throughout the world you find pieces of this tablet. You have to put it together in your mind and trace the pattern to input in your HOLY CROSS.
The correct sequence is: ⬇️ ➡️ ⬇️ ⬅️ ⬆️ ⬅️ ⬇️ ⬅️ ⬆️ ➡️ ⬆️ ⬅️ ⬆️ ➡️ ⬆️ ➡️ ⬆️ ⬅️ ⬆️ ➡️ ⬇️ ➡️ ⬇️ ➡️ ⬇️ ⬅️ ⬇️ ➡️ ⬇️ ⬅️ ⬆️
(DOWN, RIGHT, DOWN, LEFT, UP, LEFT, DOWN, LEFT, UP, RIGHT, UP, LEFT, UP, RIGHT, UP, RIGHT, UP, LEFT, UP, RIGHT, DOWN, RIGHT, DOWN, RIGHT, DOWN, LEFT, DOWN, RIGHT, DOWN, LEFT, UP)
Remaining East Forest
From the converging paths, you can go up into the guardhouse. You can also use the shortcut again if you want to avoid a loading screen, as you’ll come out in the same place. There’s two chests in the guardhouse, but they’re both bombs, so you can skip them.
TUNIC Manual page 14 and page 15
Go back to the main area of the East Forest with the altar. From there, you can notice a teleporter, and yet another manual page just hovering by.
TUNIC Effigy “Too Cute to Smash” #8
Exit to the right, along the right side of the door with the two fox statues. There’s a side road there that would lead you to the sword originally.
In this new area, you’ll see a bunch of bushes and grass in front of a staircase. You would’ve had to make your way around if you didn’t have a sword already. Use your sword to whack the bushes and go up the stairs.
In the corner shown in the image above, cut down the bushes and go into a secret passage. You’ll find your 8th effigy in the area behind the wall.
Completing the East Forest
Go back to the area with the altar. Climb the ladder and make your way to the top. Activate the lever to open the gate and go inside.
Once inside, activate another lever, go down the ladder that was just revealed and back up in the ladder at the back to find yourself a bottle on the other side if you want. Otherwise, just press on forward.
In the next area you’ll have sort of a miniboss. Defeat it and activate the lever to open yet another gate.
Make your way up to the bell. Ring it and throw down the rope to find yourself back into the initial area of the East Forest.
ACHIEVEMENT UNLOCKED:
Ding
Go out through the secret passage (C) shown in the section for manual page 12 and 13 above.
The Forest Temple
You’ll find yourself in a back area with a chest and a ladder. The chest contains a potion upgrade. Grab it if you want. Otherwise, go up the ladder and make your way up. From there, you can hookshot yourself into the main area of the temple.
Activate the obelisk and follow the railing to the left. You’ll have to activate a second obelisk there.
TUNIC Manual page 6 and page 7
The pages 6 and 7 of the manual will be waiting for you on the other side of the obelisk. Grab it and head down the ladder – the hole in the wall will lead you to the shop.
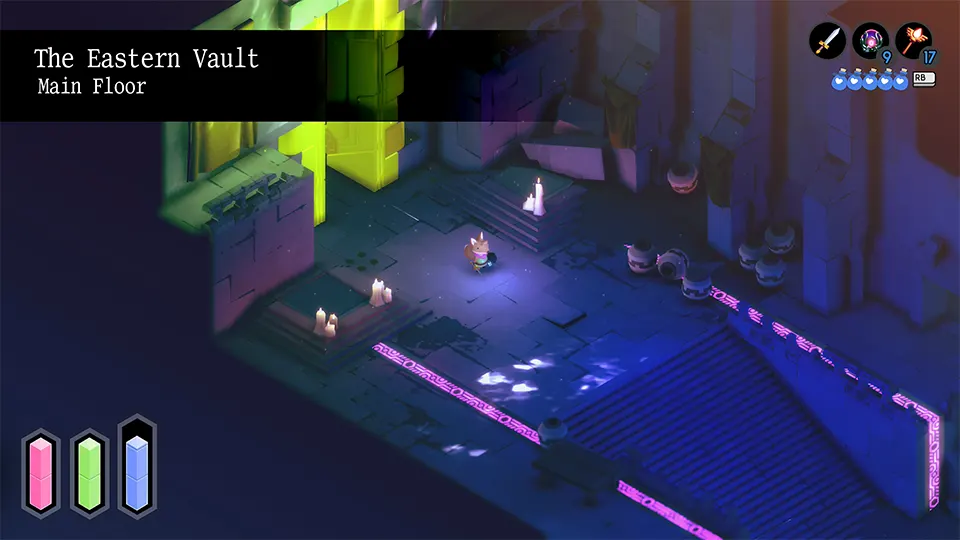
Beneath the Eastern Vault
This area should be very straightforward. There’s a hole in the north wall behind the crates at the bottom of the well. From there, the path is pretty linear. Just bear in mind that some passageways are on the south wall, so you need to pay attention for small details that would show an entrance if you find yourself stuck.
TUNIC Well done! Achievement – Coin #9
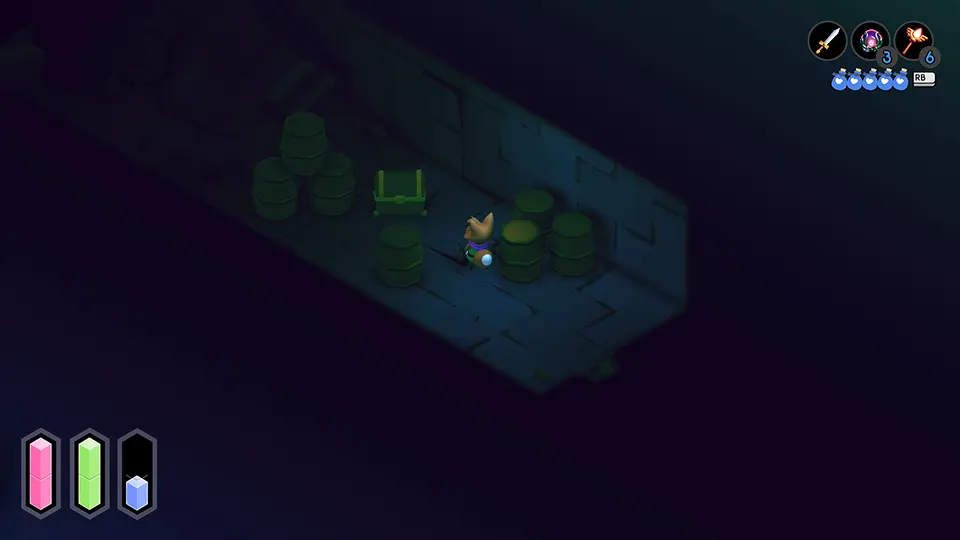
Past the prison / dungeon area of the fortress, you come upon a room with some custodians worshiping an obelisk. Instead of going down to that area, just go straight up to a bunch of barrels blocking a hole in the wall.
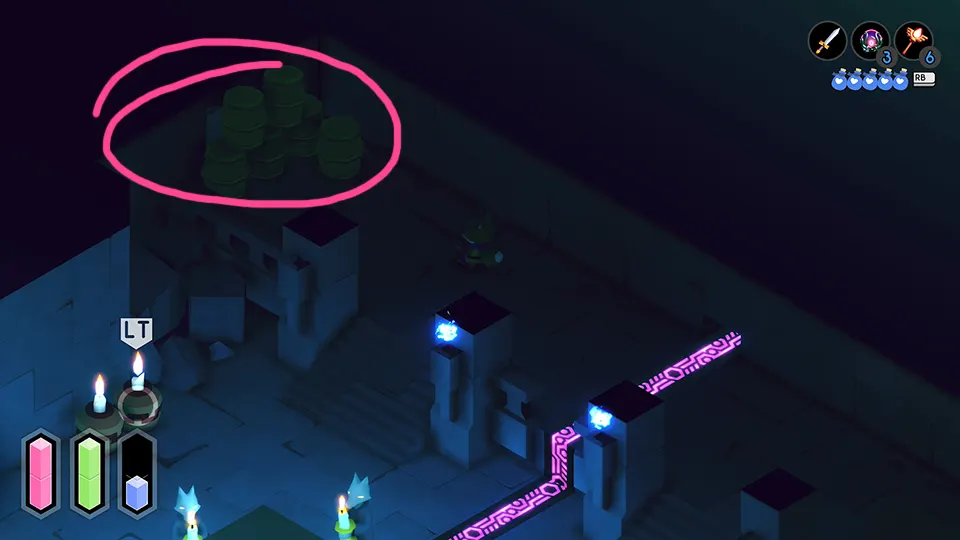
Destroy those barrels and make your way into the room they were right. There’s a chest here with your next coin.
TUNIC Manual page 36 and page 37
Activate the obelisk in the previous room, then climb the stairs at the back. You’ll find yourself in a small room with a door. Go out that door and you’ll come out in a large room with two levels. You’ll be on the second level. Head left on the balcony area to find the manual pages 36 and 37 standing close to the edge.
TUNIC Fairy #17
On the lower level, around the obelisk, you’ll notice some candles. This one is pretty obscure, since there’s candles everywhere, you’ll just assume they’re part of the decoration.
There’s a pattern to it, though. It’s about the number of candles bundled together. Counting up, based on their positioning, that’s the sequence you’ll have to input.
Pattern is: ➡️ ⬅️ ⬇️ ➡️ ⬆️ ⬅️
(RIGHT, LEFT, DOWN, RIGHT, UP, LEFT)
Completing the dungeon and getting the red key
Activate the obelisk in this room and walk past the main hall on the right until you’re in a room with a deactivated altar. Before we can go inside the big door in the main hall, we’ll have to activate yet another obelisk outside.
Go up the staircase on the right of the room with the broken altar. You’ll find yourself in an outside area. Make your way around the upper area. Activate the lever for an easy way down if you wish, but it’s not necessary, we’re not coming back here (in this particular room) later in the game. Regardless of what you do, stay in the top floor and go through the passageway in the south towards the entrance of the fortress.
Once in the entrance, go to the obelisk and activate it. Also trigger the lever so you have a quick way down and also lower the drawbridge. Activate the obelisk on the main floor as well. Go back inside and all the way up to the big golden door.
There’s two more obelisks there, so you might have to kill some enemies in order to be able to activate them successfully.
In the Interior of the Eastern Vault, defeat the boss to get the key to unlock the red key in the area right behind the altar. With this boss I found that the freezing bombs worked the best. Good luck!
ACHIEVEMENT UNLOCKED:
Deep In The Forest
The remaining keys
With the red key obtained, go to the teleporter and kill the other two bosses. We’ve made our way to their teleporters before, but since we didn’t have our sword with us, we couldn’t really defeat them in an efficient way.
In the teleporter hub, pick the Librarian (A) or the Boss of the Scavengers (B) in an order that pleases you the most.
ACHIEVEMENT UNLOCKED:
At The Root of The World
ACHIEVEMENT UNLOCKED:
High Above The Clouds
Once you’re done with them, go back to the Town Ruins (C).
The Sealed Temple
Head to the first altar in the game. From there, go north towards the Sealed Temple. Open the door and enter.
TUNIC Fairy #18
Pay attention to the blue pattern on the hallway. You guessed it! Another pattern for our HOLY CROSS.
Stand in front of the sculpture and input the correct sequence: ⬆️ ⬅️ ⬆️ ➡️ ⬆️ ⬅️ ⬆️ ➡️ ⬆️ ⬅️ ⬇️ ⬅️ ⬆️ ⬆️ ➡️
(UP, LEFT, UP, RIGHT, UP, LEFT, UP, RIGHT, UP, LEFT, DOWN, LEFT, UP, UP, RIGHT)
Unlocking endgame
Are you ready to unlock the last area of the game? After defeating the three key bosses, place their keys on each of the altars around the prism (A).
ACHIEVEMENT UNLOCKED:
What now?
When you’re done, leave through the right side (B), as there’s a manual page waiting for us there!
TUNIC Manual page 24 and page 25
Climb the ladder in the temple and walk around the blindside corner to find a manual page just floating about. Grab it and keep going forward, lowering a bridge to create a shortcut a little bit further ahead if you wish, though going back to the entrance is the quickest way out for where we’re going next.
Final Boss – the first try
Make your way to the teleporter hub. There, go into the teleporter in the middle area. Now, instead of a sword, a giant anthropomorphic fox will be there. Once you interact with it, it will slice you with its sword, leaving you with 1 HP.
You can heal and try to fight, but the game expects you to lose. So don’t waste your consumables during this fight.
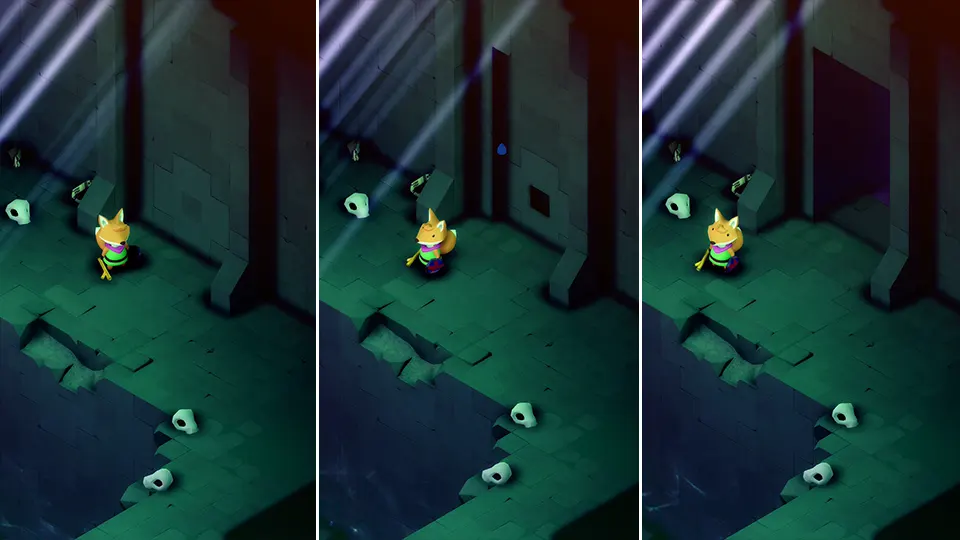
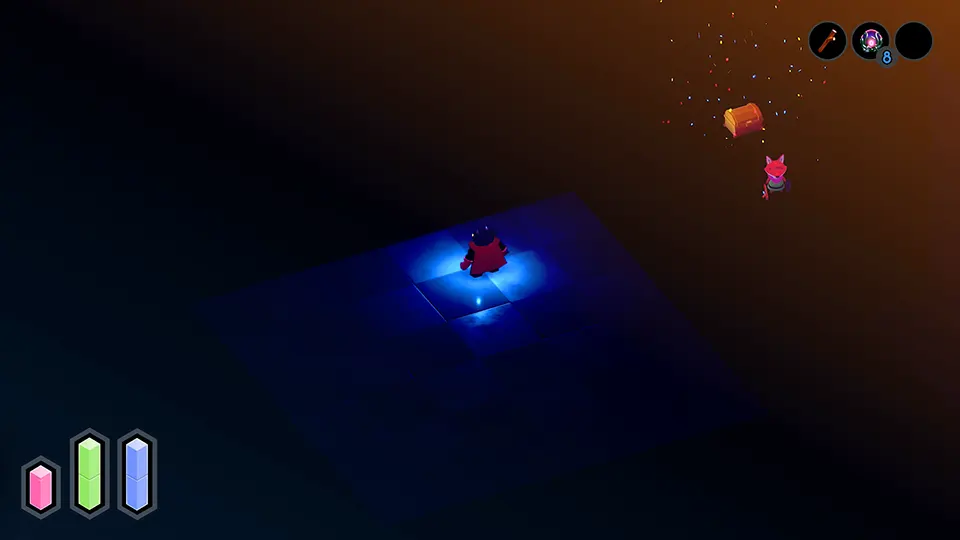
The night
Once you wake up, it will be “night.” It’s implied you’re dead, in some sort of spiritual realm. You don’t have any of your upgrades, since you’re just a spirit. You’ll have to embark on a journey to retrieve your powers and regain your physical form.
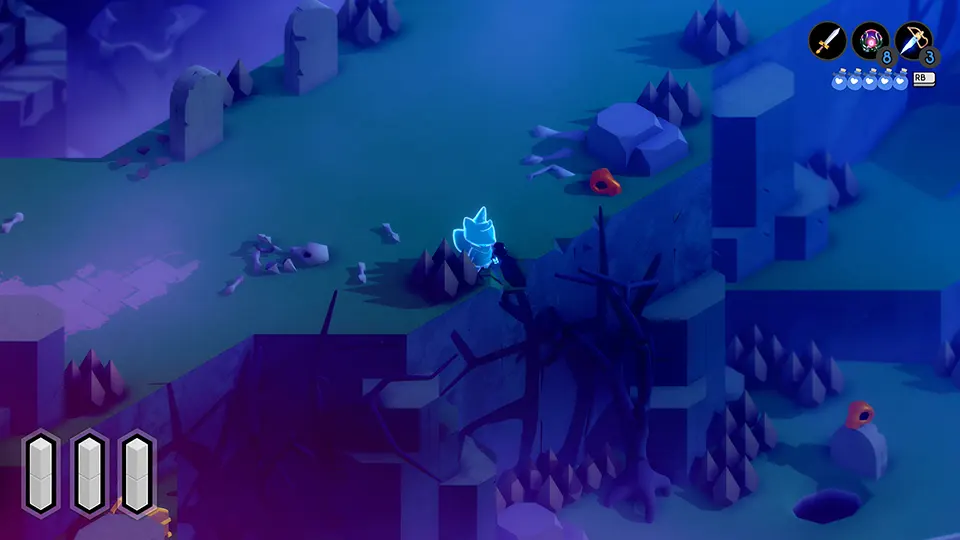
The swamp
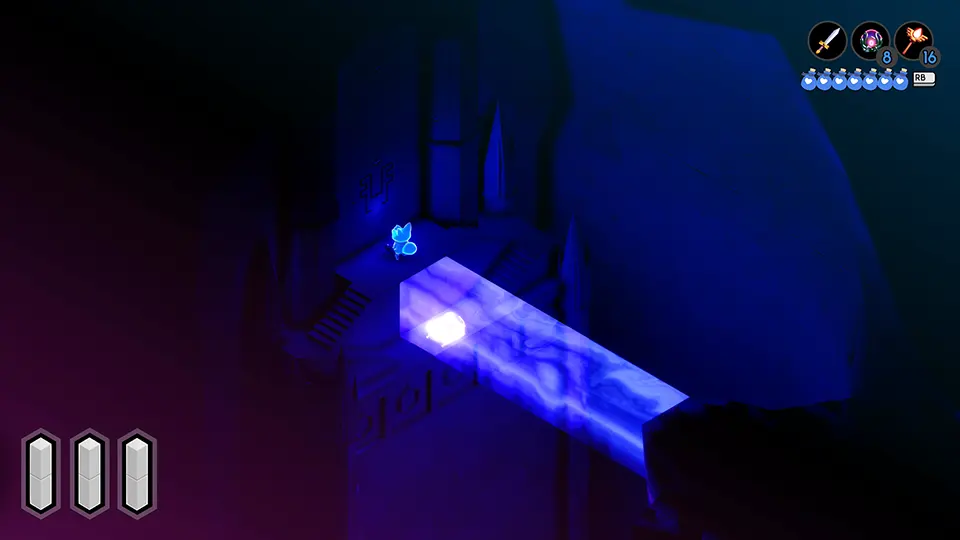
Head to the rightmost area of the map. There’s an obelisk you couldn’t reach there. Now that’s nighttime, there’s a light bridge that allows you to reach the obelisk. Go to it and activate it.
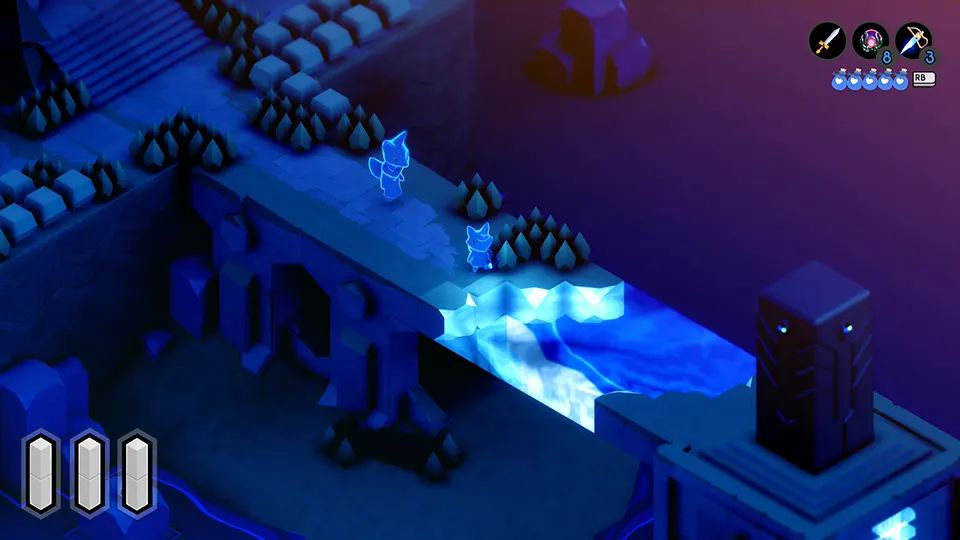
Go down the ladder and head into the swamp, also known as old burying ground. Follow the railing to the altar, and the doors behind the altar will automatically open. If you tried coming here earlier, those doors would be barricaded and inaccessible.
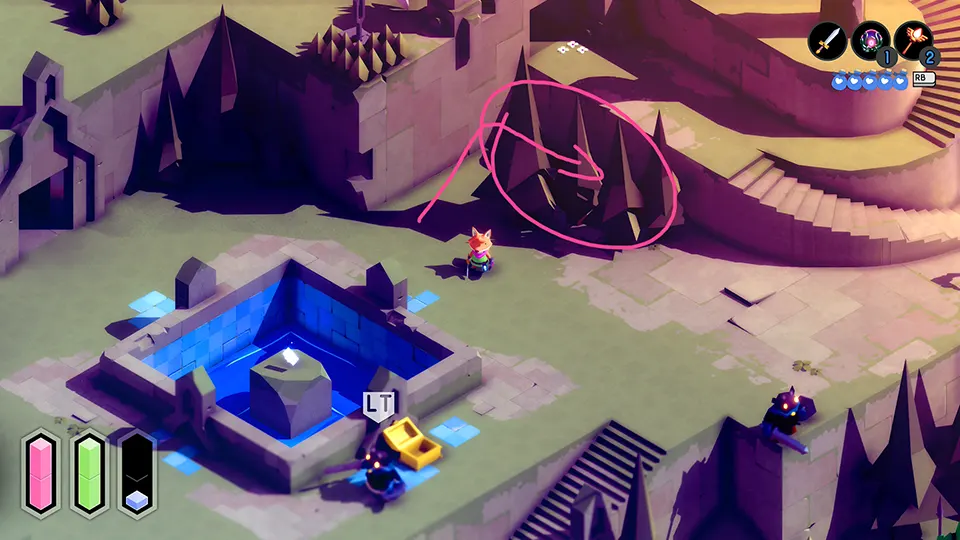
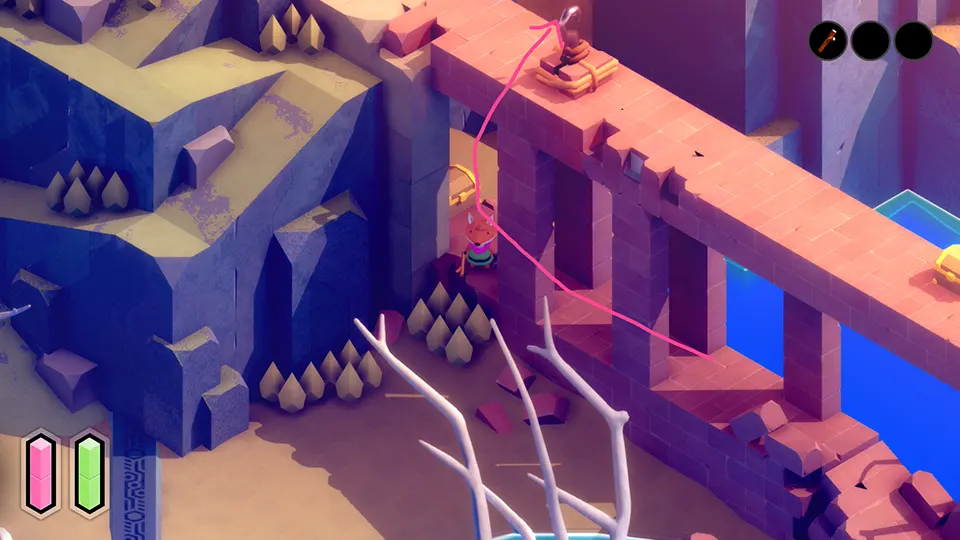
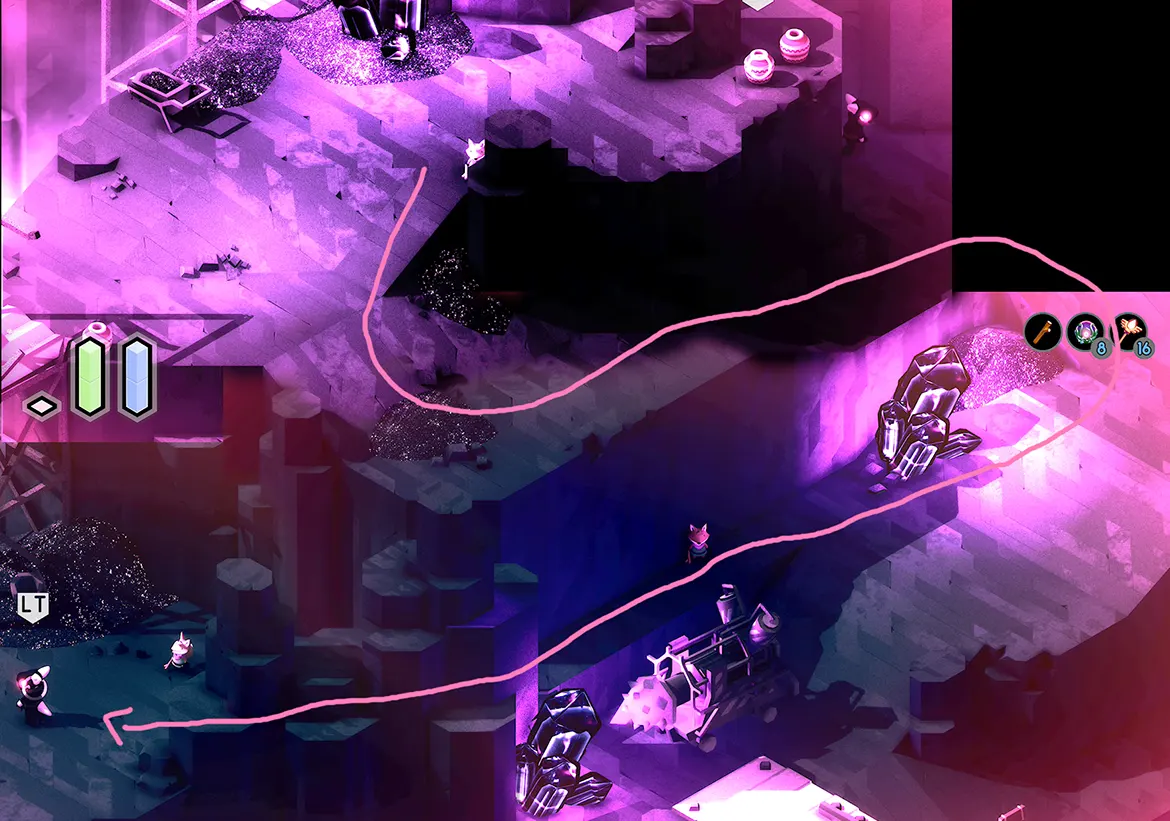
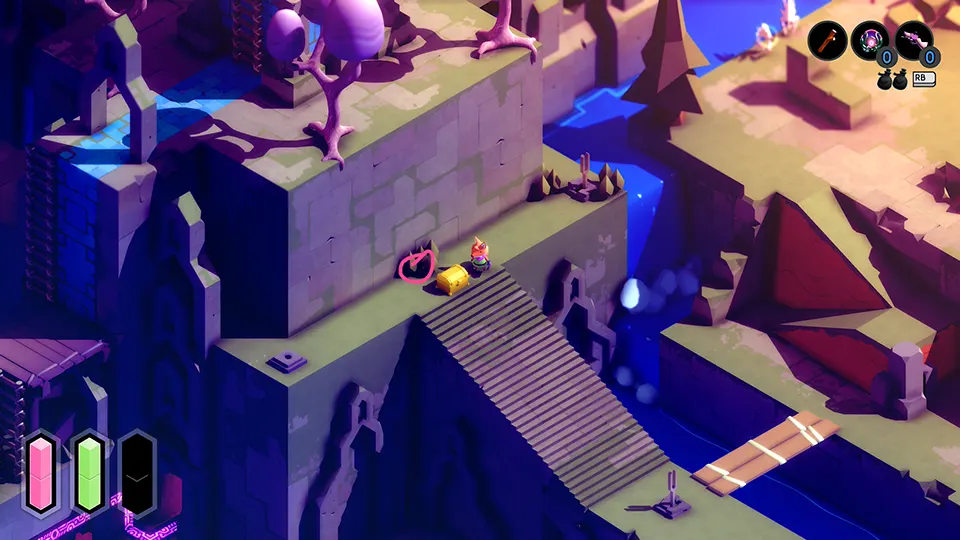
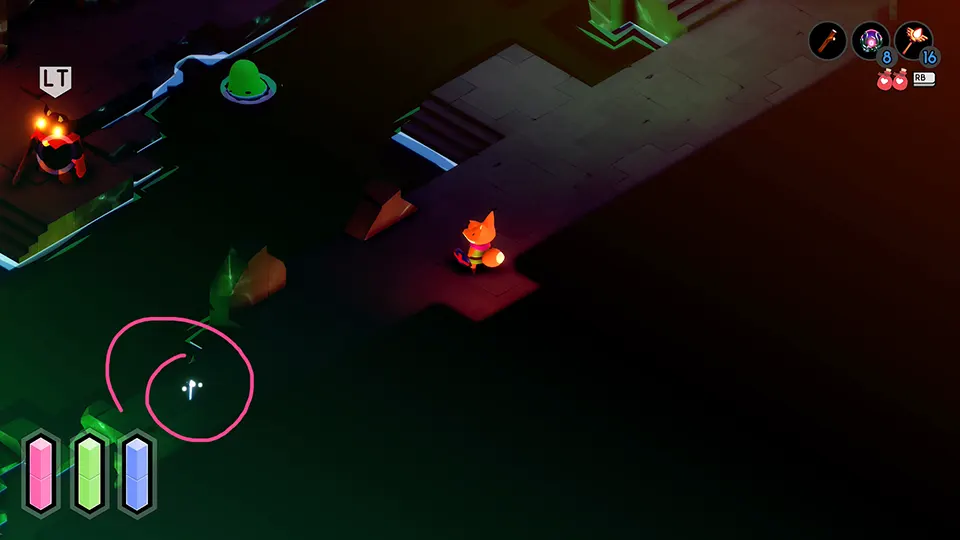
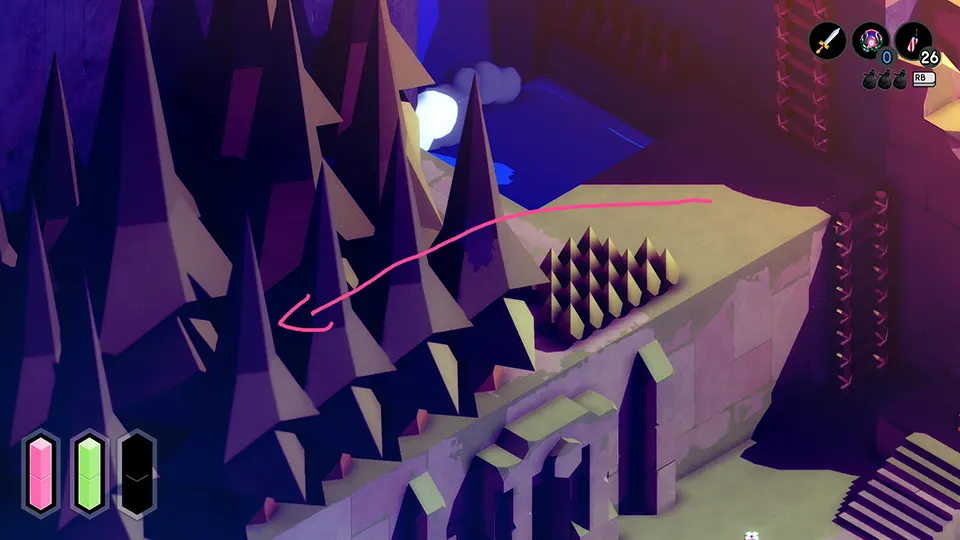
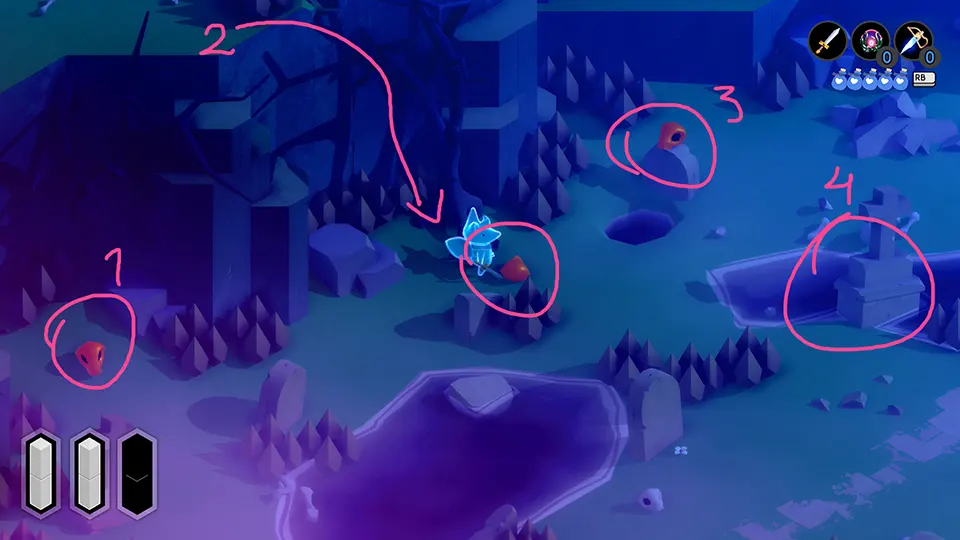
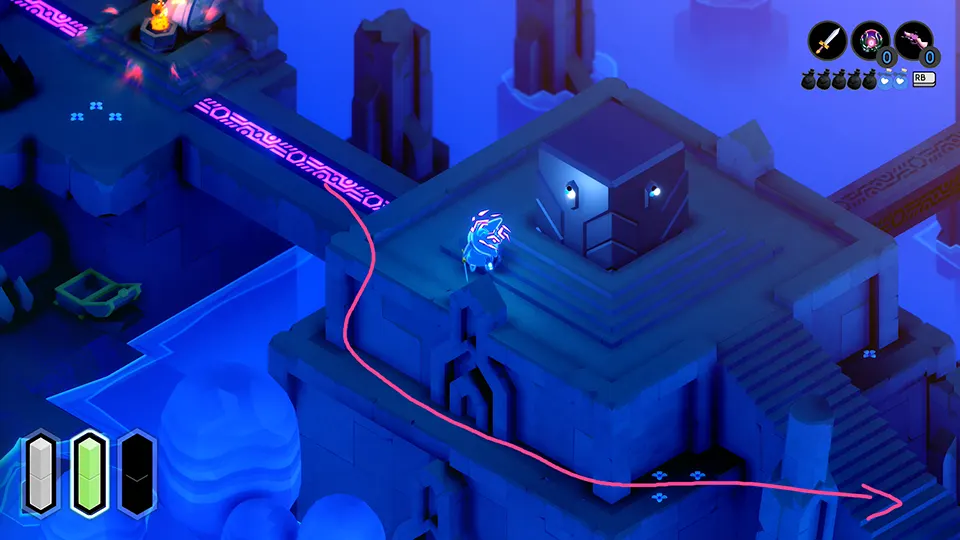
TUNIC Secret Treasure #5 – Just Some Pals
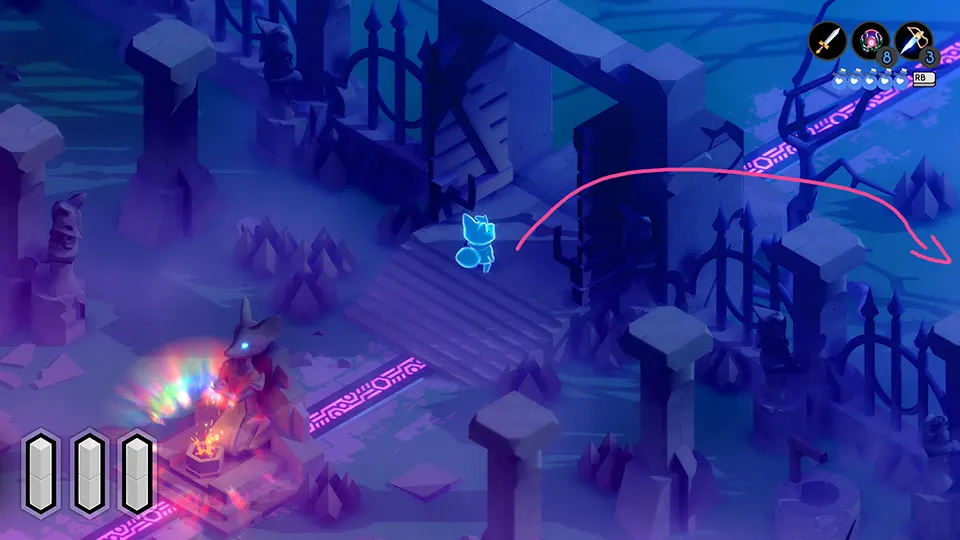
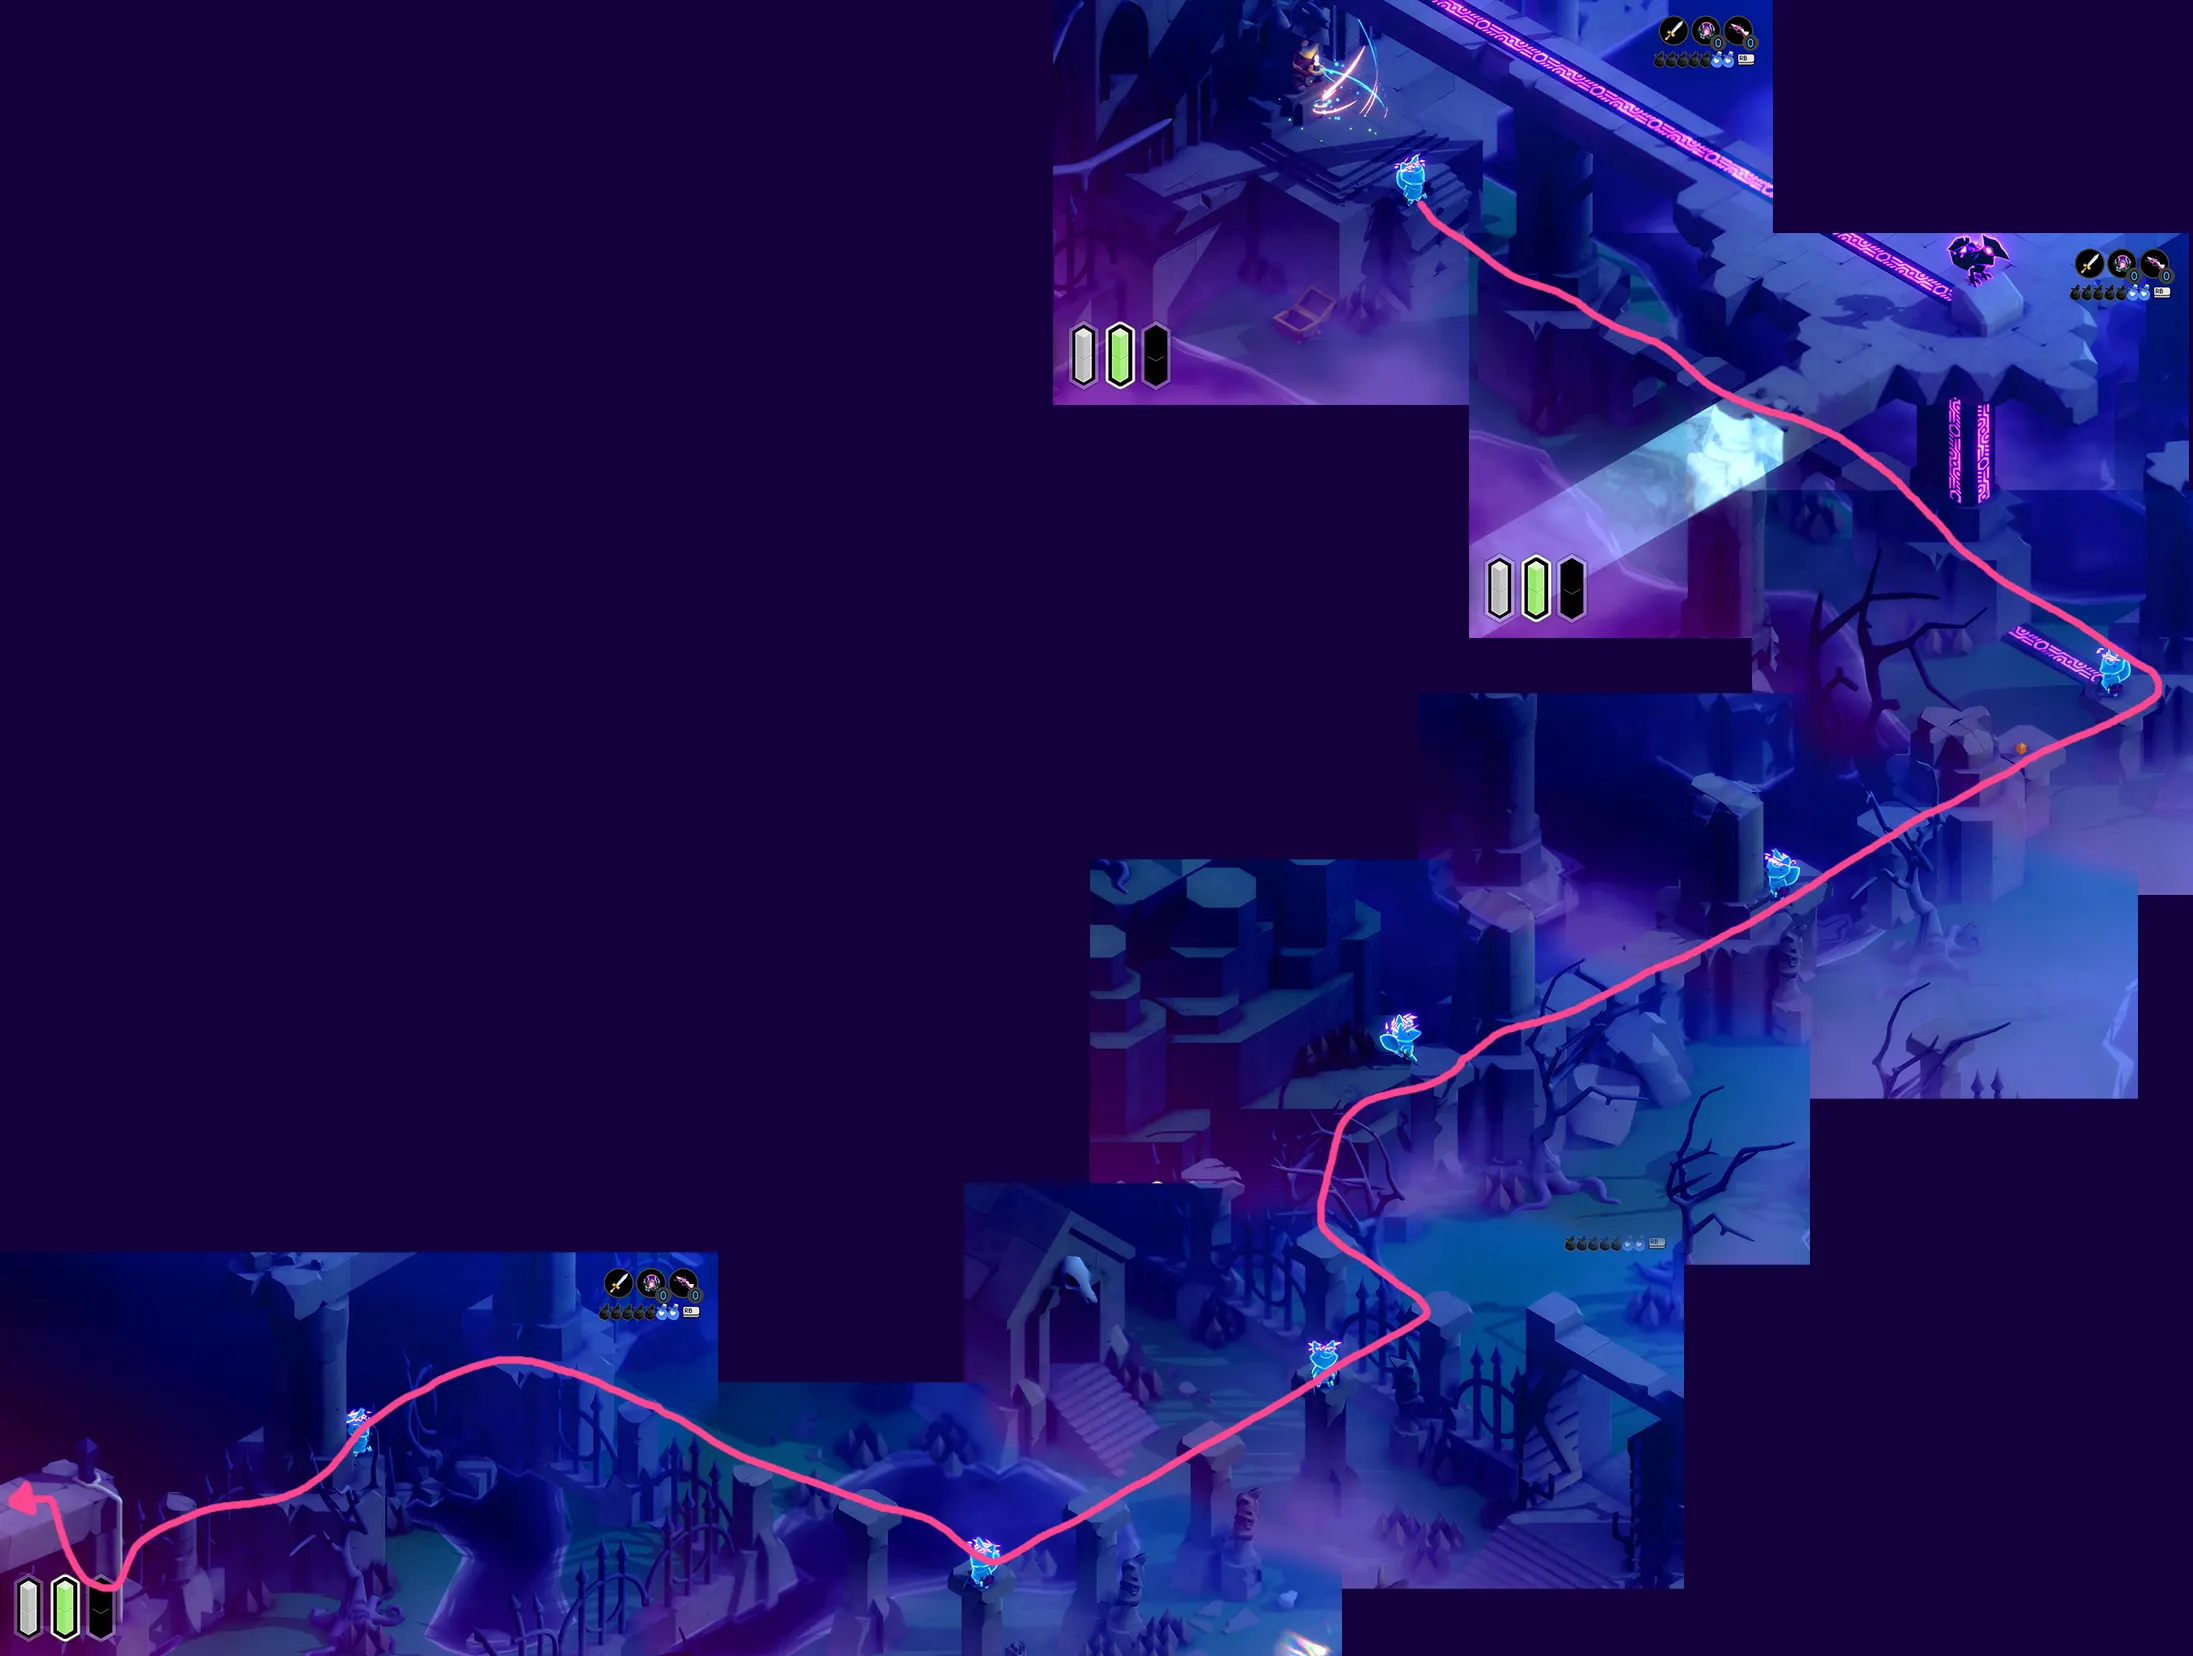
Follow the pink arrow in the picture above to a ladder on the side of the hill. Climb it. You’ll run into a red skull by the edge. You’ll notice that there’s a red skull on a gravestone below. In front of said gravestone, there’s a hole.
By trial and error, you’ll notice that this hole works as an actual hole, despite being filled with water like all the other bodies of water in this area. You have to push all 4 red skulls in this area (they’re golden if you come back here during the day) into that hole. Just walk into them to push them around.
Make your way down there to find the remaining two red skulls. One of them is hiding behind another gravestone, and that one will test all of your patience to try to push it up the slope towards the other hole. In my opinion this is the worst challenge in the game; its physics are just not meant for this kind of object manipulation. Good luck!
ACHIEVEMENT UNLOCKED:
Just Some Pals
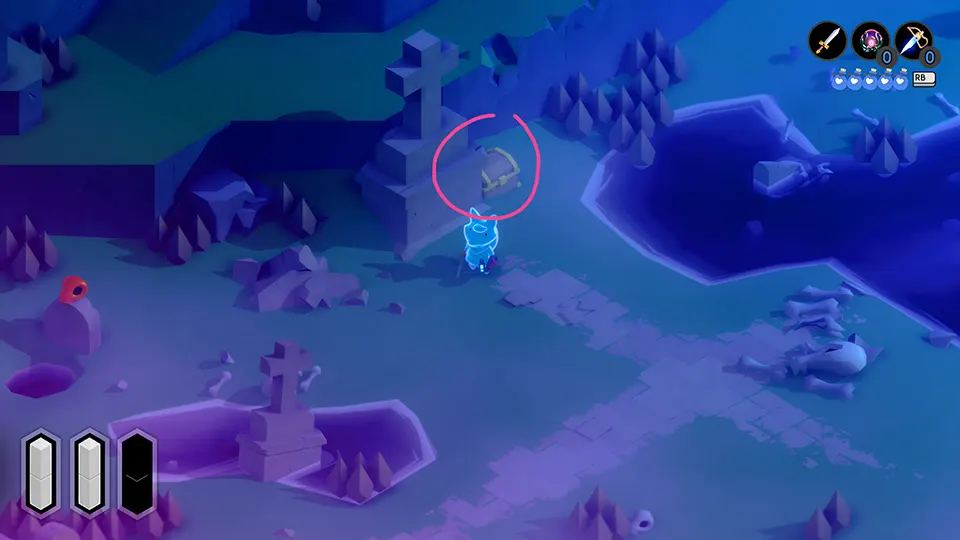
TUNIC Well done! Achievement – Coin #10
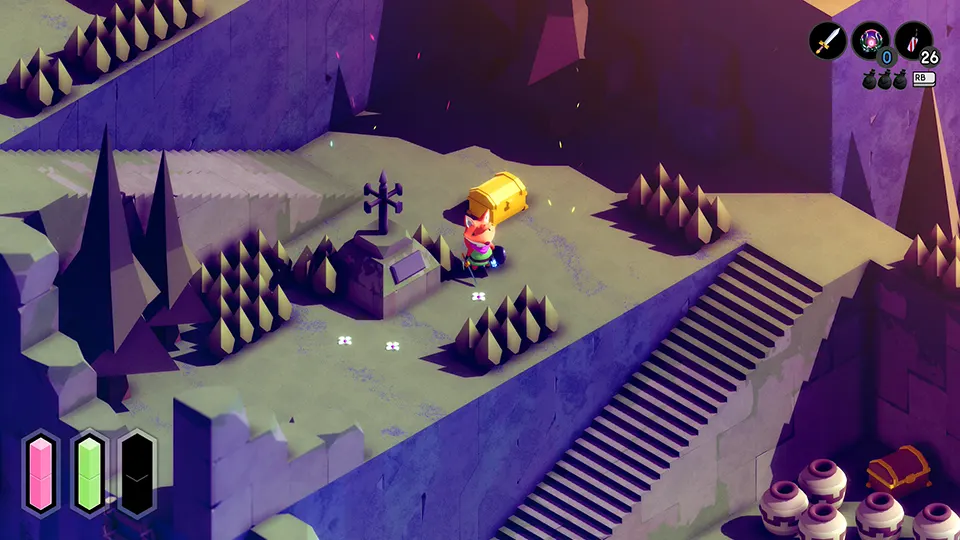
While making your way to the gravestone with the red skull, you’ll come across a giant skeleton. He packs quite a punch, but right next to his spawning area, the huge gravestone, there’s a chest with your next coin!
After you grab this coin, go back to the altar and follow the railing to the next obelisk you need to activate.
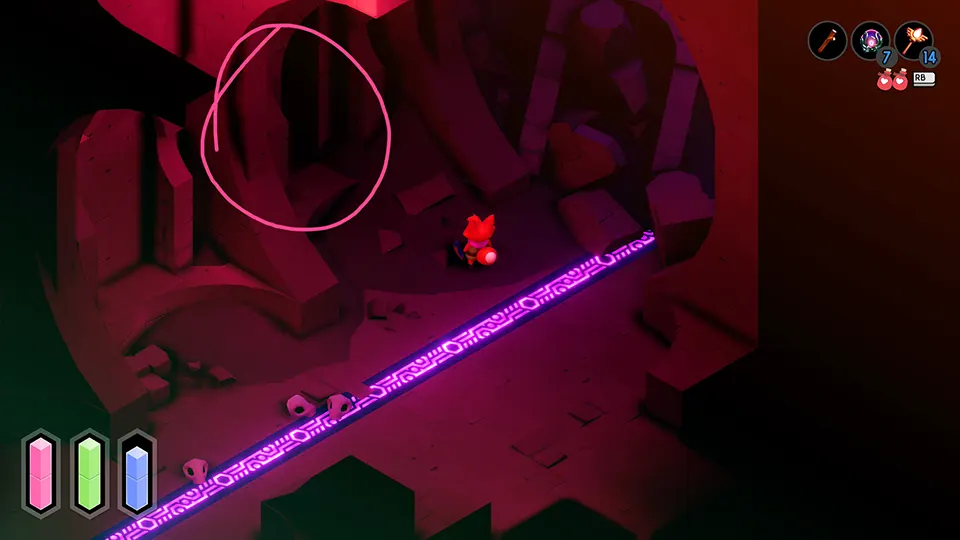
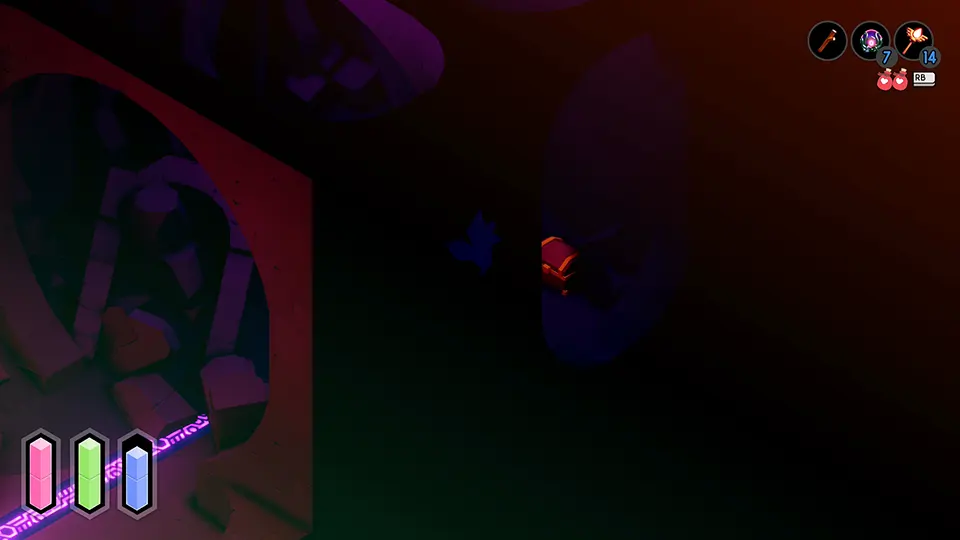
TUNIC Well done! Achievement – Coin #11
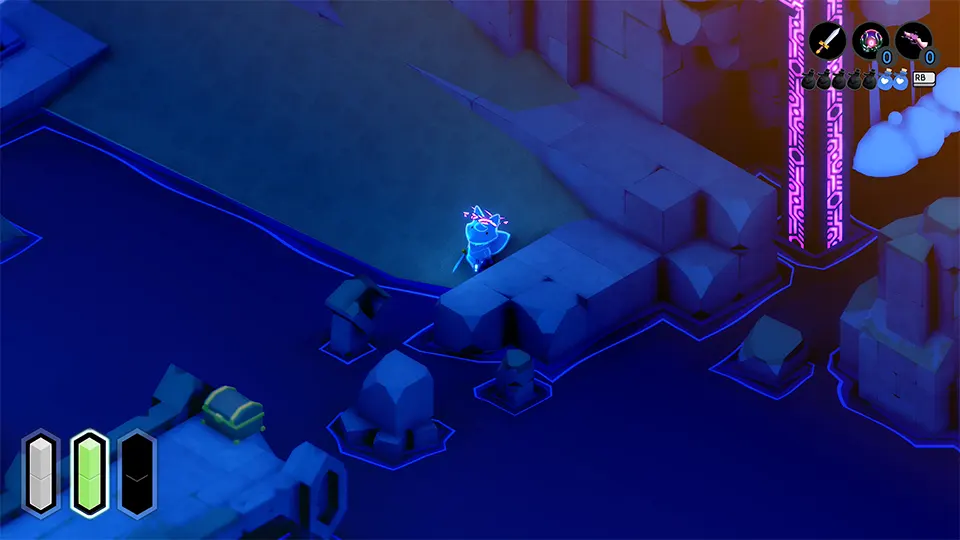
From the obelisk in the center of the old burying ground, head to the south-easternmost corner until you reach an apparent dead end.
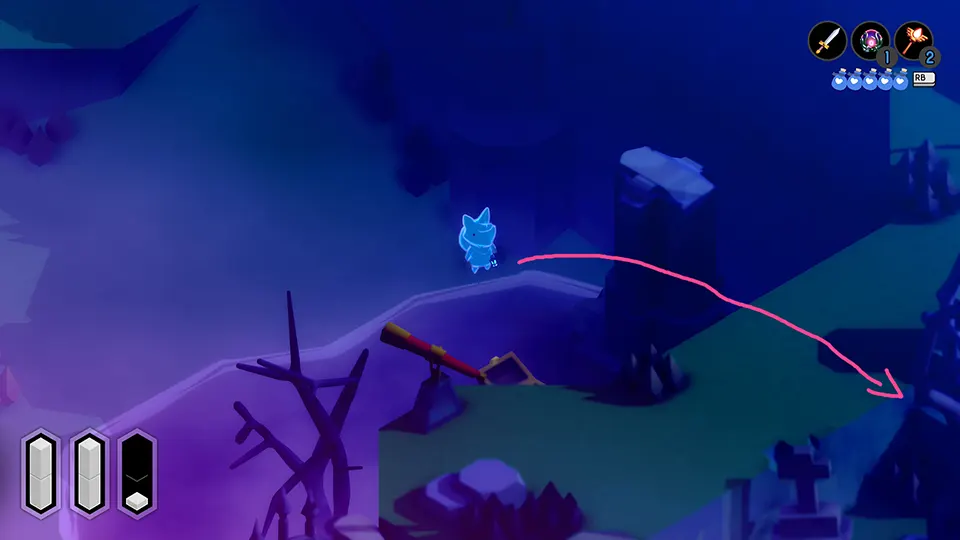
Press against the wall on the right and walk down. There’s a secret path there to a chest with another coin.
TUNIC Well done! Achievement – Coin #12
Go up the hill on the right. Once at the top, head south. A lone chest in plain sight will hold your next coin, the third in this area alone. These ghosts be rich!
Make your way to the Cathedral
While still in this elevated area, go all the way north. You’ll reach the top of the archways made of stone. From there, go to the Cathedral(north), activating one last obelisk before entering it.
The Cathedral – ground level
Careful! All enemies in this area have attacks that also reduce your max HP (in case you’re not using the “no fail mode”).
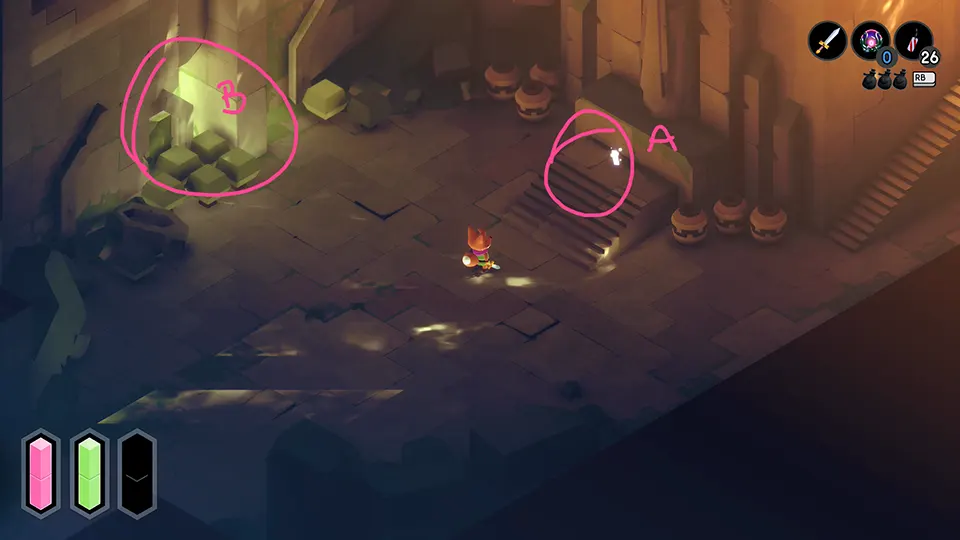
Upon entering the Cathedral, you’ll see an altar. Head right from the altar. Go up to the room with the chest (it has money in it) then up to an area with a pool of pink substance.
Going around it, you’ll find yourself in an area with another chest (a pepper) and then a staircase up. You’ll be in a hallway full of birds.
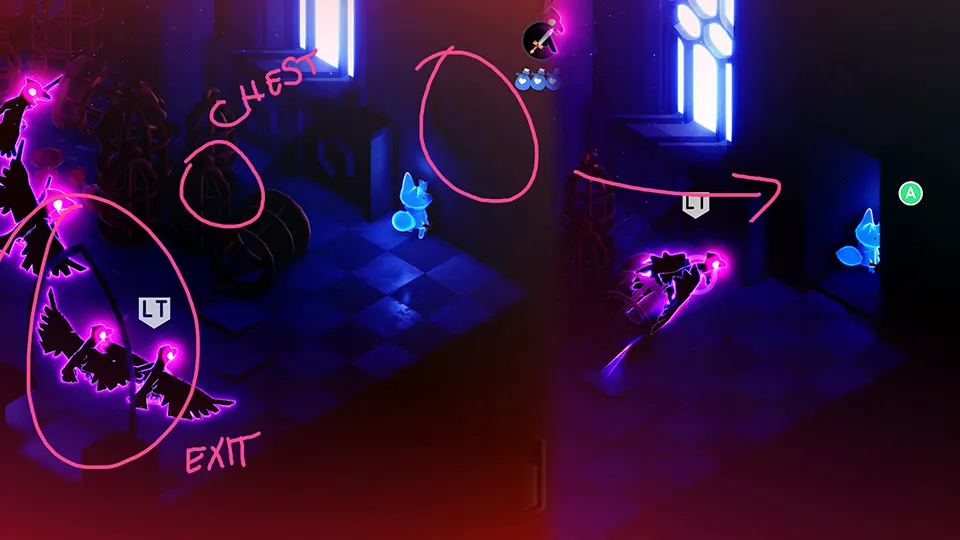
TUNIC Well done! Achievement – Coin #13
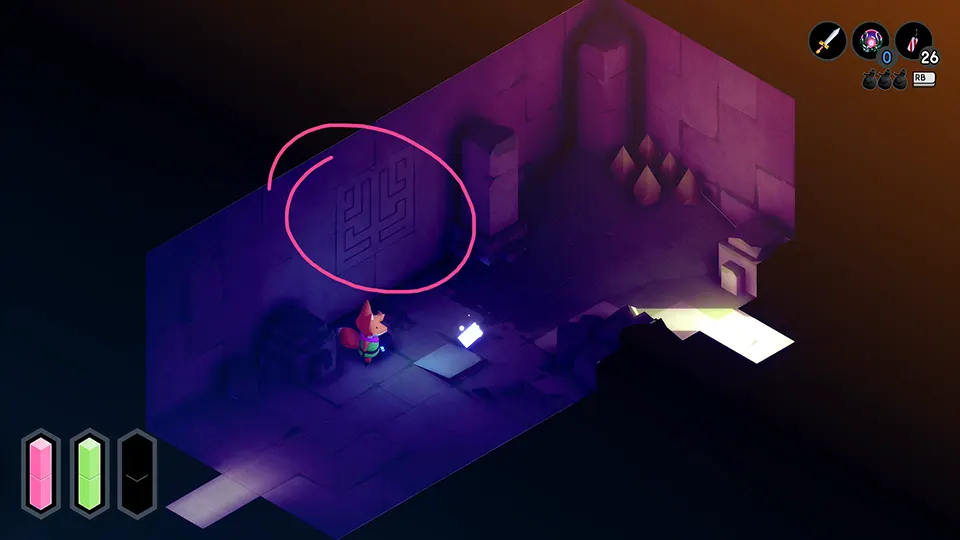
Run past the birds or defeat them. But once you reach the end of the hallway, do not exit left. Instead, go right and push the fox against the wall. It’s dark and hard to see, but the symbol on the wall is inverted, signaling a secret room (more on this in the next section).
Press A🎮 to reveal the passage containing a chest with your coin!
TUNIC Secret Treasure #2 – A Secret Legend – part 1
This one is a two-parter because you need to open the path at night, but come here during the day to be able to access the chest.
Why? Because the chest is inside a light bridge. Light bridges only show up at night, so you have to come back during the day when they’re not active. But if you try to do it all during the day, you’ll be stranded, since you need the light bridge to reach the chest.
Therefore, during the night you activate the shortcut that leads to the back of the room with the chest, so it can be yours during the day later on.
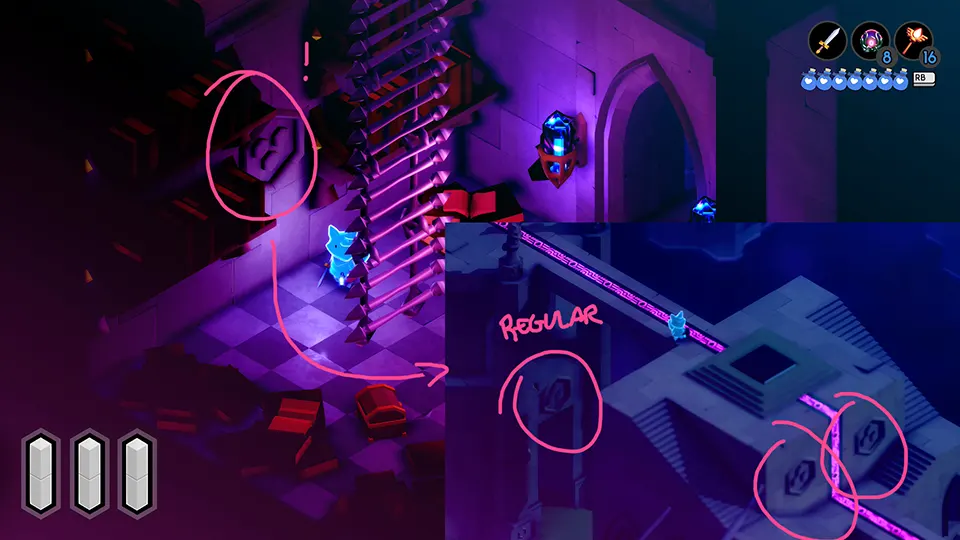
The secret entrance
Uncovering this one was my proudest moment in this game, as it was the first time I came across a “no prompt door,” which is basically something you can interact with that has no tells whatsoever that you can interact with them.
In the room across the hallway of the birds, you’ll find a balcony with a chest and a ladder you can drop down for a shortcut back to the entrance of the Cathedral. The chest itself only has explosives, but the secret is on the ground level. Go down the ladder.
On the wall you’ll see the emblem representing the three keys. So far, nothing spectacular, right? These emblems are everywhere in this cathedral. However, as you already know – since I’ve spoiled the secret in the hallway of the birds above – this one is slightly different than all the other emblems: it’s upside down!
The path to the secret chest
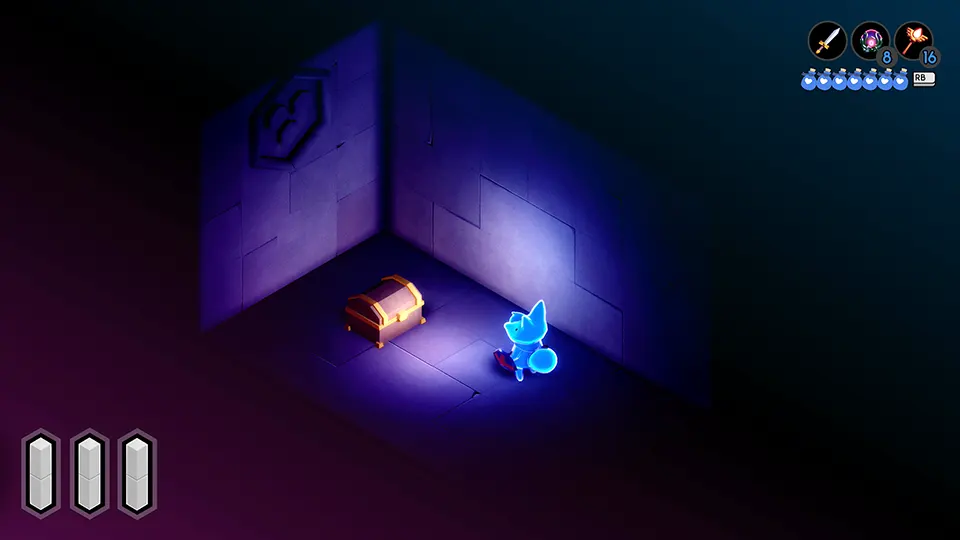
Push against the wall and press A🎮 to reveal the secret doorway. There will be a chest right there, but that’s not the one you’re looking for! Is this a dead end?
TUNIC Effigy “Too Cute to Smash” #9
Despite not being the secret we were hoping for, it’s still something that counts towards the achievement for not smashing the effigies! Grab the chest, but don’t leave yet!
TUNIC Secret Treasure #2 – A Secret Legend – part 2
As you can observe, the wall behind the chest also has the upside down emblem. We have two secret doors one after the other!
Upon activating it, you’ll find yourself in a tunnel down into the bowels of the cathedral. Make your way all the way down, across a light bridge and an apparent dead end.
At this point it should be second nature to you whenever you see a pattern on a wall. Bust out your HOLY CROSS and type those sequences!
This one is: ⬅️ ⬆️ ⬅️ ⬆️ ➡️ ⬆️ ⬅️ ⬆️ ➡️ ⬇️ ➡️ ➡️ ⬆️ ➡️ ⬇️ ⬅️ ⬇️ ➡️ ⬇️ ⬅️ ⬇️ ⬅️
(LEFT, UP, LEFT, UP, RIGHT, UP, LEFT, UP, RIGHT, DOWN, RIGHT, RIGHT, UP, RIGHT, DOWN, LEFT, DOWN, RIGHT, DOWN, LEFT, DOWN, LEFT)
Go out to find a chest with money. Now you can go around the outside of the cathedral to a hidden ladder that brings you up to the entrance. This is how you’re going to make your way back to the treasure chest later on during the day.
Making your way down
The rest of the Cathedral is very straightforward. You’ll make your way to an obelisk at the top floor that will activate an elevator in the main floor where the altar is. Go through the elevator and you’ll find another altar underground. In front of it there’s a ladder that will drop you off into an arena, but before that, go into the hole in the east wall to find a shop. This is where you’ll get your last two coins of the game!
TUNIC Well done! Achievement – Coin #14 and Coin #15
By now you should have enough money to buy the two coins in the shop. You’ll need 1998 units of money to buy both of them. If you still don’t have the money, make a mental note to gather the necessary remaining amount of money, as there’s no other way you’ll be able to get them.
If you do have the money to get them, congrats! Now all you need to do is find the nearest well and toss your final coins to get the achievement! In our playthrough, that will be the well in the West Garden.
Important notice pertaining to coin #15
Upon playing the game on PC, it was observed that the shop only has 1 coin available for purchase. The other coin is found in the swamp and can only be accessed after gaining the blink ability. If when you’re playing you can only find 1 coin in the shop, make sure to check the section “TUNIC Well done! Achievement – Coin #15” below to learn how to find the last one.
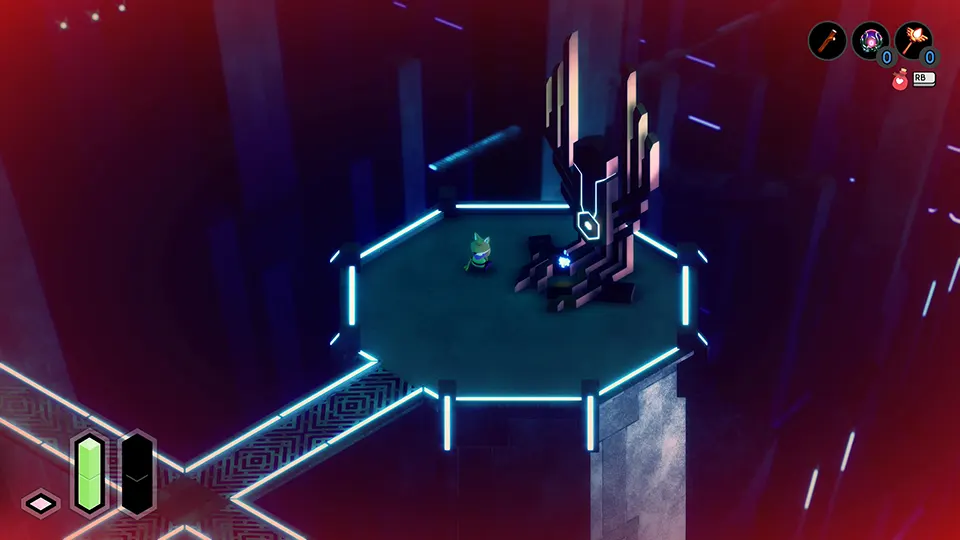
The arena
Final boss excluded, this was the hardest thing to do in the regular playthrough. If you’re using “No Fail Mode” there’s nothing to worry about though.

You’ll have to overcome 6 challenges one after the other without any of your upgrades. One of the statues will give you a health refill, but it’s still no easy task. Once you complete it, you’ll have air dash, or how I like to call it, “blink“

ACHIEVEMENT UNLOCKED:
You feel a tingling…
With this power-up we’ll be able to access everything in the map now. Time to mop up all the remaining collectibles and achievements!
Getting your powers back
Now you can attempt to fight the final boss once again, or you can try to regain your lost powers. There’s an achievement for getting all of them back, so we’re going to do just that before the final boss. Getting all your upgrades also makes the final fight slightly easier.
Make your way outside (south of the arena) using your newly acquired powers. You’ll come across a different altar: this one the fox is holding a candle, and it seems like a memorial for a fallen hero.
You could pray to those as well before, and they’d teleport you to an area with upgrade items that were just out of reach. Now with blink you can reach all of them, but you have to find all 6 altars in order to collect each one of those.
This one will give your stamina back. In the regular game, this is one of the best upgrades to get back first. In a “No Stamina Restrictions” run it doesn’t matter as much.
Making your way out of the old burying grounds
It took me a while to find my way out, so I’m going to point it out just in case some of you might be struggling as well:
TUNIC Well done! Achievement – Coin #15
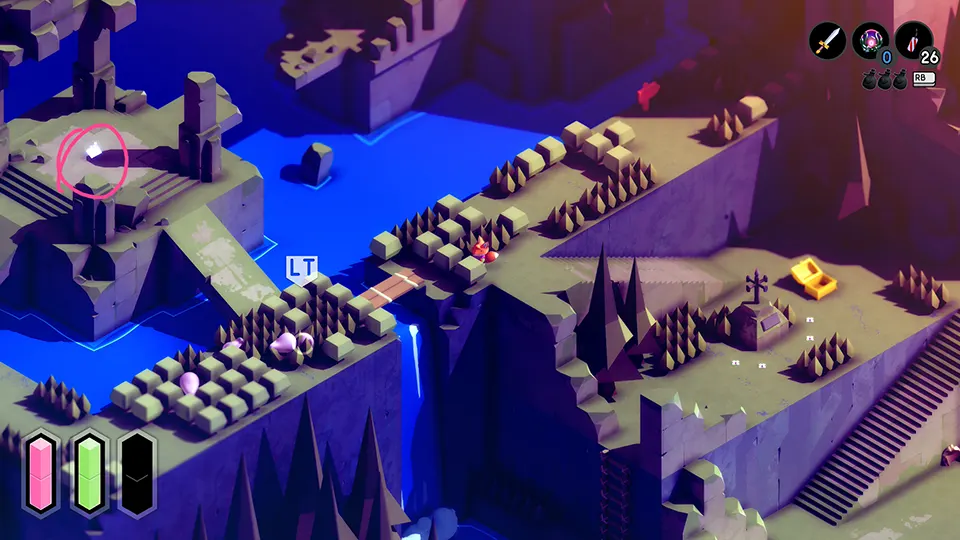
Once back in the overworld, climb down the ladder in the pillar were the obelisk used to be and return to the swamp. Make your way to the altar. Use the pillars around it (day reference here because I’m reusing old screenshots, but you can do that during the night as well) to make your way to the ledge shown in the image below. The coin will be in that chest.
TUNIC Manual page 8 and page 9
Go back to the overworld. Now with the blink ability, you can warp to the isolated pillar holding the pages next to where the obelisk to the swamp used to be.
Going back to the West Garden
Keep making your way through the other pillars towards the left side of the beach. You’ll find yourself in an already explored area. Keep going left on the beach level until you reach this area around the left of the overworld.
Now with blink you can get this chest and also find a backdoor to the West Garden. We’re going here first because you need to activate the teleporter here in order to get a page. So before we head to any of the other teleporters, we’re going to activate this one first.
West Garden – Night
You’ll find yourself back on the island were you got the magic dagger during the day.
Make your way back to the top level. You’ll have to use blink to reach it, but it’s the same path as it was during the day. Once there, on the first junction, head down to the altar.
Activating a secret teleporter to a hidden page
Walk around the tower where the obelisk is, and blink to the dilapidated staircase to reach it.
Activate the obelisk. This will also activate the teleporter that you’ll use from the hub later on to access a page for the manual.
Map of the West Garden night
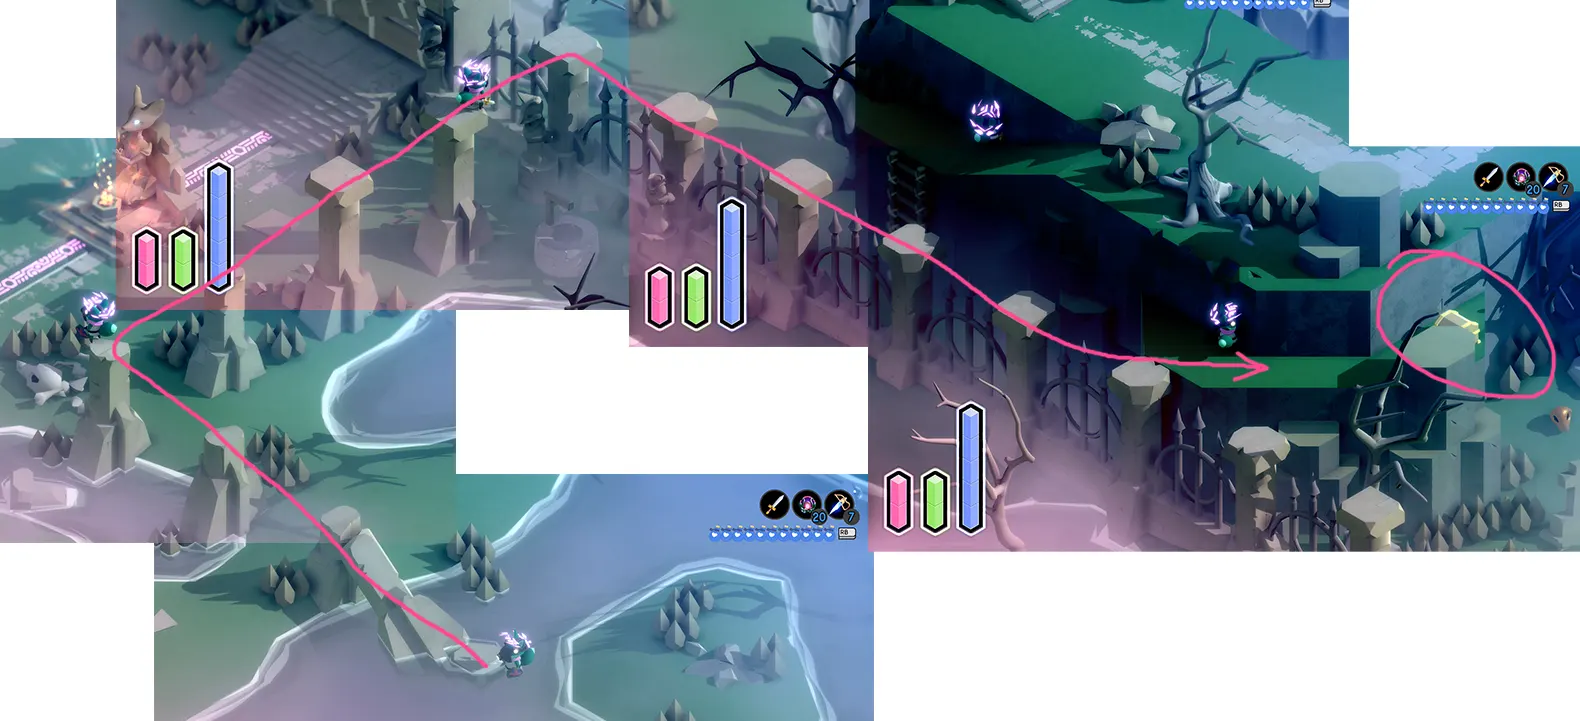
Use the map below as a reference to find a fairy (A) and also your last effigy (B)!

TUNIC Fairy #19
Follow pink path (A) on the map above. Once you reach this island, notice the pattern of flowers on the ground.
This one is misleading, as the flowers we’ve seen so far would draw lines of the pattern you were supposed to input. Not this one. Each bunch of flowers has a number from 1 to 6. Counting up, you have to create a pattern using the location of the flowers as reference, just like the one with the blue tiles in the beginning of the game and the candles in the fortress.
The final pattern is: ⬅️ ⬇️ ➡️ ⬅️ ⬆️ ⬇️
(LEFT, DOWN, RIGHT, LEFT, UP, DOWN)
TUNIC Effigy “Too Cute to Smash” #10
This is the last effigy of the game. Once you collect it, the achievement should pop up. Follow the green path in the map above, in the section “Map of the West Garden night” and grab the chest in that island.
ACHIEVEMENT UNLOCKED:
Too Cute To Smash
TUNIC Achievement “Well done!”
From the effigy above, just blink right to the main area with another altar. Right next to the altar you’ll find a well. Equip all those coins you collected and throw them all in it.
ACHIEVEMENT UNLOCKED:
Well done!
Hero Tomb West Garden – retrieving your defensive power
From this main area with the altar, keep going right until you reach a large staircase that leads to another hero altar / tomb. This one will give your defense back.
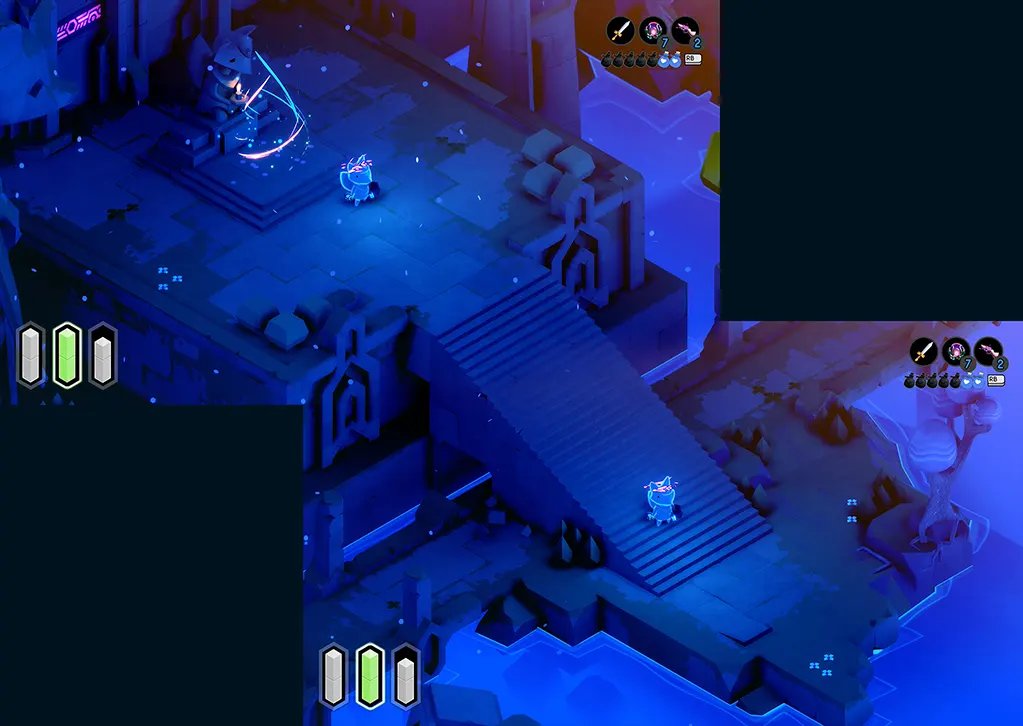
TUNIC Manual page 46 and page 47
Find your way to a teleporter. The closest one should be the Town Ruins one. You can quickly exit the West Garden by continuing right into the overworld, then using your magic orb to hook yourself to a tuning fork in the upper area.
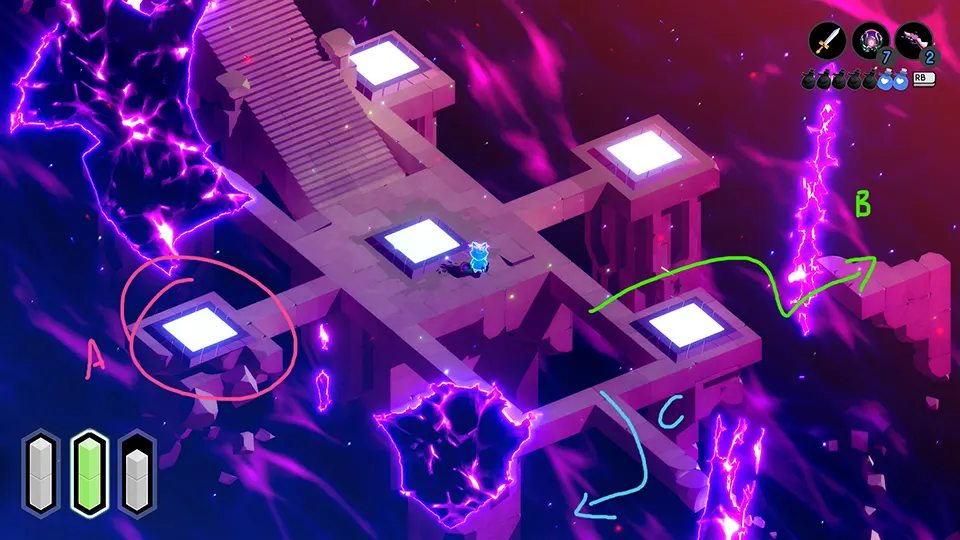
Once there, go through the newly activated teleporter for the West Garden (A) listed above. Once there, follow your way through the pillars to the manual pages 46 and 47. That’s all you can get in this particular teleporter.
TUNIC Secret Treasure #12 – Forever Friend
Follow the blue path (C) on the teleporter hub shown in the section above. You need to use your air dash / blink in order to reach it. It can be a bit finnicky to find just the right position. The chest is just there, floating in the middle of nowhere.

ACHIEVEMENT UNLOCKED:
Forever Friend
TUNIC Fairy #20 – East Forest Night
Make your way to the East Forest teleporter, tucked away from the main hub towards the green path (B) in the reference image of section “TUNIC Manual page 46 and page 47” above.
This one you can do in two different ways. The first one is by going up the ramp on the left side of the small temple-like building right in front of the teleporter and using the dilapidated pillars to make your way to the levels above.
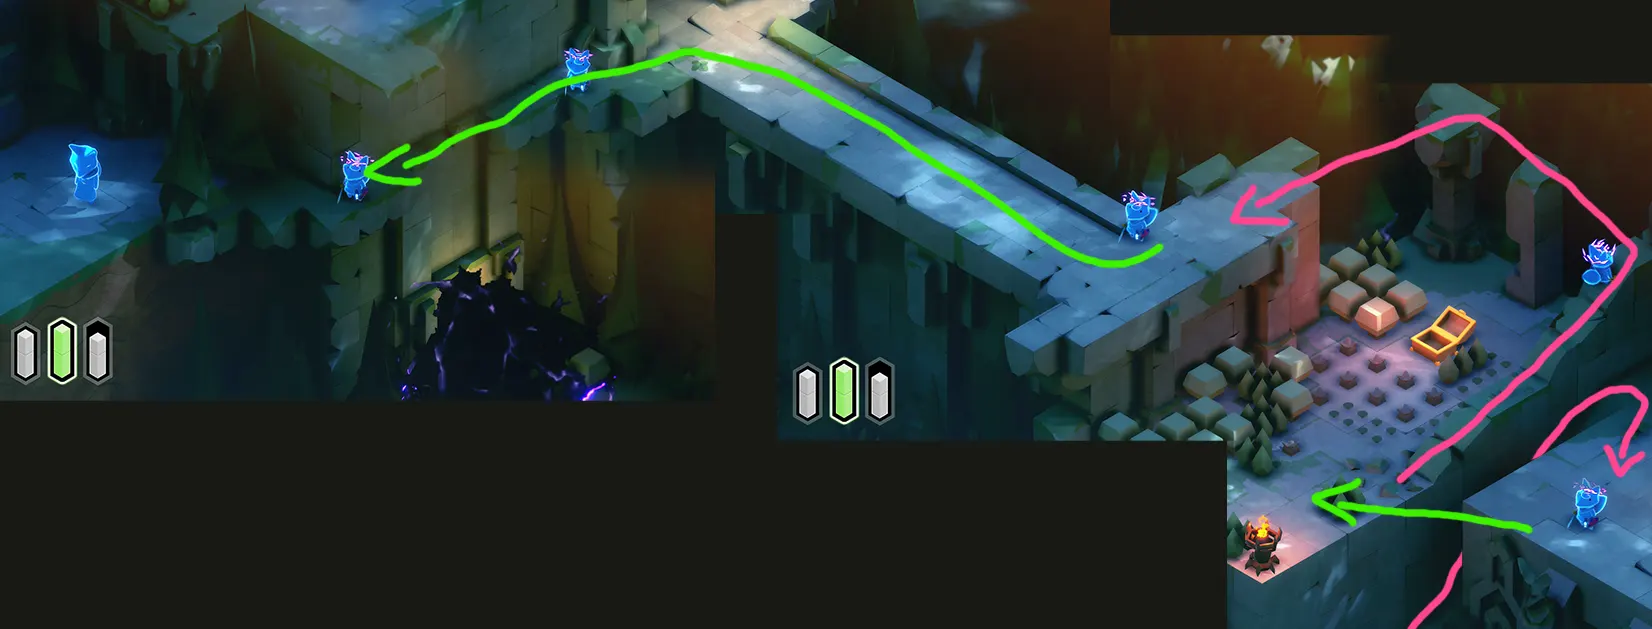
The other way is through the pillars in the entrance of this area. There, you can use the dilapidated pillars to make your way to the plateau.
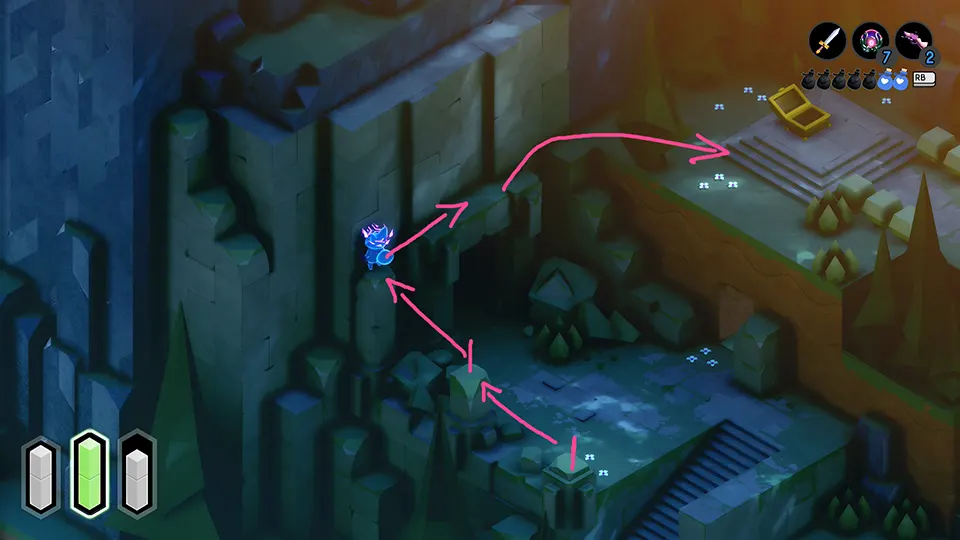
On that plateau, you’ll find a fox gesturing a pattern. Use that pattern on your HOLY CROSS to get yourself another fairy, the very last one of the game! Congrats, you’re the fairy master!
The correct sequence is: ⬆️ ⬇️ ⬆️ ⬇️ ⬅️ ➡️ ⬅️ ➡️ ⬇️ ⬅️ ⬆️ ➡️
(UP, DOWN, UP, DOWN, LEFT, RIGHT, LEFT, RIGHT, DOWN, LEFT, UP, RIGHT)
East Forest Hero’s Grave – Getting your strength powers back
Go back to the teleporter / altar. Remember where the sword originally is, around the right side of the temple-like structure with the two statues in front of the teleporter? The place where the sword was is also a hero’s grave! Pray there to recover your strength!
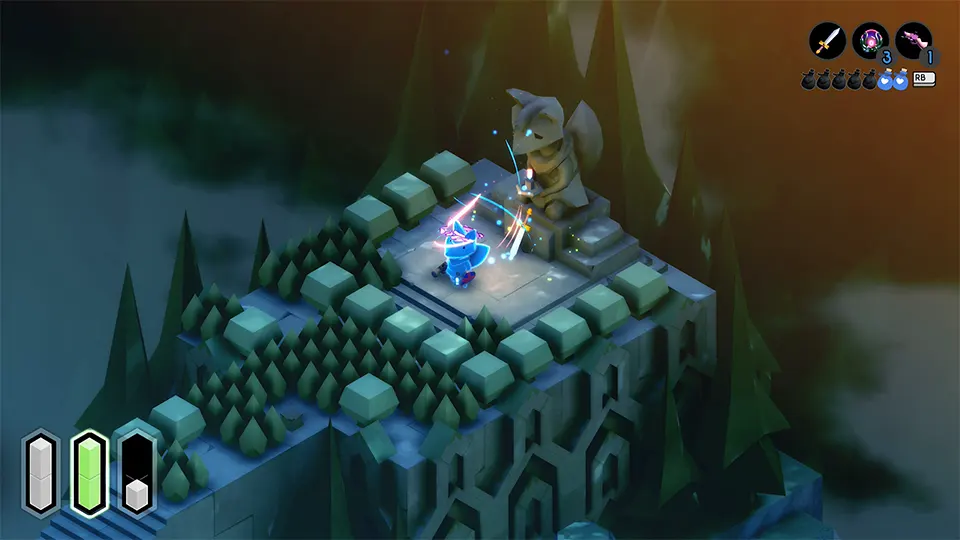
The Great Library – Getting your mana upgrades back
Return to the teleporter hub and go through the first teleporter you see coming from the East Forest one. This will take you to the library.
Make your way down to the main hall. The altar there will be covered in purple stuff (A), so you’ll have to defeat the two guardians to clear it out (B).
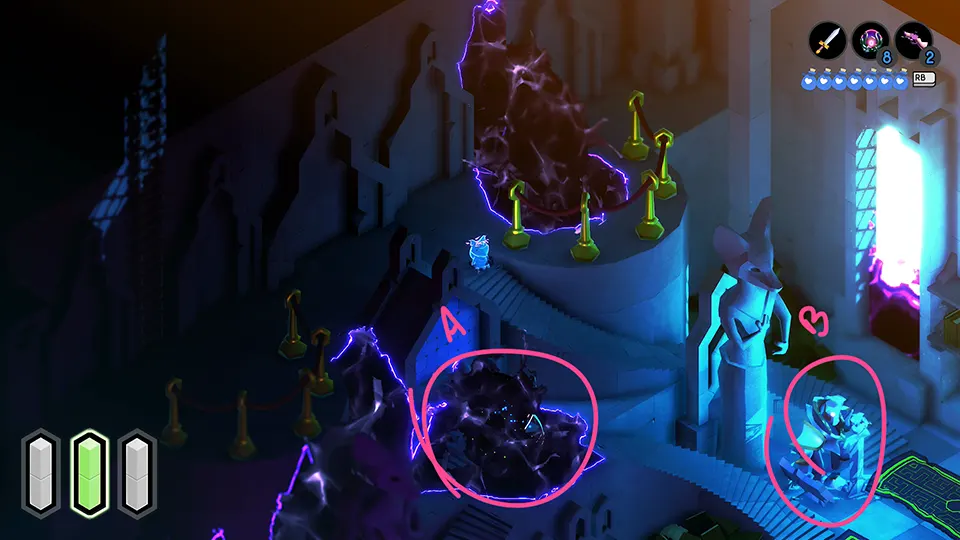
The Eastern Vault – getting your HP back
Go back to the teleporter hub. Go through the top right teleporter this time. It will bring you to the Eastern Vault. Once there, go down all the way to the outside of the temple, its front entrance. From there, head to the area on the right at the ground floor. A fox will be standing on the passageway. The altar will be at the end of this area.
TUNIC Secret Treasure #11 – Dusty
Once you come back from getting your HP back, do not leave the area. Instead, use your blink powers to reach a secret area north of the altar.
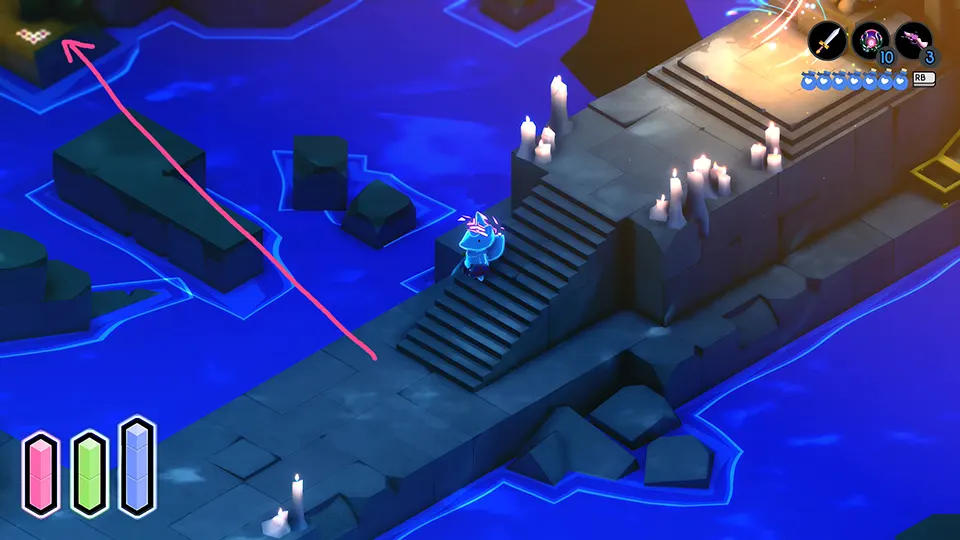
You’ll find an area with four lumps of dry leaves. Hit them with your sword to reveal a chest with the secret treasure number 11, Dusty! Bear in mind that one of them is hidden behind some trees, as shown in the image below:
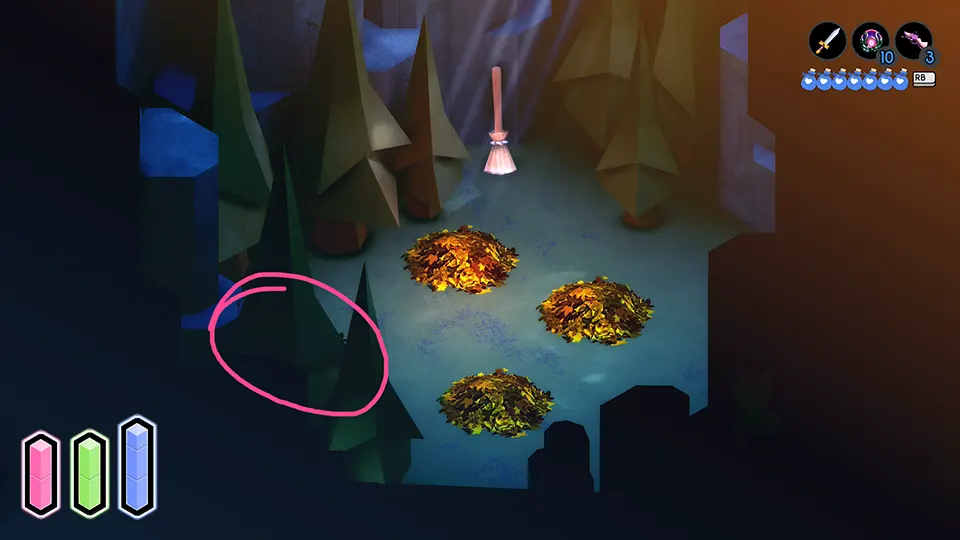
ACHIEVEMENT UNLOCKED:
Dusty
TUNIC Manual page 4 and page 5
Go back to the Town Ruins. From there, make your way north behind the windmill. There’s a stone bridge there. With the blink ability now you can reach the lone page that was isolated on a stone pillar there.
Just make sure to blink from the bridge in front of it, not the wall the fox is standing on the reference picture below; it will be easier that way.
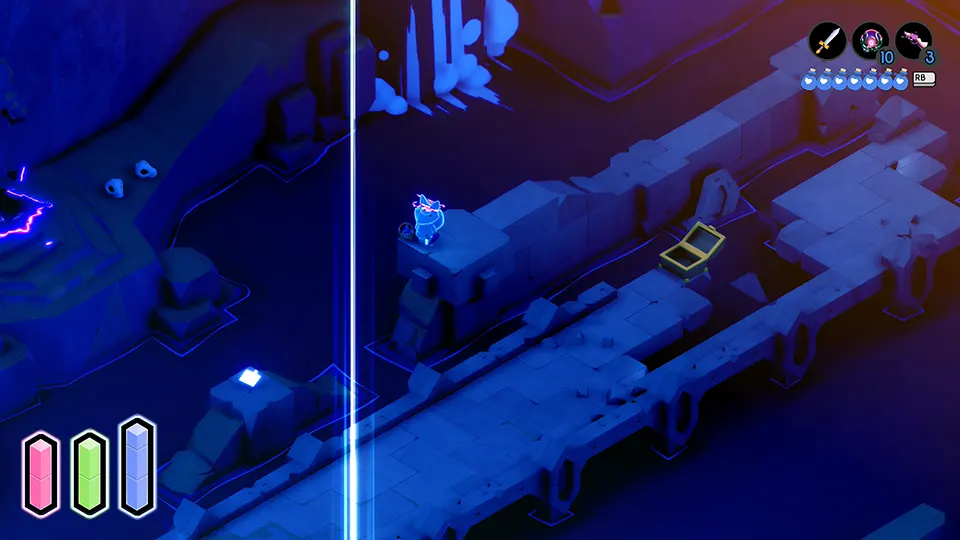
TUNIC Manual page 54 and page 55 (back)
From the little crumbled wall with the page, dash north to the path that goes around the mountain. Head right towards the waterfall and enter the fairy fountain there, behind the waterfall. For collecting 10 fairies, your reward is the last page of the game manual!
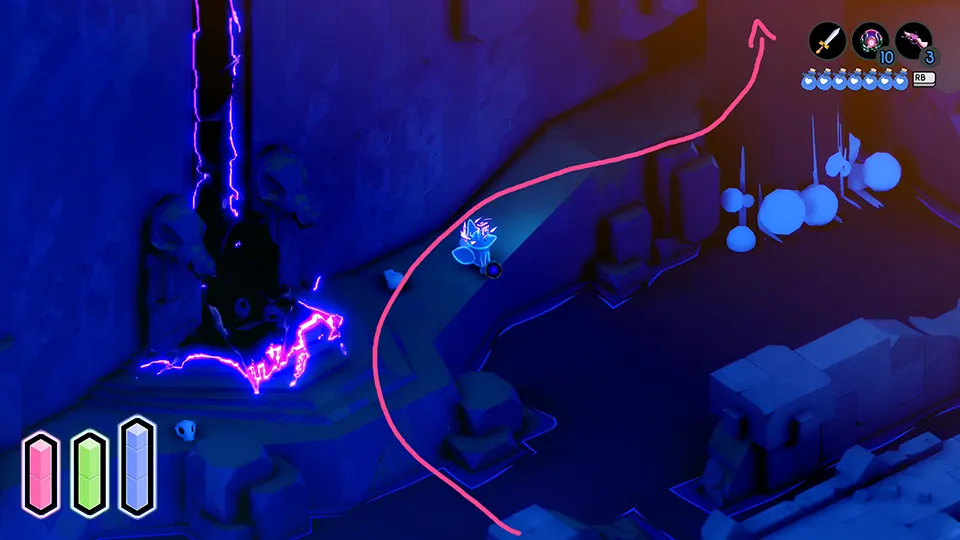
TUNIC Secret Treasure #7 – Spring Falls
Right here you’ll also find your final treasure of the game, as a reward for collecting all 20 fairies!
If were not following the guide and you’re in this section just for the treasure itself, follow the path shown in the image in the section above – it’s located in the fairy fountain hidden behind that waterfall in the overworld.
ACHIEVEMENT UNLOCKED:
Spring Falls
TUNIC Manual page 42 and page 43
Go back to the Town Ruins. South of the teleporter, on a lower level, there’s a pool of water with a manual page stranded in the middle of it. With the blink ability you can reach it now. This would be the page that would reveal to you how to figure out the patterns for the HOLY CROSS.
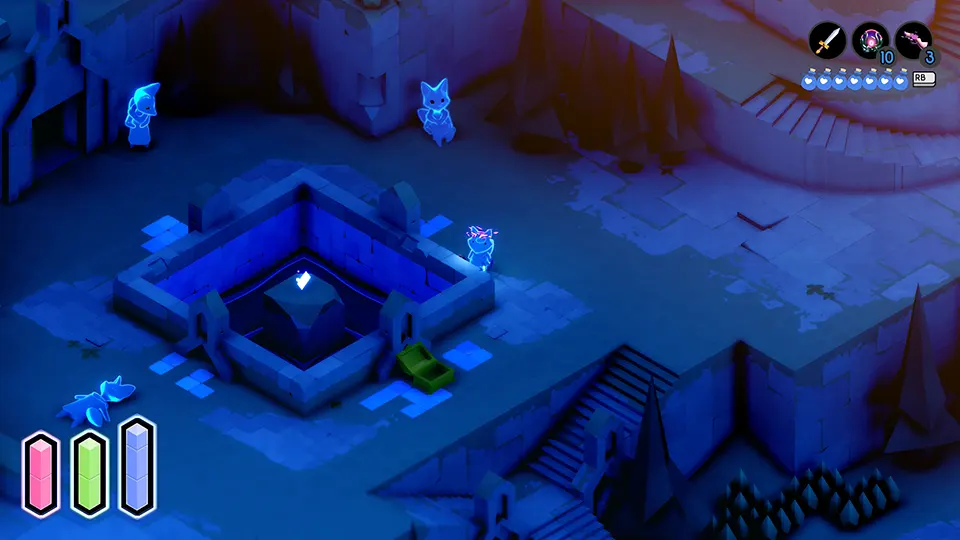
TUNIC Manual page 22 and page 23 – final page
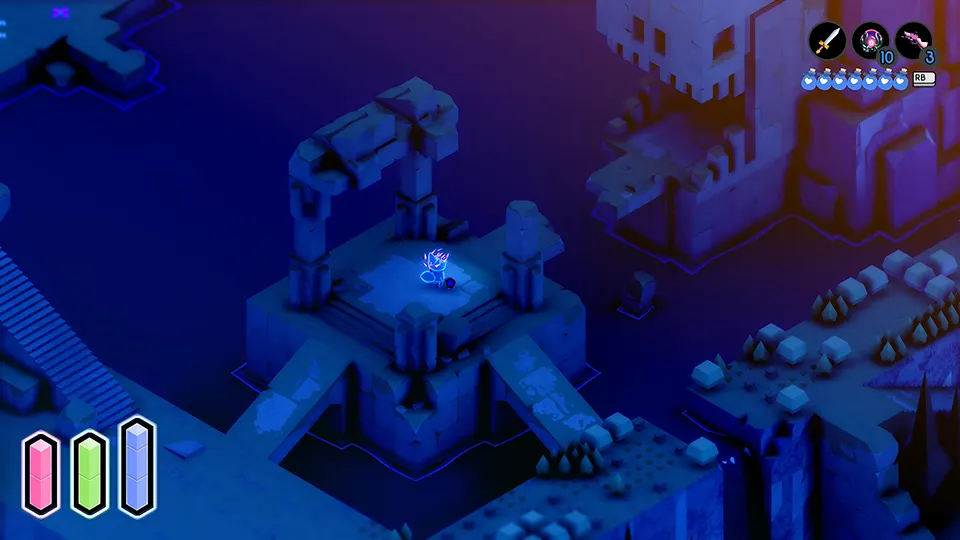
In this area you’ll find your last page of the game. You just have to blink into the cave that was otherwise inaccessible before to find it. However, don’t collect it now. Having all pages will trigger the good ending of the game once you get to the arena, and therefore you won’t be able to fight the final boss anymore.
You need to defeat the final boss to unlock the achievement Game Over, and also to unlock daytime again. Being able to go back to daytime during your current playthrough is the only way to get the last two secret treasures, “Phonomath” and “A Secret Legend.”
Therefore, we’ll save this last page to be collected during the day.
Recovering your potion recovery powers – The Mountain and the Quarry
Go up north. We’ll have to make our way around the snowy mountains into the back of the quarry to recover our last power and regain our fully-powered physical form. With your blink ability you can now dash directly into the top of the quarry. All the other areas will be submerged in pink matter.
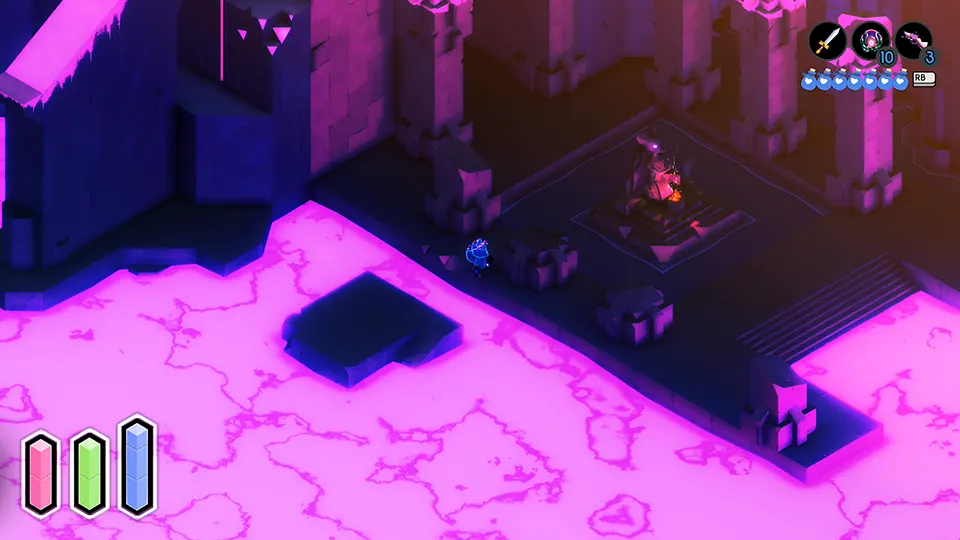
Go into the cave behind the altar. Go all the way to the back, and you’ll find that the altar there is also covered in the purple substance, just like in the library. As you go back, the gate behind you will close and an enemy will appear (if it doesn’t, make sure to go all the way to the altar and then back). Defeat it in order to release the altar from its goo and grab your final upgrade and the achievement for regaining physical form.
ACHIEVEMENT UNLOCKED:
Your body is restored
Finish the game!
Go back to the teleporter in the Town Ruins. Once in the hub, go through the teleporter in the middle. This is the final boss of the game. Defeating it will net you the achievement Game Over.
Be prepared for a tough fight. The boss has two phases and it will take a lot of effort to defeat it the legit way. Of course, if you’re not concerned with the challenge, the No Fail Mode will make it trivial. Either way, good luck!
ACHIEVEMENT UNLOCKED:
Game Over
Continue playing to unlock the ability to change the time of day
After the credits roll, you’ll be offered two choices: “new game +” or “retry” to continue playing in your current save file. Pick the option to continue playing, “retry.”
You’ll be back to the last altar you prayed, or back at the beach if you did not pray to any altar during the night.
Regardless of where you are, make your way back to the Town Ruins and enter the house next to the ladder. Now you can interact with the bed to change the time to day / night. Do so.
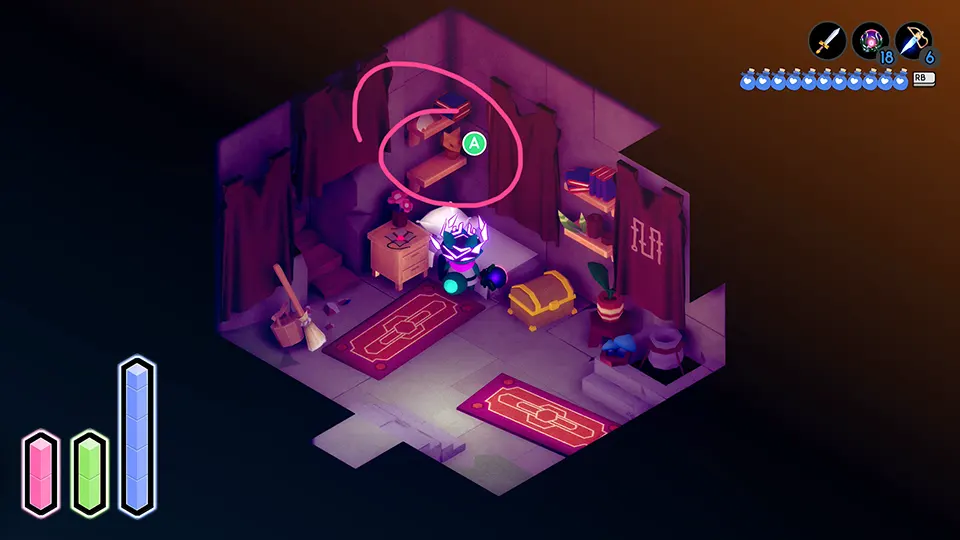
TUNIC Secret Treasure #10 – Phonomath
Now with your blink / air dash ability, you can reach two new places during the daytime. Head to the Ruined Atoll, bottom left teleporter in the hub.
From there, follow the path below to access an area that was not possible to go to without blinking. There you’ll find your penultimate secret treasure!
Bear in mind that in the image I take the back path to that area, hugging the side of the staircase into a secret entrance, but you can reach it by going down to the central area and using your magic orb to cross the water, or you could also walk all the way around from the bottom of the map.

ACHIEVEMENT UNLOCKED:
Phonomath
TUNIC Secret Treasure #2 – A Secret Legend – final part
Remember the setup we did in the Cathedral? Now it’s time to go collect the fruits of our labor. Head to the swamp in the southeast part of the overworld. You might not be able to see it in the regular camera angle, but there’s a plank there that allows you access to the swamp during the day.
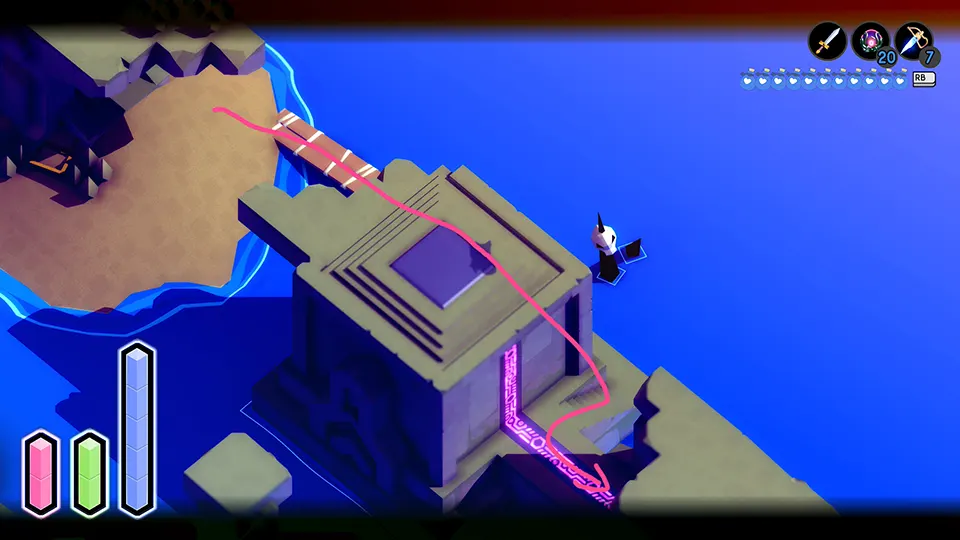
Once in the swamp, you’ll realize the door to the cathedral will still be closed. You might think about the ladder, but once going up you’ll realize the light bridges are not active during the day, and therefore you do not have a way in anymore!
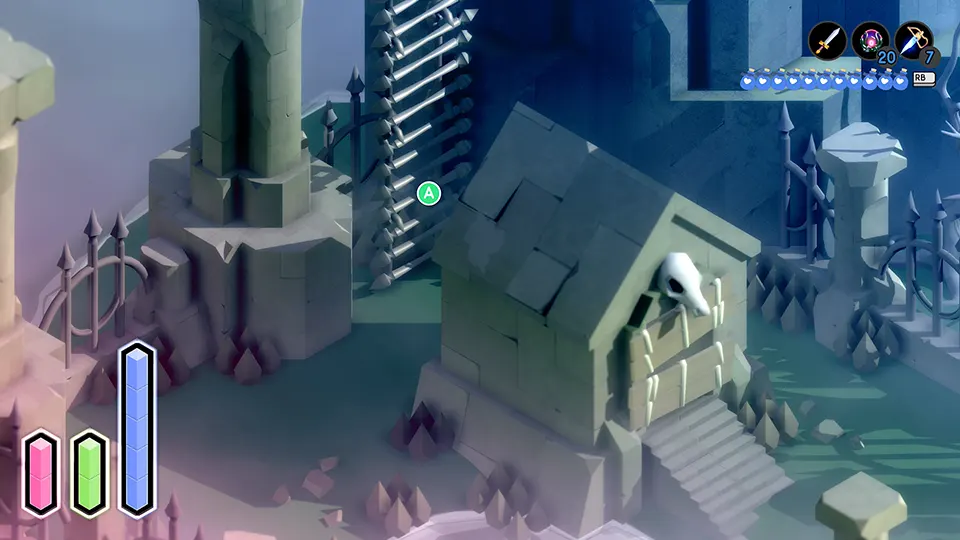
No worries! We’re resourceful. We’ll find another way in! Climb the broken pillars around the altar to go over the wall to the other side, as shown in the image below:
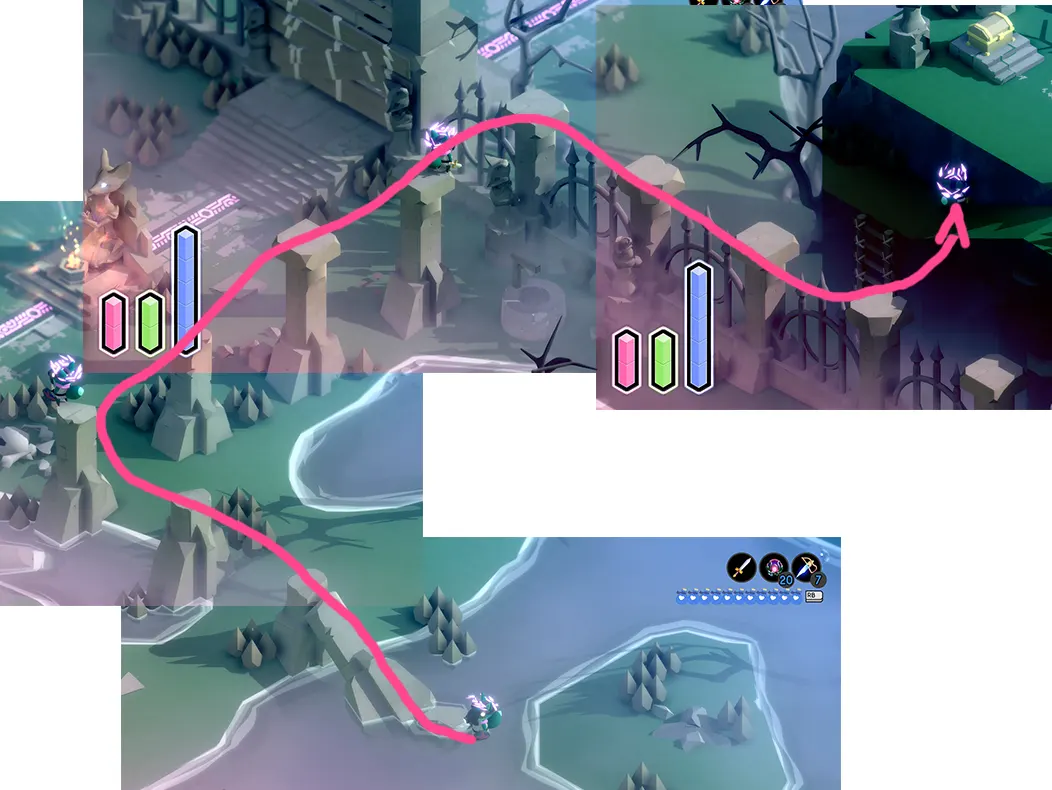
Once in front of the Cathedral, just remember to use the backdoor to the secret room. You used a light bridge to get to the chest during the night, so if you use the same path, the light bridge won’t be there during the day.
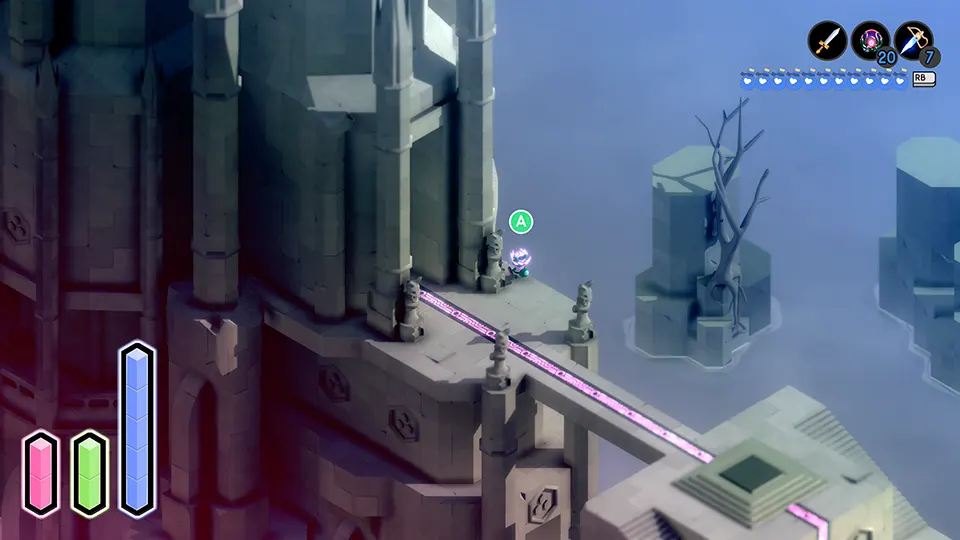
ACHIEVEMENT UNLOCKED:
A Secret Legend
TUNIC Manual page 22 and page 23 – final page for realsies now
Go back to that cave with the last page of the manual. This will unlock your final achievement of the game, Thank you for playing! Quite fitting, is it not? ; )
ACHIEVEMENT UNLOCKED:
Thank you for playing!
Bonus
Now with all the pages of the manual, if you go back to the arena in the teleporter hub and talk to the fox again, you’ll trigger a new ending! And you won’t even need to fight the boss again this time!
Congrats, you have completed TUNIC! Enjoy the cute ending! ❤️
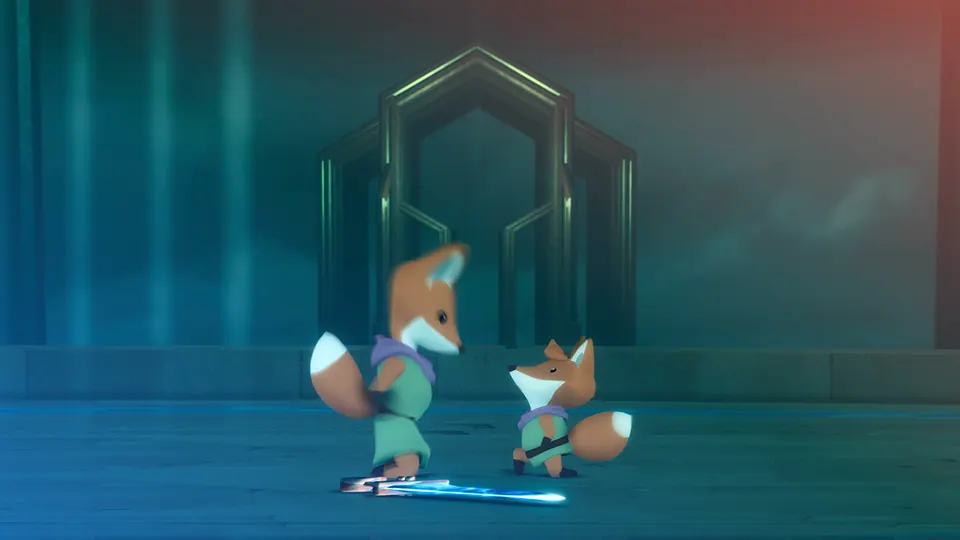
Previous Next